Tabs

Thursday, December 28, 2017

After Christmas

Slow Cooker Caramel Apple Crumble

Another Christmas has come and gone. It was a good one. We've had a house full of family since before Christmas. A good part of them will be here until "next year" as Little Sister tells me daily. I'm not sure she has grasped that's only a few days away.

I barely made any photos over the holidays, but rest assured that we had fun. Cookie baking, rock painting, jigsaw puzzles, lots of eating. And lots of sniffling. This could be called the "cold" Christmas since 50% of the crowd here had awful colds. And it was also 24 degrees when we woke up this morning. It's not getting much warmer for the next several days.

Cooking for nine is so different than my normal cooking for the two of us. Last night our crowd was down to seven and I just did a quick hot dog supper. Except I underestimated how many hot dogs we needed. It was a good thing I had made a dessert! It was the only dessert I've made during the entire holiday season. There seemed to be enough sweets coming into the house from other places, so I scratched the extra baking off my list.


This slow cooker recipe was sent to me several weeks ago by my knitting friend Paula. She hosts several knitting retreats around the country. I've been lucky enough to attend a few of these. And I've learned much from her excellent Knitting Pipeline podcast. If you're a knitter, check it out. 


This dessert was quick to put together, using ingredients I had on hand. And then for about five hours (4 hours cooking, 1 hour resting) I could ignore it all while I did other things in the kitchen. Unattended cooking is a lifesaver on busy days. While I cooked and cooked, the daughters took over the undecorating chores. Yay!


SLOW COOKER  CARAMEL APPLE CRUMBLE

For the apples:
1 cup brown sugar
1/2 cup granulated sugar
5 large apples, peeled and cut into chunks
1/4 tsp salt
1 tsp cinnamon

For the topping:
2/3 cup oats (I used old fashioned kind)
2/3 cup loosely packed brown sugar
1/4 cup flour
1/2 tsp cinnamon
3-4 T softened butter
1 tsp vanilla extract
  1. In a mixing bowl. combine brown sugar, granulated sugar, apples, salt, and cinnamon. Spread onto bottom of slow cooker. (I sprayed bottom of cooker with PAM)
  2. Mix topping ingredients until they come together. Sprinkle over top of apples.
  3. Cook on low for 4 hours, or high for 2 hours.
  4. Turn off heat and let sit, covered, for one hour to let the caramel thicken.

Paula's Note: I cut down the sugar so the sauce was not caramelized but still delicious. I think you have to use all the sugar to get the caramel. I also did not peel the apples. I washed them thoroughly and left the peels on.

Don’t forget the vanilla ice cream!


You see that Paula said she cut down on the sugar amount and the sauce didn't caramelize. I used the full amount and my sauce didn't thicken up either. But we had not one bite left! So don't worry about the sauce part. I did wonder if I uncovered it during the hour of resting time, the sauce might be a little thicker. Hmmm... I might just have to make it again soon to find out. (Isn't that a great excuse for dessert again soon?)

Now, we went a little Christmas crazy and added a scoop of peppermint candy ice cream to ours. (There was also vanilla ice cream here for the traditionalists.) My girls—the grownup ones—said they might like to spoon the apples over the ice cream next time, instead of the other way around. I would eat it either way!

There's a Daddy-O under there somewhere!


Tuesday, December 19, 2017

Deep Breaths


I don't know where you are in your holiday preparations, but I might be a little behind. I got home last night from several days of babysitting. Driving home, my mind was full of "what needs to be done" thoughts. When I looked at the early morning sky today, it was a reminder to take a deep breath and admire nature's beauty.

Yes, I still have a list to deal with—menu planning, grocery shopping, last minute gifts to find, music to practice, beds to get ready. And there is the "fun" to-do list—movies to watch, cookies to bake, maybe cinnamon rolls to be made, holiday lights to see. My helper elf, Jecca, is here to help, thank goodness.

Again I tell myself...I'll do what I can, not worry about what doesn't get done, and enjoy the family who will be here soon to spend Christmas at the farm.

And having said that, I'd better get dressed and tackle at least part of that list!


Thursday, December 14, 2017

Indigo Frost


Pattern:  Indigo Frost by Isabell Kraemer
Yarn:  Cascade 220
Needles:  sizes 7 & 8, each in two lengths


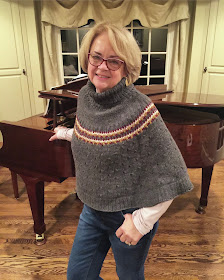
I've had a rotten cold for days and not done a thing. The cold is better and I leave today to babysit this weekend. Thankfully this post was written earlier so I have something to share here this week.  This poncho was finished a few weeks ago, in time to take to the knitting retreat in the mountains. It's a great pattern.

I had the good fortune to try this poncho on last year at a spring knitting retreat. And it was instant love! I finished this one in time to wear to a fall knitting retreat this year. It only took a year and a half for me to get around to knitting it. Now I wish I hadn't waited so long.

It's a perfect choice for those knitters with sweater fitting phobia. (That would be me.) I've never started a sweater because I'm afraid it won't fit. But now I've made a turtleneck. I had to choose a size. And it almost has shoulders. I even made a gauge swatch and changed needles sizes from what the pattern recommended. This is a baby step in the direction of knitting a sweater. One day I'll take a deep breath and cast on a sweater. Really.


I hand wound the yarn this time. Just for fun. Hand winding can be relaxing. Daddy-O was my willing helper, holding the yarn over his wrists while I wound the yarn. It was nice to have him included in my knitting activity.


It was a fairly quick knit, but I still was pushed for time when it came time to block it. Blocking means a good soak for a gentle cleaning and it also evens out the stitches and can smooth out the garment. It's an important finishing step. I tell Daddy-O it's like ironing for hand knits. When I moaned that it might not be dry in time to pack for the retreat in the mountains, a friend said she sets her things up with a fan blowing on it to speed the process. It's so nice to have knitting friends who know more than I do. That worked like a charm.


Here is a close up of the color detail. I thought it was fair isle knitting when I saw the pattern, but it's much simpler than that. The pattern detail is created by just slipping some stitches from one needle to the other instead of knitting them. That stretches that loop of yarn out to be a little longer than ones beside it. And poof! You get a design. Those longest stitches are slipped twice, so they are stretched out even longer for a more distinctive pattern.

Again, it's good to have knitting friends. I had never heard of slipping a stitch twice without knitting it. So I checked with a friend who has made this poncho twice. She assured me that I was doing this correctly. I thanked her for her help. And she said she was happy to help "while she was on a trip to Peru." I am doubly thankful that she responded so quickly while she was traveling on what must have been a fabulous trip. Knitters are the best. If you don't have your own knitting group, join Ravelry if you aren't already on there.You can find plenty of knitters willing to help when you need it. And we all need help from time to time.

Now I'm off to babysit. Bonus is that I will be there for Baby Girl's preschool Christmas program and I'll also get to see Big Sister sing with her church choir on Sunday when they present their fabulous Christmas concert. Little Sister isn't left out—I saw her Christmas piano recital a couple of weeks ago. I wish they lived closer so I could see all of their extra activities and at the same time I'm SO glad they don't live further away. We did the 14.5 hour drive to visit for years. Three hours away is a definite improvement. 


Saturday, December 9, 2017

Soup's Good For You


There is a little snow falling outside. (Very little, but it doesn't take much to get us excited.) The Christmas tree is lit. Flames are flickering in the fireplace. Bread is rising on the kitchen counter. There is a Hallmark movie on TV. (The Christmas Train—recorded so I can fast forward through the commercials.) And my nose is itchy and tingly and my throat is raw. Bummer.


So as soon as the movie is over, I'm making chicken noodle soup for lunch. I heard a doctor on the morning news today explain why chicken soup really is good for a cold. And I have a rotisserie chicken in the refrigerator waiting for a recipe. The doctor also said that parsley is a good cold fighter and I have some of that on hand, too, so I'll chop a little up and toss it in the pot.


This soup is nearly as easy as heating up canned soup. But it is oh so much better. Hang on to this recipe. Winter isn't even here yet but cold season is. You might need this recipe before winter is over.


CHICKEN NOODLE SOUP
  
1 (32-oz.) box of chicken broth (I use low-sodium broth)
1 carrot, peeled and sliced (I like to quarter the carrot lengthwise first)
1 stalk celery, diced
½ cup uncooked medium egg noodles
1 cup cubed cooked chicken
pepper, to taste
2 tablespoons chopped fresh parsley (optional)

Mix broth, carrot, celery, and pepper in saucepan.  Heat to a boil.  Stir in noodles and chicken.  Cook over medium heat for 10 minutes, or until noodles are done. Stir in fresh parsley at the end. 

Serves 4


This soup might not cure anything but it surely won't hurt. And it tastes good. It only takes a few minutes to make. Depends on how quickly you can slice and dice the vegetables. But, goodness—it's only one carrot and one celery stalk!  


Wednesday, December 6, 2017

But It's SO Easy


Today is Daddy-O's birthday. I wrote this post yesterday as the cheesecake was cooking. But I waited until today to post so that I could get permission from Lynn to share her recipe with you.


So many times I've said, "But it's so easy!" I totally apologize if I've ever said that when you found a recipe here harder than I did. I never meant to make anyone feel lesser. Most of the recipes on this blog really would be found in the easy section of a cookbook. But after my time in the kitchen today, I am fully aware that MY easy might not be YOUR easy.

I have a cheesecake in the oven as I am typing away here. It stays in the oven a long time, so I should be good to sit still long enough to write this. I got the cheesecake recipe from a cousin who says, "It's so easy." And I've even made it before. But that was about 15 years ago. Today it doesn't feel quite so easy. I'm tired. It's been ages since I've done this. And there are a zillion other things going on.

It really is a fairly straight forward recipe....assuming you have some basic cooking knowledge. I knew that before I started this process, I should have brushed up on how to beat eggs whites. It's been ages and ages since I needed to do this. I did remember that glass bowls are better than plastic for beating egg whites.
For best results, beat egg whites in a clean glass bowl. Plastic bowls can retain a slight film of grease, even with careful washing, that can hinder volume development.
I was very careful when separating the yolks and the whites. I knew it was crucial to not to get any yolk into the bowl with the whites.
Separate each egg white into a small bowl and then pour it into the mixing bowl. Do this for each egg. That way if you have a yolk to break when you crack the egg, you haven't ruined the entire bowl of whites.
But it was the part that said, "beat whites until stiff (but not dry)" that should have sent me running to my trusty Joy Of Cooking book to brush up on my egg beating skills. I'm pretty sure I beat mine too long this time.
Beat the whites without stopping (oops!) until the whites are airy and moist and glossy and the peaks stand up straight when beaters are removed from bowl. (Soft peaks will flop over at the tips.)
And then there was the mountain of dirty dishes that filled the sink by the time I slid the springform pan into the oven. That made me feel like this recipe must have been hard. But it shouldn't make this much mess. When I mixed the cream cheese, sour cream and egg yolks, I realized that my bowl wasn't going to be big enough to fold in the egg whites. So I had to scrape this mixture into a much bigger bowl before I added the egg whites. Next time I'll know. Because I'm going to make a note in this recipe.
Always fold in whites by hand. Work quickly and gently. Add the heavier mixture to the lighter one to start. (Ugh. I did it the other way around.) Then mix it all together with a cutting and lifting motion.
Would I rate the recipe "easy" like my cousin Lynn does? Well, yes, it IS pretty easy. (Especially now that I know to use the big blue bowl for mixing.) But it's still easier for her than for me. She has been making this recipe for years. I've made it three times.


That's the difference. You become more proficient by doing an activity—be it playing piano, golf, or making cheesecake—over and over and over again. Not three times. Not five times. But many times. Give yourself a chance to learn.


I just peeked at the cheesecake that's baking away in the oven.
It's all puffed up, so maybe my less than skillful egg beating
hasn't caused too much of a problem.

Okay, so I know I'll never make as many cheesecakes as Lynn has. But if I don't wait another 15 years to make the next cheesecake, the next one will be easier than it was today.


Lynn has brought this to our big family Thanksgiving for about as many years as I've brought home baked bread. We missed her cheesecake so much this year when we had to skip the gathering. So today I'm making her wonderful dessert for Daddy-O's birthday tomorrow.


Fingers crossed that the things I didn't do "by the book" won't make much difference...because this is the only gift I'll have for him. Much of cooking isn't that exacting. I'll let you know how it goes with this cheesecake!

LYNN'S FAMOUS CHEESECAKE

Crust:
1 cup graham cracker crumbs
1/2 cup sugar
4 tablespoons melted butter

Mix together and press into the bottom of a 10-inch springform pan. DO NOT BAKE.

Filling:
4 eggs, separated
2 (8-oz) packages cream cheese, softened
16-oz sour cream
1 cup sugar
2 tablespoons all-purpose flour
2 teaspoons lemon juice
1 teaspoon vanilla

Beat egg whites until still (not dry) and set aside.

Mix yolks, cream cheese and sour cream in a large bowl. Add sugar, flour, lemon juice and vanilla. Mix until blended. Gently fold in egg whites.

Pour filling over crust and bake at 350 ยบ (preheated) for 1 hour. Turn oven off and leave door closed for 45 minutes. Then let stand in oven with oven door open for another 45 minutes.

Refrigerate. May top with pie filling. (Although we like it best plain.)

The cheesecake puffs up as it bakes, then sinks as it cools. Don't worry. That's what it is supposed to do.


UPDATE: The cheesecake is delicious. We actually had cheesecake for breakfast. You only get to do that on your birthday!


Monday, December 4, 2017

Morning Glory

The view from my kitchen when I poured my coffee today. I love morning.

It's that time of year—for me, at least—when thinking about my ever growing to-do list makes me feel slightly nauseous. So it's even more important for me to take a little morning time to be quiet and still.

Time to put things in perspective. Time to say a prayer for the family who will lay their precious mother to rest today. And another for the family who said goodbye to a dear husband and dad last week. Time to say a prayer for a friend's granddaughter who is in the hospital having tests. Time to give thanks for another busy day.

If I get everything crossed off my list, that's great. If I don't, that's fine, too. I have learned that it's okay to make the list shorter. Lots shorter, if necessary. It might be time to embrace the "less is more" philosophy.

And in that spirit, this is all I'm writing today.