Tabs

Friday, August 31, 2018

Let Them Eat Cake


I am going to dash off a quick post before I shower, and get ready for company. We will have a house full for the Labor Day weekend. And I still haven't grocery shopped yet! But I wanted to share what I was doing in the kitchen all morning.

Food serves many purposes in our world. Purposes beyond sustenance. Sure. It keeps us alive. But it's much, much more than that. This morning I makes TWO caramel cakes. One for a belated birthday party for Little Sister. And one for a funeral dinner at our church. A cake to celebrate. A cake to console.

And it's okay to bake one every now and then just to enjoy at home. The recipe has been on the blog a time or two. But here is is again, along with about the only cake baking tip I know. I don't consider myself a cake baker. This one, however, has never failed me.


When your cake layers are baked and cooled and ready to frost, put the first layer on your plate or a cake board, like I did today. Then slip strips of waxed paper (parchment would work, too) under that layer all the way around. You want to use strips so that you can pull them out when you're done. So go just far enough under the edges to cover the plate or cake board.


Frost your cake as usual. Whatever drips or smears at the bottom of the cake ends up on the waxed paper. If there is a way to frost a cake neatly so that you don't need the paper, I do not know what it is.


Let the icing set. And when it's ready (this caramel frosting hardens as it sits) very carefully wiggle the paper strips out. I used the tip of a paring knife before I pulled out the paper and ran it around the edge of the cake bottom to cut the excess frosting so that it would separate from the frosting on the cake.


See how nice that looks? All the messy parts are on the paper. If you have anyone around who likes to like the bowl, they might also like the extra frosting on the paper. It's pretty yummy.

Yes, fiddling with those strips of paper takes a few extra minutes. But goodness, it works better than trying to wipe off the extra frosting. Now your cake is ready to serve. Ready to deliver. Ready for public viewing.

I will tell you that at the very end of frosting the cake, I had a little in the pan that I had not used. I put it back on the burner over low heat and with the whisk stirred until it melted a little. I've never done that before but it worked great. I patched up a spot or two that needed "help." My first cake is not a thing of beauty. That will be for the family birthday. Thank goodness, the second one is a little prettier. (But there still will be no doubt that it's "homemade.") It's going to church. If I baked layer cakes more than two times a year, maybe they would all look good. I am confident, though, that both will taste delicious.

Here's one I baked last year, so you can see the inside.

QUICK & EASY CAKE

2 cups self-rising flour 
1-1/2 cups sugar 

1 cup oil
1 cup milk
3 eggs
1 teaspoon vanilla 

Mix all ingredients together in a large bowl. Beat until well mixed.  This can be baked in layers or 13x9x2 pan. (Greased and floured, of course; or use baking spray.) Bake at 350 degrees for 30 to 40 minutes, until golden brown and top springs back when lightly touched.


QUICK CARAMEL FROSTING

2/3 cup butter
1 cup dark brown sugar (packed)
1/3 cup milk
3 cups powdered sugar, sifted (that means after you measure it)

In a saucepan over low heat add butter--melt. Add brown sugar--stir and cook for 2 minutes. Add milk--stir and cook while you bring it to a boil. Once boiling, remove from heat and let it cool for 10 minutes. Slowly add powdered sugar while stirring--keep stirring until thick enough to use as frosting.

(I used a wire whisk to add in the powdered sugar and beat it briskly. Switch to a heavy spoon if it gets too thick to beat.  This frosting hardens, so ice your cake quickly.) 


Wednesday, August 29, 2018

Easy Supper — Chicken with Rice


This is the easy kind of cooking that kind of makes me feel slightly uncomfortable now. (But not too uncomfortable to share it with you.) Years ago I wouldn't have given these ingredients a thought. It uses dry onion soup mix and a can of cream of mushroom soup. Those used to be pantry staples in most kitchens. Times have changed and these convenience foods have fallen out of favor with those who are looking for "clean" foods. And I am SO in favor of that approach to food.

But sometimes life gets in the way of good intentions. This is the kind of recipe you need for those days when easy is your first requirement. My logic says it's probably better than a meal that is handed to you at a drive-thru window. We don't have many sit-down restaurants where we live. Your options might be better. Yay for you if they are. I'm envious! We cannot have our dinner delivered. Our local evening restaurant options are Mexican and Greek/Italian. Everything else nearby has a drive-thru window.

So I need a few of these recipes on hand. This one is a variation of the ages-old chicken and rice that I have made forever. Maybe even longer than I've been married. But the ingredients are put into the dish in a different order and this one adds onion soup, which adds a really nice flavor.

If you're a working mom, this only takes minutes to put together, then it cooks in the oven for over an hour. Time to relax a bit. Or, give the kiddies a bath. Or have a homework session. Hands on time is minimal. That makes it a good recipe for busy families.

Daddy-O had thirds last night. That's his stamp of approval. He'd been on a tractor all day. This was comfort food to the max. And I did add a healthy green salad to the meal. That made me feel better.

CHICKEN with RICE

4 boneless chicken breasts, OR 6-8 boneless chicken thighs
1 cup uncooked rice
1 packet dry onion soup mix (I used Lipton's)
1 can cream of mushroom soup (I used Healthy Request Campbell's)
1 soup can water

Place chicken pieces in lightly greased baking dish. (A 2-qt dish worked fine this time.) Pour rice over chicken. Sprinkle soup mix over rice. Mix soup and water and pour over all. Cover with foil and bake at 350 º for 1 hour & 15 minutes.

Edited:  Make sure the rice gets down in the liquid. Or, even put the rice *around* the chicken instead of on top. It has to be in the liquid to cook completely.


Keep in mind that this recipe is flexible. The original called for 4 chicken breast. I had six thighs in the freezer. I had used two from that pack for something else. If I'd had all 8, I would have used them all. I think you'd be fine if you have chicken pieces on the bone. There isn't a need to be so precise with this kind of cooking.


Monday, August 27, 2018

Knit It Once, Knit It Twice


Knitting relaxes you. It's peaceful. The repetitive movement is meditative. Many studies show that it's an excellent way to relieve stress and reduce anxiety. And that is all true. Until it isn't.

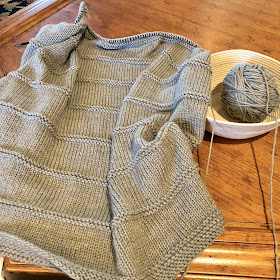
The photo above is a nearly finished baby blanket. A blanket is a LOT of knitting. Even a baby-sized one. I started it just before last weekend's retreat. The simple pattern was the perfect choice for social knitting. And you can see in the picture that there are no glaring errors. In fact, I don't think I made a single wrong stitch. But somewhere about four inches into the blanket (that's about up to the first raised "stripe), I knew this wasn't right.

It really looked beautiful. And I wanted to be done. So I just kept going. Knitters are a very hopeful tribe. And I'm a card carrying member.  I figured it might miraculously adjust itself as I knitted. Or maybe when it was washed, it would all be better. (This is not wool. Nothing is going to change when it's washed.) But every time I picked it up to knit, I knew it was too stretchy. My stitches were too loose. I won't even mention that it was also coming out bigger than I wanted.

Last night with three-fourths of a blanket laying in my lap, I thought about it. I'm knitting this for a gift. I also thought about the beautiful sweater that I received as a door prize at the knitting retreat last week. That young knitter gave away some of her best work. Then I was honest and I accepted what I knew 20 inches ago. 20 knitting hours ago. I really didn't want to pull out a week's work, but I really didn't want to give a gift that wasn't worthy.


Then I did it. I tugged that needle out of the long row of stitches like you'd rip off a bandaid.  And I unraveled the entire blanket. Unraveling took much longer than ripping off a bandaid. So much for that "reduces stress" thing. 

But when it was done and the yarn was wound into balls and I started a new better blanket (I went down a needle size), I eased back into the "zone" where knitting is meditative and peaceful. Think of it this way. Because I'm making this blanket twice, I am getting twice as much relaxation. Mmm hmm. That's my story and I'm sticking to it.


And here is blanket #2. You probably can't tell a speck of difference. But my hands can. That was my problem from the start. Blanket #1 looked perfect. But it didn't feel right. Next time I'll trust my hands. And I'll trust them sooner. I also might follow the very first line of instructions on the pattern, too—"first, make a swatch*." 

Remind me I said that when this happens again....


* A swatch is a small knitted sample that lets you check your yarn/needle combination to see if you achieve the desired result.


Friday, August 24, 2018

All That Butter!

I could not resist sharing the text message conversation that happened yesterday with my daughter while she was cooking to take dinner to another family. And cooking a double amount so her own supper would be done, too. 

Creamy Mashed Potatoes

Baby Girl does not start her 4-year-old preschool until after Labor Day (the big sisters have been in school for nearly a month), so she is still at home during the day to "help" her mommy in the kitchen. Remember now...she isn't quite 4-1/2 yet. Maybe she's our future nutritionist.


Baby Girl might be right. This probably shouldn't be your everyday version of mashed potatoes. But I cannot wait to try them next time I visit down there. <hint, hint, Mommy>


And she did. I got this email first thing this morning...


CREAMY MASHED POTATOES
6-8 servings as a side

  • 4 lbs (12 medium russet) potatoes, peeled 
  • 1 1/4 cups hot milk
  • 2 sticks unsalted butter at room temperature, not melted
  • 1 1/2 tsp salt or to taste (Recipe says she uses sea salt)
  • 1 Tbsp fresh parsley or chives finely chopped for garnish (optional)
  1. Peel potatoes (cut potatoes in half if very large). If you want the smoothest potatoes possible, remove the little knots from the potatoes with a small spoon or the tip of a potatoes peeler. Place potatoes in a large pot (5 Qt+) and cover potatoes with cold water. Bring to a boil and cook partially covered until easily pierced with a knife (boil 20-25 min depending on the size of your potatoes; mine took about 30 min).
  2. Drain well and transfer to the bowl of your stand mixer. Grab the whisk attachment and mash potatoes lightly by hand to break them up. Fit mixer with whisk attachment and start on low speed 30-seconds then increase to medium and slowly drizzle in the HOT milk.
  3. With mixer on, add softened butter 1 Tbsp at a time, waiting a few seconds between each addition. Potatoes will be whipped and fluffy. Finally add 1 1/2 tsp salt, or add to taste.

Recipe Notes:  To keep mashed potatoes warm until serving: cover potatoes and place into a warm oven or transfer to a slow cooker on the low setting to keep potatoes warm until ready to serve.


Mommy’s Notes:
  • I used a 5-lb bag with 12 potatoes, but one potato was lost during the water-draining process.
  • I used whole milk and table salt.
  • I used salted butter, but next time will use unsalted like recipe calls for, or back off adding salt at the end of recipe. (I thought they were salty, but the rest of my family didn’t seem to notice or mind.)
  • I skipped the stand mixer. Once potatoes were cooked & drained, I left them in the same pot they cooked in, and mashed them up a bit with a large wire whisk. Then did rest of the mixing using hand-mixer with egg beater attachment.
  • I lightly sprinkled top with a little dried parsley at end so they didn’t look so naked.
  • Will definitely make again. Little Sister closed her eyes and happily moaned as she ate them while singing-to-herself “delicious!” and I think Big Sister ate 4 helpings last night alone. (And you’ve already heard Baby Girl’s commentary on them…perhaps I’ll back off the butter next time too ;) )


You'll find the recipes for Bourbon Marinated Pork Tenderloin, Company Carrots and Pumpkin Bread in the recipe index here on the blog. 

Mommy said she took the pork tenderloin "oven ready"—which meant she took them the tenderloin in the marinade in a ziplock bag, in a foil pan, ready for the meat to be taken out of the marinade and put  back into the pan for baking. It's only 30-40 minutes in the oven. That way, Mommy could take the meal earlier in the day, but the family could have an easy hot meal when they wanted to eat.


Wednesday, August 22, 2018

Retreat Time


I suppose it's a good thing when I get home from a knitting retreat and have almost no photos to share with you. (It's a bit of a pity because this is held at a beautiful lakeside setting.) This was a retreat where I was so engaged with the project and the other knitters that I hardly thought about making photos. Except for our retreat keepsake...this travel mug. The retreat logo is one of Jessica's designs and I had to make a photo to show her. This picture and a very few others are all I have from a wonderful weekend. Fewer photos. More good memories. That's a good thing.


Nearly 40 knitters from several southern states gathered at a camp situated on our lake. 10 minutes away from our lake house. For the first time, the retreat offered a pre-retreat day for those who wanted to come on Thursday for an extra day. Since we had room at our lake house, a few knitters that I have met at other retreats came a day early and we had a "pre" pre-retreat visit. How much fun it was to have some pajama knitting time on our lake cabin porch before we left for the real retreat.


This retreat always has a project that is especially chosen for this gathering. It always includes something for us to learn—a new stitch, a new technique, etc. For this particular retreat, our leader/hostess designed a shawl pattern, Pajama Day. AND she dyed all of the yarn that we used. She is amazing.

Another feature common to most retreats is the "show and tell" session. That's when knitters are invited to show us their finished projects. And we all "ooh and ahhh" and make notes of pattern names and yarn colors. This retreat had two younger knitters in the mix. Retreats are often made up of those of us "of a certain age." Those of us who might be retired and have time to come. So it was exciting to see knitters who are not grandmothers. The youngest knitter told us that she had been knitting for four years. Now, there were plenty of knitters there who had been knitting for forty years, so we waited to see what a newer knitter had to share.

My wonderful door prize.

And we were totally and completely blown away.  She learned to knit from videos while she was deployed overseas and had lots of time by herself. Oh. My. Goodness. She pulled fabulous creation after fabulous creation out of her very large bag. Where the first bag was empty, she announced that she was giving away everything we had seen. My name was the first drawn and I chose this sweater that fit me like she had knitted it for me.

Another friend got a silk and cashmere shawl. Another chose a beaded lace shawl. It was such an extravagant act of generosity. This knitter didn't give away her rejects, or the projects she learned on. These were were wonderful beautifully knitted works.

That stack of beautiful hand knits were given away to 15 thrilled recipients. And then our young knitter showed us what was in the other bag. It was full of cabled sweaters that she had made for her husband who is currently serving in the military and huge lace wraps that she can snuggle up in when the weather gets cold. She said she can knit her husband a cabled sweater in less than three weeks. Wow. In addition to her excellent knitting skill, she is a speed demon of a knitter!

And the other young knitter, also a military wife, then showed her bag of equally amazing work. Rest assured. Knitting is not endanger of dying out. These young women are proof that the craft is still going strong.


A bonus at this retreat was the music. Live music! At a knitting retreat. A friend of one knitter came along and provided some background music off and on during the retreat. Ukulele. Piano. If you could name it, he could play it. I hope he comes again. I hope we all get back there again. A few days away with friends, old and new, is a renewal for the spirit. Now I'm looking forward to our next get-away.


Thursday, August 9, 2018

Bracelet Making The Easy Way


Attention all Mimis! Or anyone who needs a fun project for kids. We made these friendship bracelets at Mimi Camp and both girls loved making them. The four year old could do this by herself...after I got the yarns set up in the little loom. (And she taught Daddy-O how while I was taking a shower one night.) And the seven year old actually got out of the wading pool one afternoon to go work on her bracelet.

There are so many ways to make friendship bracelets. Some have beautiful complicated patterns. But this method using the cardboard loom is by far the easiest I've ever seen. It's perfect for young children. But the adults who have done this have also found it strangely addictive.


You can find instructions, both written and video, online by googling "friendship bracelet cardboard loom." But I'll show you what we did. First I cut cardboard circles from a shoebox. I traced the top of a Tervis tumbler to get my circle pattern.


Then you mark 8 spot around the circle. You don't need to measure anything. Just mark top and bottom. Then halfway between those marks, use your pencil to mark the sides. Then make the last marks halfway between the four "north-south-east-west" marks. If you are a little off with your spacing, it won't matter. I measured nothing!

Cut a little slit at each mark, about 1/4 inch. Then poke a hole in the center. I used a nail to make the hole. Then I used a pencil to enlarge the hole enough to get the yarn through it. You can use scissors, a pencil, or anything you can poke through the cardboard.


Cut 7 strands of yarn or craft cord or embroidery floss (don't separate the strands) about 20-22 inches long for a child's bracelet. Make longer strands if you want an ankle bracelet. Or, a grownup bracelet. We used leftover sock yarn for one bracelet and embroidery floss for the other. You can buy a package of craft cord or embroidery floss for under $4 at a craft/hobby store if you don't have leftover yarn at home.


Poke all seven strands of yarn through the hole and tie a knot on the underside (so the yarn doesn't pull through) about an inch or so from the end. Yes. Tie all the strands together. I used a pencil to push the yarn through.


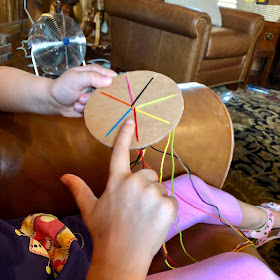
Then drape the yarn strands over the top and tuck one strand of yarn into seven of the slots. Leave one slot empty and turn that one "toward your tummy." That's how I explained it to the girls. Always keep the empty slot "toward your tummy."


Starting with the yarn to the right of the empty slot, count three yarns to the right. (You can also work to the left if that feels more comfortable. But only go in one direction.)


And move yarn #3 to the empty slot. Rotate the circle so that the empty slot is "toward your tummy" and do that again. (You can also work to the left if that feels more natural. Just make sure you always go in the same direction.)


As you continue moving yarn #3 to the empty slot, the braid will begin to grow on the underside of the circle. Give it a tug every now and then to pull it down. The girls got so excited when they could see their bracelets growing.


We also figured out that every few moves, we needed to run our fingers down through the strands of yarn to keep them untangled. Just like you would run your fingers through hair to untangle it.


When the bracelet is long enough—for these little girls, we made the braid 5-1/2 inches long—take the seven yarns loose from the loom, pull the bracelet down through the loom and cut the yarn a couple of inches above the end of the braid. Trim off the ends (or not) to suit you.


We used the simplest of joins. I untied the original knot and then tied the two ends together. You can check this video for other ways to make a join. Make sure you don't tie it too tightly. I also measured generously and had extra yarn at both ends. That was trimmed off later. I found it was easier to tie and untie knots when there was enough to work with.


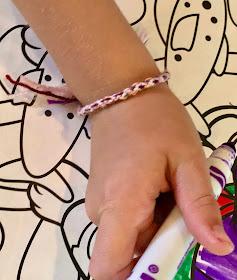
Little Sister and Baby Girl wore their bracelets home and asked for me to start another one for each of them so they could work on them in the long car ride home "so we won't be bored." That was a grand idea, but Baby Girl was asleep before we were very far down the interstate. But they have their looms set up and ready to go at home.


Monday, August 6, 2018

Baked Bowties w/Tomatoes, Spinach & Mozzarella

Baked Bowties w/Tomatoes, Spinach & Mozzarella

Here is a recipe that I've posted before, but it's been ages since I made it. Maybe you've forgotten about this one, too. Or, maybe you've never see it if you are new here.

It was our dinner on the first night of Mimi Camp. Mommy brought the girls to the farm and they arrived just as this was coming out of the oven. Both little girls ate heartily. Maybe it was because they were excited about camp. But they must have also loved the pasta because they had seconds. When we finished the meal, we made an official declaration that "Mimi Camp has begun."

This recipe is great for serving to your vegetarian friends. Or, for the nights you want a meatless meal. I won't wait so long before I make it again.


BAKED BOWTIES with TOMATOES, SPINACH & MOZZERALLA

3 cups uncooked bowtie pasta*
1 can (14.5 oz.) diced tomatoes, undrained 
2 cups Alfredo pasta sauce (I used a 15-oz refrigerated Buitoni sauce)
1 cup shredded mozzarella cheese 
2 handfuls baby spinach

Heat oven to 350 degrees. Spray a 2-quart baking dish with PAM. Cook and drain pasta as directed on package.

Meanwhile, in a saucepan, heat tomatoes to boiling. Reduce heat to medium and cook uncovered for  6 to 8 minutes, stirring occasionally, until liquid is nearly evaporated. Stir in spinach just to wilt it.

Put Alfredo sauce into a microwave-safe bowl and heat for about 90-seconds to heat. Stir in shredded cheese. Heat another 30-seconds and stir until cheese melts. (Mine usually is not totally melted.) Mix in tomato-spinach mixture. 

Put pasta in the baking dish and pour sauce over it. Stir gently to mix it all. 

Bake uncovered, about 30 minutes, or until hot in center.


*Make note this does not take a whole box of pasta—if your box is 16 oz. 

Mommy makes this at home and says she adds more spinach to hers. And she coarsely chops the spinach, too.


Thursday, August 2, 2018

Mimi Camp 2018


Another Mimi Camp has come and gone. It was a success! Did we do all that I had planned? No. Did they like all the activities? No. Did everything go smoothly? Mostly.  But they both said, "We want Mimi Camp to last forever!" (For the record, Daddy-O and I couldn't last "forever" doing all we did last week.)

If you are planning a Mimi Camp—or Nana Camp, or Auntie Camp—know that there are as many ways to do a "camp" as there are Mimis. You plan it to suit you and your littles. But here is a peek at what we did with ours for five days.


Every morning starts with "the box." There is something in the box that is related to the day's activity. One day our box had yarn for loom knitting and a jar of applesauce for baking muffins. I'll be honest there was a day we never did the activity from the box. My own motto for camp is "go with the flow."


Making bag puppets and putting on an elaborate puppet show was a hit with the girls. I'm so glad I didn't throw out the giant cardboard box a few weeks ago in my big cleaning out.


It was Baby Girl's first time coming to "camp" and we had worried about her spending the night here without her mommy. Plus, we worried that she would not go to sleep well here. She is famous for not going to sleep easily. Those worries were all wasted energy. They were so tired at night that everyone was ready for bed. (She did fall out of bed once, but crawled right back in.)


They both love to bake and they requested that we make applesauce muffins. Then we prepared a snack tray for a visitor that came to the farm that afternoon.


We took them to the town park with the splash pad and then came back to the backyard sprinklers. We lucked out with incredible weather all week which made outdoor time fun. They loved the wading pool in the yard and juice popsicles and lots of splashing.


There were pre-breakfast games of "gold fish." By the end of the week, Baby Girl knew it was called Go Fish. We visited a cousin who taught them to play Chinese Checkers. And Daddy-O played Candy Land with them. There were some serious lessons in fairness and good sportsmanship that happened during the games.


Paints. Markers. Crayons. All the things that are messy were fun were good camp activities. But neither girl wanted to finger paint. "Too messy!" Now, that surprised me.


And in a few days,  I'll share the how-to for making bracelets that was the craft they loved best. Easy enough for a four year old to do, and interesting enough to keep the almost-eight year old engaged.


We live in the country, on a farm, where there is lots of space for running and racing and all things with wheels. For the suburban dwelling children it was paradise. Bikes, scooters, wagons, cars, coasters. They did them all. No wonder they were tired at night. And we were tired at night.


Last year Little Sister fixed some party foods to surprise Daddy-O and it was so much fun that she talked about it all year. Now she says, "It's a tradition." So we did it again. Don't tell her, but it's a great way to clean out the refrigerator on the last night.

We used the last of the vegetables that we snacked on during the week to make a vegetable tray and finished up the chicken salad and pimento cheese to make little sandwiches. Little Sister set the table (see the Christmas napkins?) and they both cut flowers for the centerpiece. It's not the food that so important for a party...it's all in the presentation. Fancy trays. Tiered servers. Paper doilies. And voilà, it's a party!


I let them do all the work. It was going well until I realized that Baby Girl was sucking the juice off all the pineapple chunks before she put them on the toothpicks! We made a tray especially for her, and her sister finished the rest for us.


At the final night party, we officially declared that camp had ended. And the next morning, it was time to drive them back to their home. They live in another state, a few hours away. They won't be back here at the farm until Thanksgiving. But we have lots of fun memories to last us until then.

~~~~~~~~~~~~~~~~~~

BONUS GRANDMOTHER TIP: 

You surely have noticed that there are no ads on this blog. There are no places to click so that I'm making money from the blog. (Hats off to those who can do this, though.)  So this is purely a recommendation from my experience...


These paint sets from Crayola are by far the easiest and least messy to use of any I'm seen. I get them at Michael's. These are pricier than other Crayola sets, but you can use a Michael's coupon to get them cheaper. There are always coupons.

Even the four year old can open and close the little paint pots by herself. The palette holding the paints keeps them from spilling. And the brush is actually a decent one. I also use small jars with a couple of inches of water for brush cleaning. Plastic cups tip over too easily.