Tabs

Monday, September 30, 2013

In The Company Of Women


It's part knitting class and part pajama party, this annual weekend at the lake. We go to learn something new and visit with friends. This year there were new faces mixed in with returning knitters. Many of us had become friends when we met last year and had kept in touch, so Friday's arrival was a reunion of sorts. 


I even reconnected with a hometown friend that I had only seen once briefly in last 40 years. And, the Ravelry friend who drove all the way down to the retreat from Ohio last year to meet us?  She only had a 4-hour drive this year because they moved to a SC beach this year! (Did we influence their decision to move south?) We're so happy she came again.


We learned about dyeing yarn this year. Playing with Kool Aid dye was messy fun. We all ended up with a ball of yarn to take home and hopefully make into a project to bring back next year. Unofficially, we learned other knitting stuff from each other. Everyone is willing to help someone else and to share.


But the "retreat" part of the weekend has equal billing with the knitting. We take a couple of days off—no cooking, no cleaning, no laundry, maybe no makeup— and enjoy the company of women. You'll always find someone to talk to. Or, you can take a book to the lake and read if that suits you better. 

Over the weekend, conversation drifts lazily from yarn to books to music to recipes to families. There is lots of laughter—even the tears-rolling-down-your-face kind of laughter that we don't do often enough. 


I loved hearing, "Remember last year when you told me....? Well, since then I've...." Those words might relate to nearly anything—health tips, knitting techniques, movies to see or computer help. We are connected now. We'll be back next year. It's just a good place to be.


There was a snack table set up in the lodge, loaded with goodies for the weekend. Some healthy. Some not so much. All yummy. Friday morning before I left, I made a new recipe that the blog promised to be quick and easy. Those were true words. These were my contribution to the table. I also left a few for Daddy-O to snack on while I was gone. He was glad.

GERMAN CHOCOLATE CAKE BARS

1 box German Chocolate cake mix
1/3 cup cooking oil
2 large eggs

Frosting:
11-oz. bag caramel bits (I used Kraft)
3 tablespoons heavy cream
2 cups sweetened shredded coconut
2/3 cup chopped pecans (finely chopped works nicely)

Preheat oven to 350 degrees. Spray a 7x11-inch pan with baking spray and set aside. (I used regular PAM.)
In the bowl of a mixer, beat cake mix, oil and eggs on medium low speed until combined--mixture will be thick. (I just used a hand mixer.) Press mixture into the prepared pan and bake for 15 minutes, until edges are set and center is puffy. (Mine took a couple of extra minutes.)  Remove from oven and let cook for 30 minutes.
Prepare frosting: In a microwave safe bowl, microwave caramel bits and heavy cream, stopping to stir every 30 seconds, until smooth. (It took me about 2 minutes total.) Stir in cocnut and pecans. Spread over bars. 
Let cool completely before cutting and serving. 


It took longer to unwrap the candies than I thought. That was truly the hardest part of this recipe. It would be a good one when you need a homemade goodie but don't have lots of time to bake. Be sure, though, to allow for plenty of cooling time.


Thursday, September 26, 2013

It's All About The Color


I woke up this morning to this beautiful sunrise. I never get tired of watching the morning sky. Yesterday it was just solid gray. It stayed that way most of the day. We got an inch of rain. But this morning the clouds had cleared. I like the gray sky, too, but the color-filled sky always makes me smile.

Yesterday I was the substitute teacher at church for the children's program. This month it's a "kids in the kitchen" theme. We read the story about Joseph and his multicolor coat and talked about family jealousy. They all seemed to understand that! 

Our food project was making fruit kabobs with lots of colors to remind them of the Bible story. Can't go wrong with food on a stick. And we made a wonderful dip for the fruit, too. When they were done, I wanted a photo so that I could share the dip recipe. And then they started a chorus of, "Hey! Make a picture of mine, too."


"Is this okay?"


"Do we have to eat the dip?"


"Hey! It matches my shirt."

The dip recipe was given to me by a local caterer when I was still working as a home economist. I've used it for over 30 years for many baby and bridal showers. It's so good and so easy. The kids at church made it completely by themselves. Not sure why we never make it just to enjoy at home. It can turn fresh fruit into dessert.


MALLOW FRUIT DIP

1 (7-oz.) jar marshmallow crème
1 (8-oz.) pkg. cream cheese, softened (leave out at room temperature until soft)
1 tbsp. grated orange rind
Dash of ground ginger

Gradually add marshmallow crème to softened cream cheese, mixing until well blended.  Stir in orange rind and ginger.

Serve with fresh fruits, such as strawberries, apple or pear wedges, bananas and grapes. 
(Don’t forget to use Fruit Fresh or lemon juice to keep apples, pears and bananas from turning dark.)


Wednesday, September 25, 2013

Good Years Together


This past weekend we took a few days off and headed to the mountains to celebrate our 34th anniversary. It was nice to slow down and just enjoy being together. The hotel took good care of us and provided a couple of nice suprises, like the dessert plate here. (Someone writes better in frosting than I do with a pen.) Thanks, Daddy-O, for lots of good years together.


The drive up the mountain was a challenge. Happily, the rest of the weekend was perfect. The first official day of fall was also our anniversary. I'm so glad that cooler weather is just around the corner. I'm pretty sure we chose this time of year to get married because it was between hay season and the soybean season. All these years later, there are no more soybeans. But I'm glad we chose a fall date all those years ago. It's just the nicest time of year.


The night before we left, I made a favorite pasta dish for our supper. I've posted this recipe before and I've made it many times. This time was maybe the best ever. Could be because for the first time I didn't use reduce-fat alfredo sauce! That was only because the store was out of it. I hate to admit how much better it was—creamy and rich. I'll likely still use the healthier sauce when I can find it, but it was interesting to observe the difference. I also changed the cooking directions this time, so the recipe below is written this "new" way. 

I have used and abused this recipe so many times—less Alfredo sauce; reduced the tomato liquid or just barely warmed them up; made it with spinach and without spinach. I've used penne and bowties. I've used flavored diced tomatoes and fire-roasted diced tomatoes. I've used plain diced tomatoes and added some Italian seasoning. I've tried jarred Alfredo sauce and refrigerated sauce. 

I've never used the smoked mozzarella that the original recipe called for. Our small town store does not sell it. However I've done it, it's always good. (So glad that half of this dish is in the freezer for another time.) Here is the most current version:

BAKED BOWTIES with TOMATOES AND MOZZERALLA

3 cups (9 oz.)  uncooked bowtie pasta (or penne pasta)
1 can (14.5 oz.) diced tomatoes, undrained (this time I used fire roasted)
2 cups Alfredo pasta sauce (I used refrigerated Buitoni sauce)
1 cup shredded mozzarella cheese 
2 handfuls baby spinach

Heat oven to 350 degrees. Spray a 2-quart baking dish with PAM. Cook and drain pasta as directed on package.

Meanwhile, in a saucepan, heat tomatoes to boiling. Reduce heat to medium and cook uncovered for  6 to 8 minutes, stirring occasionally, until liquid is nearly evaporated. Stir in spinach just to wilt it.

Put Alfredo sauce into a microwave-safe bowl and heat for about 90-seconds to heat. Stir in shredded cheese. Heat another 30-seconds and stir until cheese melts. Mix in tomato-spinach mixture. 

Put pasta in the baking dish and pour sauce over it. Stir gently to mix it all. 

Bake uncovered, about 30 minutes, or until hot in center.


The original recipe calls for heating the Alfredo sauce on the stovetop, but I've always found that the sauce/cheese mixture was hard to wash out of the pan. The glass bowl in the microwave made clean up easier.


Tuesday, September 17, 2013

Homemade Nuggets


Mommy called me a couple of days ago with a cooking question. I still get them from time to time, but not as often I used to, as both daughters become more experienced. She was planning some kind of oven baked chicken strips for dinner and discovered that she had the wrong cereal to use for the breading. She was asking about substitutions. 

I remembered a really good oven "fried" chicken recipe that I have used many times—just not in a long time. It's the one right on the back of the Bisquick box! I love this recipe because it's good and the ingredients are usually on my shelf. I photographed the recipe on the box with my smart phone and texted the photo to her. Just call me grandma gadget!  

Last night I cut my chicken more into nugget shapes, just because the thin-cut chicken breasts that I had seemed to lend themselves to that shape. Strips, nuggets...it doesn't matter. The recipe works. I know I needed something green on the plate, but beyond some wilted lettuce in the refrigerator, there just wasn't anything here. We'll eat green tomorrow.

Mommy said all of her family liked this recipe. We did, too. (Thanks for reminding me about this recipe, Mommy!) Give it a try and surprise your family who just might think that chicken nuggets only come from a drive-thru window.

ULTIMATE CHICKEN FINGERS
   ...adapted from the Bisquick box recipe

3 boneless skinless chicken breasts (about 1 lb) cut crosswise into 1/2-inch strips
2/3 cup Original Bisquick mix
1/2 cup grated Parmesan cheese (I used shredded)
1/2 teaspoon garlic salt or table salt
1/2 teaspoon paprika
1 egg, slightly beaten
3 tablespoon butter, melted
  • Heat oven to 450 degrees. Line cookie sheet with foil. In a 1-gallon ziplock bag, mix Bisquick, cheese, salt and paprika.
  • Put 3 tablespoon pat of butter on cookie sheet and place in oven to melt. Keep a close watch so it doesn't burn. Spread butter over bottom of sheet.
  • Dip half the chicken pieces into egg; place in bag. Seal bag and shake to coat. Place chicken on cookie sheet. Repeat with remaining chicken.
  • Bake 12-14 minutes, turning halfway through bake time. (Turning with tongs makes it easy.) Bake until there is no pink in the center, or temperature reaches 170 degrees.


As usual, I didn't follow the actual directions on the box—because I didn't read them completely. The above recipe is how I did it. You can find the official method on the box. These browned so nicely, that I'm happy with how I did it. I think another time, though, I might use cooking oil instead of butter just to see if that works.


This morning I photographed the morning sky from our back porch. I've been doing this for years. I am a morning person and our kitchen has huge windows that face the sunrise. I have done this in all seasons and in all sorts of weather. Always standing in the same spot. This morning, I'm pretty sure I saw a footprint in the sky. What do you think?


Friday, September 13, 2013

A Stitch Here, A Stitch There

I haven't posted much about knitting lately, but there has been knitting going on. It just seems to have taken longer to finish things this year. But I kept making a stitch here and a stitch there and it finally added up. 


Pattern: Summit
Yarn: Sublime Yarn Tussah Silk DK
Needles: Size 5


I started this shawl in September 2012. 
There was lots of stopping and starting, but it's done now, a full year later.
I am so glad I didn't give up, even though that was a temptation.


There is a bit of magic in knitting,
when you can make this wonderful pattern...


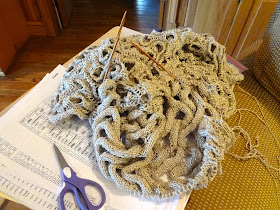
...from this goofy pile of yarn and loops. 
That's all knitting is—lots and lots of loops pulled through more loops.

It's this magic, this promise of beauty, 
that keeps me working away even if it seems to take forever.


Make the loops in a different order, and you get a completely different pattern.
Different colors, different fibers, different stitch patterns—it's never boring.


Pattern:  Honey Cowl
Yarn:  Ella Rae Lace Merino DK
Needles: Size 8

And as soon as one project is finished, another is started.


Yarn: Berroco Comfort Solids
Needles: Size 8

I enjoy my knitting...whether it's done in bits and pieces or when I find a luxurious stretch of time to work. I enjoy the projects that ride around tucked into my purse and the projects that must live carefully on a tray so that I don't get confused with the pattern. It's all fun.


Let me tell you knitters about a new tool I found. These new blocking wires were a dream to work with. (Maybe that's why they are so named.) No flat ends to snag in the knitting like my older ones. And they come in this handy storage tube. If you are looking to buy blocking wires, give these some serious consideration.


Wednesday, September 11, 2013

The Wayback Machine


Spaghetti Pie

Remember this blue cornflower pattern of Corningware? It was the first one, I think. (Remember Mr. Peabody and his Wayback Machine on the Rocky & Bullwinkle Show?) Remember when we thought we would be cooking all of our foods in the microwave by now? Today I pulled out this old pie plate and an equally old microwave recipe. I used to make this spaghetti pie when my girls were small.

I have rewritten the recipe to make it suit today's kitchen. The original recipe was done completely in the microwave. The way we use a microwave oven has changed over the years. I was working as a home economist when microwave ovens first hit the market in a major way—a completely new way of cooking. Some people were ready to try it. Others were skeptical and thought it might be dangerous since it cooked with "radiation."

I did several microwave cooking schools in our town to teach people how to use this new-fangled gadget. Every class was packed, usually standing room only. I taught them how to cook turkey breasts, meat loaf, cakes, desserts, corn bread and all kinds of vegetable dishes. The microwave ovens were huge and often came with a temperature probe to let you know when the meats were done.

Well, here we are 30-something years later. Now we use our smaller microwaves mainly to pop corn, melt butter and chocolate, reheat leftovers and cook frozen dinners and maybe bake a potato. We don't use them as predicted, but use them we do. Not many folks want to be without one.


For this updated recipe, I do use the microwave to cook the spaghetti crust after it is pressed into the pie plate. Today I used meat sauce that I had in the freezer. I'll be honest—I don't always use the meat sauce part of this recipe. Ground beef and a small jar of marinara works. You just don't want a very "juicy" sauce for this, or you'll end up with a watery pie (like we did tonight when Daddy-O cooked it. It still tasted good.)


Tonight I won't be home until later, so my pie is all done and ready for Daddy-O to pop into the oven when he comes in from baling hay.


SPAGHETTI PIE

1 lb. lean ground beef, browned
1 medium onion, chopped
1 8-oz can tomatoes
1 6-oz can tomato paste
1 teaspoon sugar
1 teaspoon dried oregano
1/2 teaspoon salt

 6--oz. spaghetti, cooked
1/3 cup grated parmesan cheese
1 egg, well beaten
1 tablespoon butter
1 cup cottage cheese (or ricotta)

1/2 cup shredded mozzarella cheese

Make meat sauce with ground beef, onion, tomatoes, tomato paste and spices. Let simmer for 20 minutes. While sauce is cooking, make the "spaghetti crust."

Cook spaghetti according to direction on the box. Drain. In a bowl, combine spaghetti, beaten egg, parmesan and mix well. Turn into a 10-inch pie plate. Press evenly into bottom and sides of pie plate to form crust. Microwave on HIGH for 1-1/2 minutes.

Spread cottage cheese over "crust". Spread the meat sauce over the cottage cheese, covering almost to the edge of spaghetti. Bake at 350 degrees for 20-25 minutes, or until heated through. Sprinkle mozzarella over the top and bake 5 minutes more. (It hopefully will cut into pie wedges to serve.)

If you are taking this out of the refrigerator to bake, cook it an extra five minutes or so. Just make sure it's hot all the way through.


Friday, September 6, 2013

Just Do It


My days start early. But I could have still used a few more hours this week.


At the end of September last year, I attended Rewind Retreat at the lake with a group of knitters, where we started this shawl project. Well, the 2013 retreat is just a few weeks away and I'm still knitting on that same shawl! There were months off while I had pneumonia and bronchitis. There were weeks off while I knitted other things. There were days off when I baby sat. And some of the time I just ignored it. 

But I am determined to wear the finished shawl to the retreat. I don't care if it's 90 degrees that weekend. This pile of a million stitches will be a shawl by then. I hope. No, it WILL be a shawl. Must think positive! So this week, while I've cooked (but nothing memorable), the focus has been on the knitting. Just stay with the program and get it done.


I did take a few minutes this afternoon to try a new cake recipe. Something for Daddy-O to enjoy during tomorrow's football game. I didn't want it to take long, so "dump cake" sounded easy enough.

I don't use a lot of cake mix. It's not that hard to make one from scratch. But this afternoon, I was in a hurry. I had one box of cake mix and one box of pudding mix in the pantry. Both chocolate. That decided it. This was the recipe to try.

It's the kind of recipe that my daughter (Mommy) doesn't like because it doesn't say how long to cook the pudding or how thick it should be. I figured if they didn't say, it probably didn't matter so much. I cooked it until it was thicker than just milk but still not nearly as thick as cooked pudding. When I stirred in the cake mix, it looked gloppy and spongy. Strange way to make a cake but I just kept going.

Daddy-O came in from the hay field just a few minutes after it came out of the oven. He asked if I was taking it somewhere and was delighted when he found out it was just for us. He cut a piece right then and asked, "Is this some kind of fancy brownie?" It's not as dense as a brownie, but it IS nice and fudgy—really, really good with a scoop of ice cream on the side!


CHOCOLATE DUMP CAKE

1 (5-oz. box) cook-&-serve pudding mix
2-1/3 cups milk (I used fat-free milk)
1 box of chocolate cake mix (2 layer size)
2 cups chocolate chips (I only had about 1 cup)

Preheat oven to 350 degrees. Lightly grease a 9x13-inch baking pan.
Combine chocolate pudding and milk in a saucepan and cook over medium heat until thick, stirring frequently.
Remove pan from heat and stir in dry cake mix. Blend well and pour into greased pan. Sprinkle chocolate chips evenly over batter.
Bake for 35 to 40 minutes, or until done. (Test with a toothpick.)


I know. I know. I should have had the grapes. 


Monday, September 2, 2013

Yarn Paradise


Just so you know, I am married to the best husband ever. Today is Labor Day. We had been pretty close to home all weekend, but today the weather was perfect and the chores were (mostly) caught up. He suggested that we ride to the mountains to check out a wonderful yarn shop there that is sadly closing. Yep, his idea. I said I didn't really need to buy yarn. And he responded, "But you can't ever have too much yarn, can you?" His words.

Jessica and I have enjoyed browsing and shopping here many times. I hate to think today was my last trip. But I now have a stash of beautiful yarn. In the past I've tended to just buy something because maybe the color caught my fancy. This time, each set of yarn was bought with a specific project in mind. (I made a list. I'm learning.) Never mind that fact that it might take me five years to knit it all!


We enjoyed the ride in the mountains and found a new little bistro for lunch. It's nice to have another good choice. We spotted the Goodyear blimp floating over the interstate while we drove, probably the one that covered Saturday's football game we watched on TV. It's been a nice weekend.


Now, on to food. I don't think I've ever posted a recipe three times on this site. Until now. Why does this recipe rate a third post? It ranks high with me because it's so easy to make and extremely good. The last time I made it, I got home to find I had bought skinless chicken thighs WITH bones. I do know how to bone chicken pieces and I own a really sharp knife, so I did it myself. But if you can find them already boned, this becomes one of the easiest recipes ever. 

I've played around very slightly with the original recipe, so the recipe below is the exact way I made it this weekend. I think I'm stopping with this version. I have found the way we like it. But you may want to tinker with it to suit your folks. 

HOT & SWEET CHICKEN

1 cup pineapple preserves
1/2 cup ketchup
1/4 cup low-sodium soy sauce
2 teaspoons minced garlic (from a jar)
1-1/2 teaspoons Tabasco
1 package boneless, skinless chicken thighs (6-8 thighs) 

Preheat oven to 350 degrees. In a small saucepan, combine preserves, ketchup, soy sauce, garlic and Tabasco. Cook and stir over medium-low heat until preserves are melted.

Arrange thighs in a 9x13-inch baking dish. Pour sauce over chicken, turning each piece to coat with sauce. Bake, uncovered, for 30-35 minute or until done, spooning sauce over the chicken a time or two while baking. (I served this over brown rice.)


Glad I have a few quick recipes I can pull out when I'd rather be knitting than cooking. Just like this one.  Do you have a favorite for days when you'd rather be doing something else? I'd love to have to add to my collection. Looks like I'm going to be knitting for a while.