Monday, June 22, 2020

Banana "Nice" Cream

BANANA "NICE" CREAM

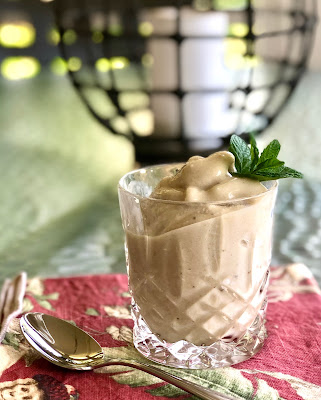
I've been making something similar to this since long before I was married. But I just discovered that this stuff has an actual name—"nice" cream. It's nothing but frozen bananas and something to make it blend. Somewhere deep in an old recipe box is the recipe to make this frozen dessert using frozen bananas and apple juice.

Right now as we've focused on making even healthier food choices, I saw a version that used fat-free Greek yogurt, your choice of fat-free milk, and frozen bananas. Yesterday for a Father's Day treat I whipped up another batch. What a terrific way to use up those last three overripe bananas! (Why is it always three?) I also baked banana bread again this week from the ripe bananas on the kitchen counter. But I had a small container of banana slices in the freezer, too. Making this healthy dessert instead of more banana bread (which we love) was a winning choice.

One change I've noticed in my "still in quarantine" cooking is that I am using fewer true recipes. I'm just cooking. Understand that I have many, many years of experience in the kitchen, but with some basic understanding of cooking all of you can do this, too. I've been watching Jamie Oliver and Al Roker (among others) on Instagram as they show what they are doing in the kitchen. No recipes. They have cooked foods simple enough that you can watch them and then repeat in your kitchen. And it frees you to substitute and make changes to suit your family. This year I've looked more for food ideas than recipes.

When I'm doing this kind of cooking I sometimes ask myself, "What's the worst thing that can happen?" When I was giving Little Sister a FaceTime omelet lesson, I told her that the worst thing that could happen was that she would end up with scrambled eggs instead of an omelet. With this faux banana ice cream, the worst is that you might have a banana milk shake instead of a soft-serve frozen dessert. Sounds pretty yummy either way.

This is not really a recipe, but here's roughly what I did... 

BANANA "NICE" CREAM
       ...makes 2-3 servings

3 overripe bananas, sliced
juice of 1 lime
1 spoonful of fat-free Greek Yogurt
unsweetened vanilla almond milk

Slice the bananas and toss in the lime juice. Freeze. To make these easier to blend, freeze in a single layer then place in a freezer container or freezer bag. This keeps them in separate slices. Not a frozen clump.

To make the frozen dessert, put a big spoonful of yogurt in the blender (I use a Vitamix,) toss in the frozen banana slices and pour in some almond milk. You will need enough milk to let the bananas blend. As more as you need it. Start blender on a slow speed and increase slowly. Stop and push bananas down in the blender as needed to continue blending. Process until it reaches a soft serve consistency.





Monday, June 15, 2020

Blue Cheese Dressing Two Ways

BLUE CHEESE DRESSING

At the lake last weekend I made Daddy-O a treat. He loves a wedge salad and often orders one when we go out to eat. It's not something I ever make at home. Of course, the best part about wedge salad is the blue cheese salad dressing. I have bought the bottled version a few times. They were barely acceptable. So this time I decided to find a recipe and make it.

There are a zillion recipes floating around out there in cyberspace. But I wanted an easy one. The recipe with the fewest ingredients. And mercy, this could not have been any more simple. And it far exceeded our expectations. Why on earth have I not been doing this for years? The leftover dressing made a good dip for celery sticks the next day.

BLUE CHEESE DRESSING

1/4 cup mayonnaise
1/4 cup sour cream
2-oz blue cheese crumbles (I used 1/2 of a 5-oz container)
1 tablespoon fresh lemon juice
pinch fine sea salt
pinch ground black pepper
water, to thin it (optional)

Blend all ingredients until well combined. Use the back of the spoon to mash some of the blue cheese into the dressing. This consistency makes a good dip. For pouring onto a salad, thin with a little water.


Now...I am on a mission to lose some extra "pandemic pounds," so that rich, luscious dressing was not going on my salad. And glory be, SkinnyTaste has a "skinny" version on her website. I didn't have exactly what her recipe calls for, so I made do with what I had at the lake. Here is her recipe along with my substitutions. 

SKINNY BLUE CHEESE DRESSING

1/2 cup crumbled blue cheese
6-oz fat-free Greek yogurt
1 tablespoon light mayonnaise (I used regular)
1 tablespoon lemon juice
1 tablespoon white wine vinegar (I used all lemon juice)
1/8 teaspoon garlic powder
salt & pepper to taste

Mix all until well blended.  I made my substitutions and just eyeballed the amounts to make a single serving.


Did this taste like the dressing Daddy-O ate? No. Was it good? Yes! He even said if he had not tasted his, he would have been perfectly happy with this one. I will be using both of these recipes from now on.


Friday, June 12, 2020

PSA: Check Your Freezer


PUBLIC SERVICE ANNOUNCEMENT: If you stocked up on foods at the beginning of the quarantine, now is a good time to take stock of what is in your freezer. Make sure you are using up foods before you buy more of the same thing. Like I'm guilty of doing. Yes, it happens.

I was making my online grocery order this morning and took a minute to go see what was in the freezer. And promptly took a couple of items out of my cart. 

While you're at it, check the dates of the refrigerator items that have a long shelf life, like smoked sausage, packaged deli meats, sour cream, ricotta, cheese, etc. Nothing lasts forever. And it is painful to find something pushed to the back of the fridge and see that the date ran out two weeks ago. Rearrange them and pull the nearest dates to the front. Shuffle your meals plans a little to use them up.

You can find a freezer storage chart here that tells you the optimum time for freezer storage. Be sure to date the prepared foods that you freeze. It's probably a good idea to print this out and keep it handy.

Happy weekend! Stay safe, people.


Tuesday, June 9, 2020

Spinach Salad with Bacon


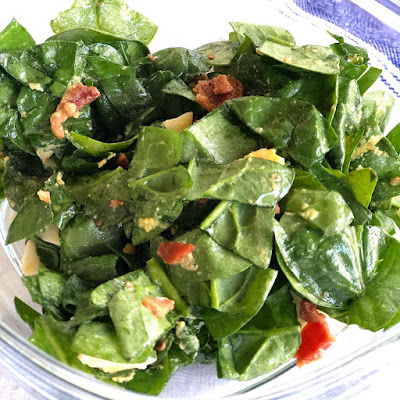
SPINACH SALAD with BACON

When the pandemic lockdown began, the thinking was that we would be quarantined for about two weeks. (That was three months ago.) I stocked up on food, including snack foods. Mentally I was treating it like "snow days." A few days inside and then things would be back to normal. 

But as the days at home went on and on, I kept eating like I was on vacation. Then it became comfort eating. We had extra treats. I baked more. And then I realized my pajamas were tight. So after some mental struggle I realized that I had a rare chance, one where I had total control over the foods we ate. I alone am making food decisions for our household. Three meals a day. 

No more lunch out at the local Southern cooking buffet. No boat ride across the lake for dinner, where we are usually tempted by appetizer and dessert. No weekly book club (which I have missed desperately) where we take turns bringing the dinner that always includes dessert. Instead of looking at this as a hardship, I saw it as an opportunity for a food reset. So weeks ago I began planning meals with more vegetables, more whole grain foods, more fruits as treats. And I'm happy to say the pajamas already feel better. 

Our local restaurants re-opened a couple of weeks ago, but we have opted to stay home longer. Just not ready to jump back in the deep end yet. And so we continue to eat vegetable focused meals. We are "learning to like" whole wheat pasta. ("Learning to like it" is what the little granddaughters say when they have a food they DON'T like.) I am making more sheet pan meals, which as easy to cook and easy to clean up and loaded with veggies, and making the occasional meatless meal.

Our salad supper--spinach salad and whole wheat pasta salad

So today I share a spinach salad we are loving. I made it for the third time last week. I only made a half recipe for the two of us. Before someone tries to do the math and divide 1/3 cup in half, stop! You don't need to get out the calculator. Just get out the 1/3 cup from your measuring cup set and fill it halfway. That's practical "kitchen math." (FYI, 1/4 cup divided in half is 2 tablespoons.)

SPINACH SALAD with BACON (adapted from NYT Cooking)

1 to 1-1/2 lb fresh baby spinach 
2 hard-cooked egg, coarsely chopped
6 slices lean bacon
1/3 cup vegetable oil
1 teaspoon finely minced garlic
1/4 cup red wine vinegar
1/4 cup finely minced parsley (optional)

Pick over spinach and remove tough stems and blemished leaves. Cut into bite-size pieces. (There should be about 16 cups of of spinach.) Put spinach in large bowl. Sprinkle eggs over spinach.

Fry bacon until crisp and drain well. Chop or crumble the bacon.

In a small skillet, heat oil and add the garlic and bacon pieces. Cook briefly, being careful not to burn the garlic. Bring to a boil and add the vinegar. Remove from heat. Let it cool one minute. Pour over spinach and egg. Add parsley if using. Toss to coat.


The second time I poured the dressing over the spinach as soon as I took it off the stove. It really wilted the spinach, which is probably how it should be. But we decided we liked it better not quite as wilted. The first time I made it, the dressing had cooled a minute while I sprinkled the egg over the spinach. We liked the salad better with that tiny cooling off period.

This last time I had a small amount left and popped it in the refrigerator for lunch the next day. It's not particularly good left over. 


EDITOR'S NOTE:  I just realized that I had already posted this recipe a month ago and here it is again. Yep. We liked it that much.


Saturday, June 6, 2020

Video Cooking Class

BANANA MUFFS

I haven't seen the little granddaughters in so long it hurts. But the pandemic has kept us apart. We, of course, have done FaceTime visits, but that's not the same. Then Mommy had a brain storm. One thing they love to do when they are here with me is to cook. So we cooked together this week. Together apart. It was the closest thing to being in the same space that we've had in months.


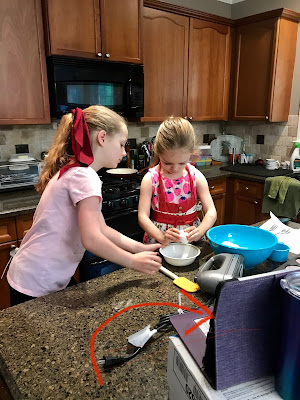
Because we planned this ahead I had time to order a tripod for my iPhone. Back in the day, I did cooking demos on the local television station as part of my job. This reminded me of the setting up we did. Except they used real cameras and had real cameramen. But the "think it through" process was the same. I made sure everything was set out. And Mommy made sure the little girls had the same ingredients and tools set out and ready.


We still used FaceTime but this was more interactive. They used an iPad. See it propped up on a box? They could watch me and I could see them. Baby Girl made banana muffins. The recipe is an old one and it's called Banana Muffs. Because they are a healthy eating family, Mommy liked this one because it only uses 1/4 cup sugar. And it's delicious.


We talked about the different kinds of measuring cups and what each is for. We learned how to properly measure. Squishing the bananas was the most fun! This was such a good set up. They could ask questions as we cooked and I could see what they were doing.


Seriously. This was the most fun. If you have any thoughts of doing this with your hobby—whatever your hobby is—spend the $30 for the tripod. I don't think it would have worked without it. I could easily tilt the camera down so that they could see into the  bowl and then move it back up so I could talk to them.


And because we had a Daddy-O handy, he could capture what was going on. He used his phone to get a few pictures and thankfully a little video. I think he was fascinated that this all worked. This video clip is only 4 seconds. See us in action!

Cheese Omelet

Some serious thought went into the recipes we chose. We wanted something suitable for their skill level. And we got lucky that these two foods worked together. Baby Girl (who just finished kindergarten) made the muffins. When she slid them in the oven (with mom's help,) Little Sister and I started the cheese omelets. No written recipe for us. Just a demonstration. I would do a step. She would copy me. It was a miracle. The timing was perfect. The 15 minutes baking time was just right to have a omelet lesson. And they had a complete breakfast. J-Daddy got the first plate and he gave it a two thumbs up. 


And after making two more omelets, the girls got to enjoy their own breakfast. I snapped a quick photo of them. I was still watching. Licking the plate clean is about the best compliment any cook could get. Baby Girl was licking the omelet plate and Little Sister got every crumb off the muffin paper. They make quite a team.


Mommy taught kindergarten for several years. And the teacher in her made this a real learning project. After we cooked, she had each of the girls write their recipes. I dictated the recipe and Baby Girl wrote it down. In her own way. Can you read it? If you are not fluent in kindergarten writing, the recipe (in an easier to read version) is below.

BANANA MUFFS

2 cups Bisquick baking mix
1/4 cup sugar
2 tablespoons butter, softened
1 egg
1 cup mashed very ripe bananas (2 to 3 medium)

Preheat oven to 400º.
Combine baking mix, sugar, butter and egg. Beat vigorously for 30 seconds. Fold in bananas.
Fill 12 greased (or line with cupcake papers) muffin cups 2/3 full. Bake 15-18 minutes. until lightly browned.
While warm, you can drizzle with Thin Icing and sprinkle with chopped nuts, if desired. (The girls decided they liked them better plain.)

Thin Icing: Blend 1 cup confectioners sugar and 2 tablespoons water until smooth.

Sometimes I made 36 mini muffins instead. Bake them for 12-15 minutes. 


I'm not sure we will ever come up with two foods that work so well together, both in the timing and the food pairing. But I do think we will try this again. I really had a good time. I'm pretty sure they did, too. And Mommy got a few minutes to herself for a change. It was good every way we looked at it.


Wednesday, June 3, 2020

Cooking "Freestyle"

With that is happening in the world, it feels a little out of sync to write about cooking at the moment. Sam Sifton, NY Times food writer, says "...And yet it is not. It is one thing you can do that can make someone else’s life a little better, if only for a few minutes." He is correct. Cook your food. You need to keep people fed. Share your food. It says you care. Choose good food. Keep your family healthy. We do what we can. 

Sheet Pan Supper
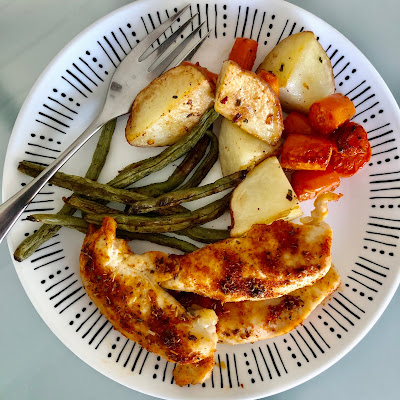
chicken tenders, roasted green beans, roasted potatoes & carrots

You know...you don't HAVE to have a recipe. A recipe leads to thinking "I can't make that. I don't have all the ingredients." I've been cooking for a very long time. Over half a century. (Sounds awful when I say it that way) and I'm okay with "just cooking." But if you are a newer cook, you might depend on recipes to tell you every step. You only need some of the basic parts of a recipe, then you can cook with what you have on hand. You can cook freestyle. Let me help you a little.

We were at the lake for the weekend and I made an easy dinner in the oven. I figured out the temps and times so that I could put everything in the oven at one time. My first thought was to cook it all on one sheet pan. But after looking at the ingredients, I realized it wasn't going to fit. My pan at the lake is a little smaller than the one at home. So I checked to see if I could put two pans in the oven at the same time. Yay! A 9x13 pan and my cookie sheet fit side by side on one rack. 

The potatoes cook at 425º for 35 minutes.  (The time and temp are from the Lipton Onion Soup recipe on the box, but I used salt & pepper, garlic powder and dry minced onion to season.) That is also the temperature I use most often to roast vegetables, like the beans. I found a recipe online that said chicken tenders can cook in the oven at 425º for 25 minutes. That's all I needed to know.

The potatoes got a head start in one pan, then the chicken and beans joined them. Then I watched. And I checked them. This is the part newer cooks don't want to hear—"It's done when it's done."  

Trust yourself to see that it's done. Stick a fork in the potatoes to see if they are tender. Did you cut your potatoes bigger than I did? Then yours might take longer. Are your chicken tenders on the small side? They may be done a little sooner.   It's done when it's done. If something gets done faster, take it out of the oven sooner. You could take the beans or the chicken off the pan if one is done before the other and put the pan back to finish cooking. You are the boss of your kitchen.

I am writing this down for future reference. It's nice to have the times figured out. And it was delicious.

SHEET PAN CHICKEN TENDERS DINNER

potatoes and carrots, peeled and cut into chunks
1-2 tablespoons of olive oil
seasonings of your choice (I used S&P, garlic powder, dry minced onion)

1-lb. package of chicken tenders
a good handful of fresh green beans, trimmed
a drizzle of olive oil for the beans

Seasoning mix for the chicken: (I didn't use all of this for 1 lb. of tenders)
1 teaspoon smoked paprika
1 teaspoon garlic powder
1 teaspoon oregano 
1/2 teaspoon salt
ground black pepper, to taste

Preheat oven to 425º. For easy clean up, line pans with foil. 
Toss potatoes and carrots with oil and season them. Spread them in a single layer in a 9x13-inch pan. Put in oven and set timer for 35 minutes.

While the potatoes are cooking, spray chicken tenders with cooking spray (to make the rub stick) and sprinkle seasoning mix over both sides. Spray lined baking sheet with cooking spray and place tenders at one end of the pan. Toss the green beans with a bit of oil, season and spread them on the other end of the baking sheet. 

When the potatoes have cooked for 10 minutes, slide the baking sheet in the oven and continue cooking for the remaining time.


For the record, I have also roasted vegetables at 375º and at 400º. It depends on what else is cooking in the oven. And for my oven fries, I use 450º. Changing the temperature will change the time. 

If you are on Facebook or Instagram, check out Jamie Oliver and watch him cook. Always healthy. Usually simple family dishes. No recipes with exact measurements. Just watch him put together a simple dish. It helps get your cooking juices flowing.