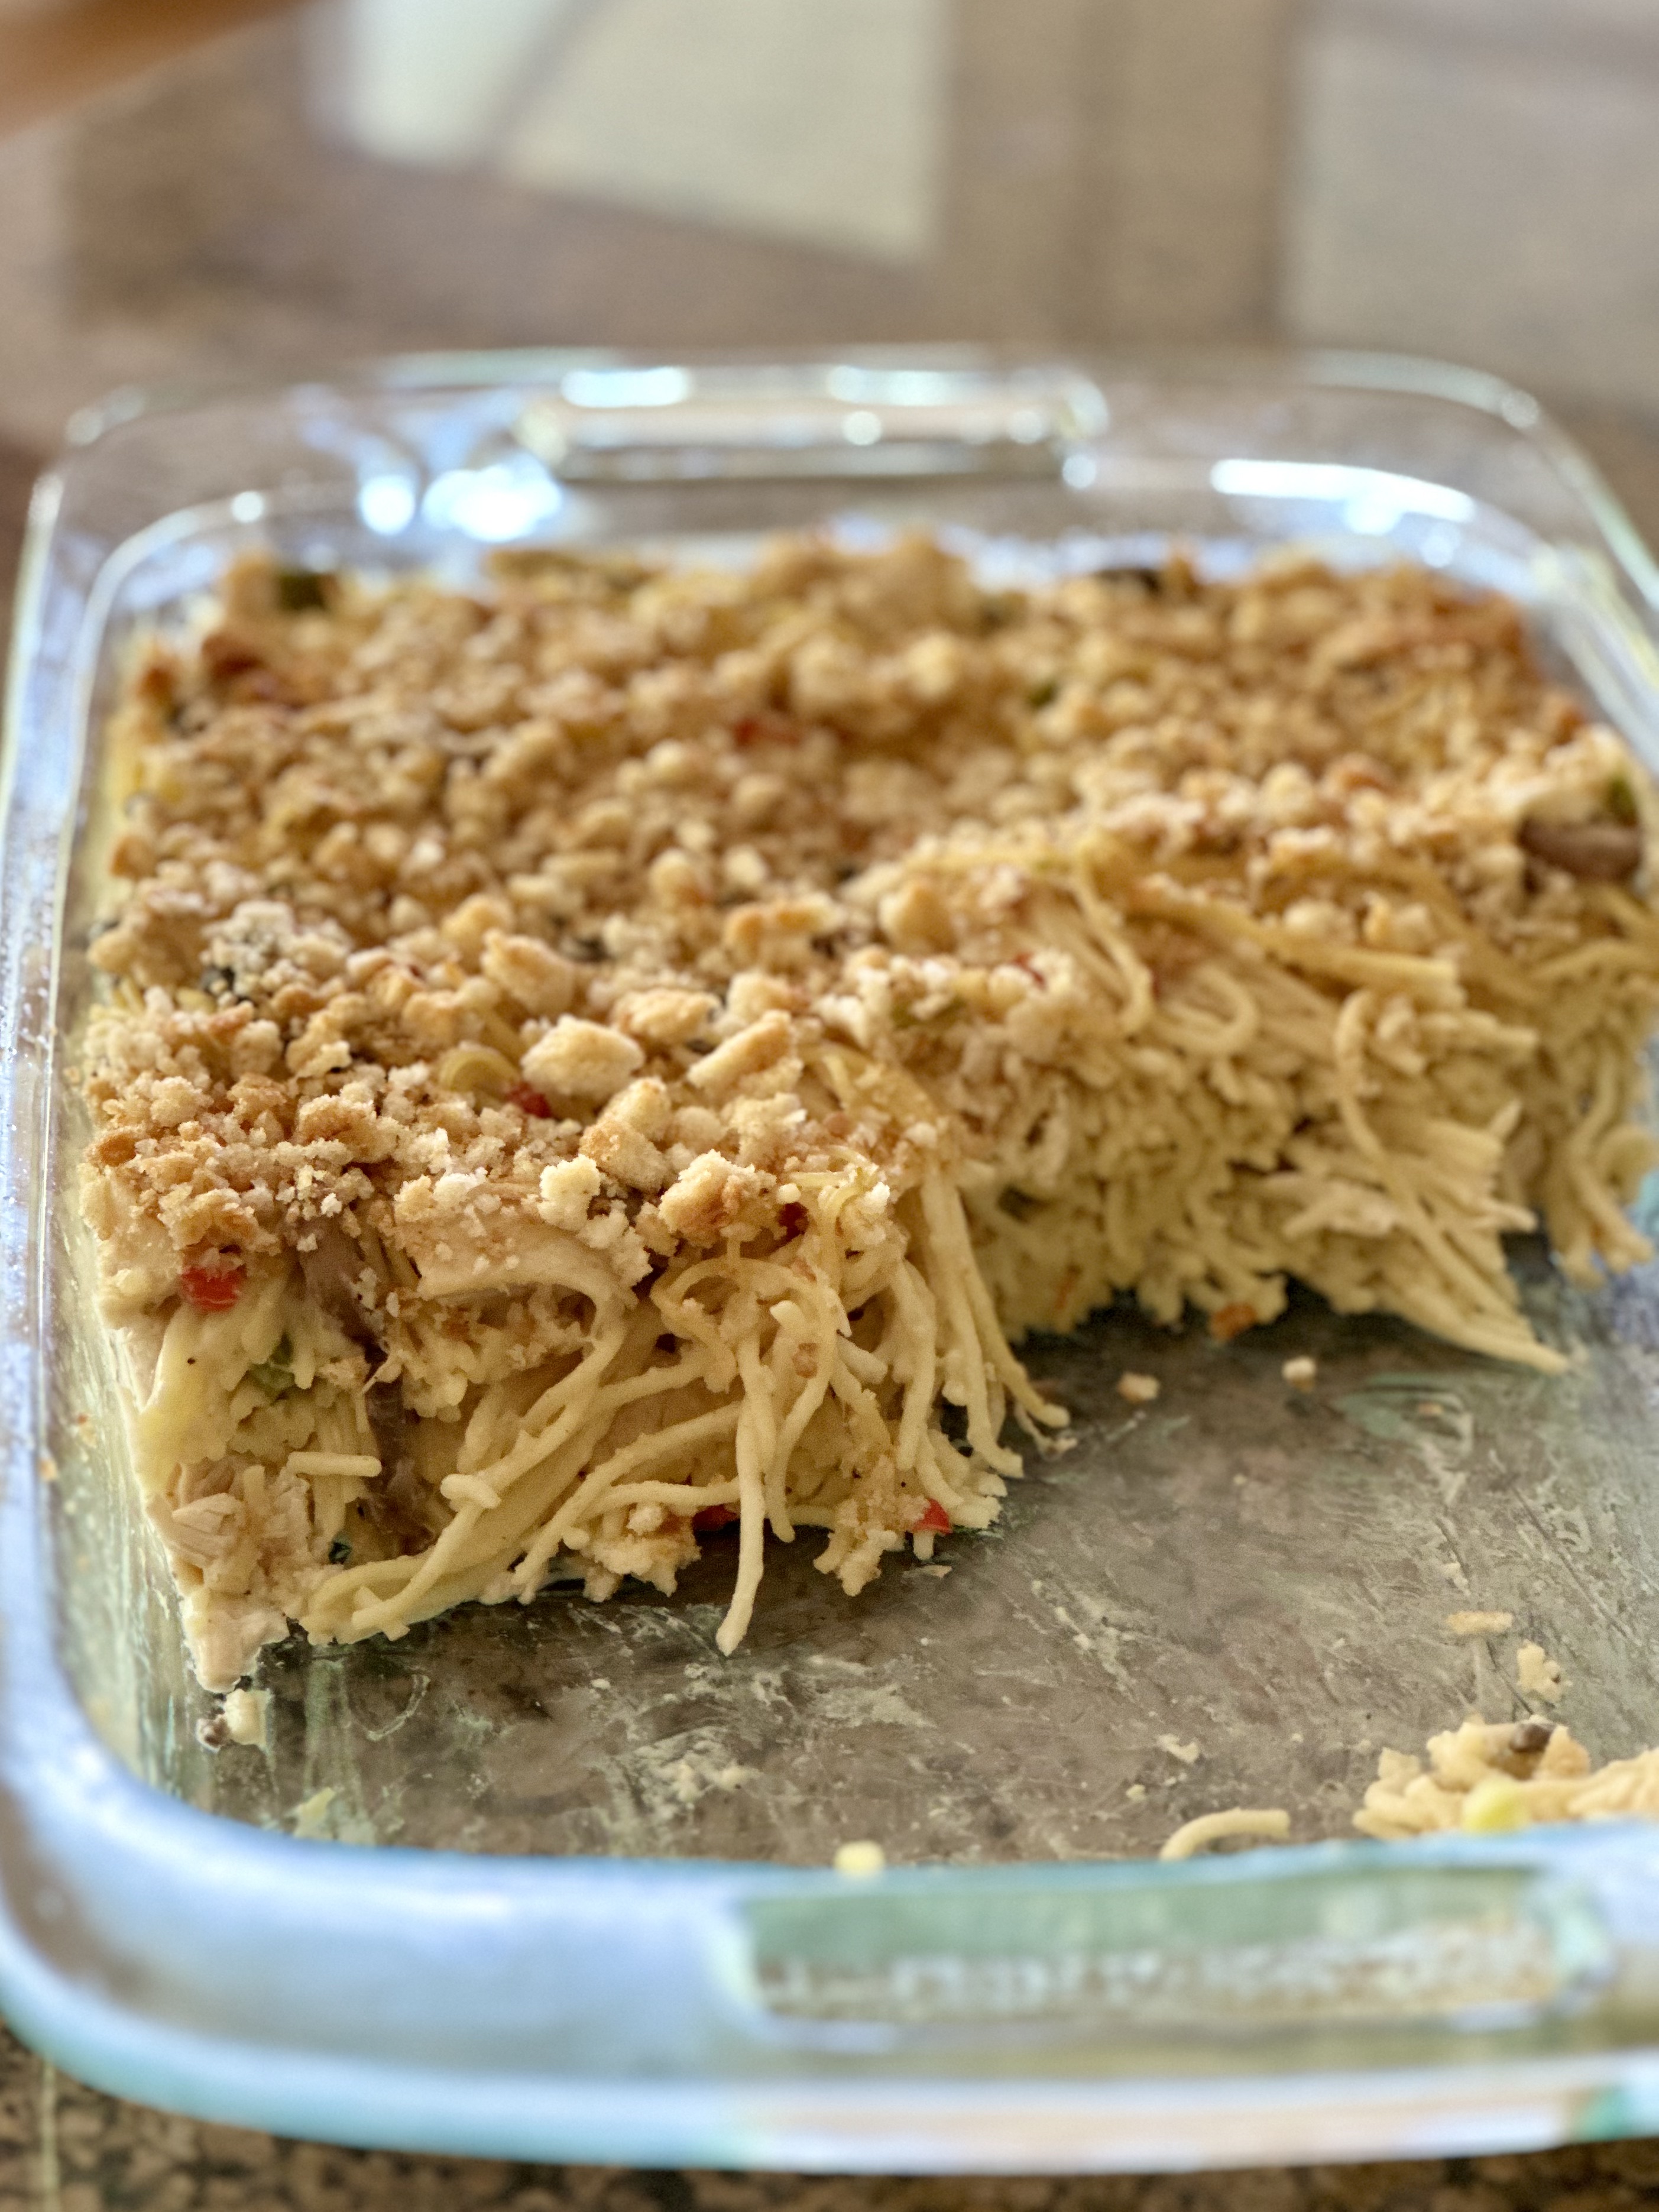
Wednesday, May 10, 2023

Vintage Dessert

I’m on grandmother duty but I wrote this post before I left home. 

Chocolate Eclair Cake

Here's another vintage recipe. This is the dessert I served to my book club pals. The recipe can be made ahead and it's really easy. The recipe has been around a long time but this was the first time I've made it.  It isn't really a cake at all. And it's not baked. It's assembled. It was very popular a few decades ago and it still shows up at church dinners from time to time. So I've enjoyed it at those occasions.

But there's another reason this recipe holds a special memory for me. When my girls were about middle school age, a dear friend called me one day and said, "I've made your dinner for tonight. Stop by and pick it up when you're out." Now, I live in an area where taking a meal is common when there is an illness, a death or a new baby. But I'd never heard of anyone sending you supper "just because." There should be more people like my friend.

She was older than I and she knew all about those crazy years of driving kids back and forth to school and the after school activities. I practically lived in my car. Putting dinner on the table was one more thing on my long to-do list. On this one wonderful day we had a home cooked dinner and I didn't have to make it.

I cannot remember what the meal was but I've never forgotten the dessert. And after all the years I made it myself. 

You can find newer versions of this no bake cake that use a homemade chocolate ganache instead of canned frosting. But let's be honest. We've already used instant pudding and Cool Whip for this dessert, so the recipe isn't going to be "real" or "whole" food anyway. Canned frosting surely was easy. I had never microwaved it to make it pourable. But it worked really well. Tastes good, too.


CHOCOLATE ECLAIR CAKE


1 (14.4-oz) box graham crackers

3 cups milk

2 (3-oz) packages of instant French vanilla pudding mix

1 (8-oz) Cool Whip, thawed

1 (16-oz) can chocolate fudge frosting


Spray a 9x13-inch pan with cooking spray. Place a single layer of graham crackers in the bottom of dish. Break some cookies, if necessary, to fill in spaces. 


In a large bowl, whisk together the milk and two packages of pudding mix. Mix until smooth. Let sit for 5 minutes. The fold in whipped topping.


Spread half the pudding mixture over the crackers. Top with another layer of crackers, then spread the remaining pudding mix over. Top with a third layer of crackers.


Remove the lid and foil liner from can of frosting. (Be sure to remove all the foil.) Microwave the canoe frosting for 20-30 seconds, or until frosting is pourable. 


Pour frosting over the top layer of graham cracker and spread to cover with offset spatula.


Cover and refrigerate until ready to serve. Best made 8 to 24 hours ahead to let crackers soften. (I used a 9x13-inch dish with a lid instead of covering with plastic wrap. If the plastic touches the frosting, it won’t be smooth.)


Any leftovers can be frozen for up to 3 months. Which reminds me.....there is a little left in our freezer!
 

Tuesday, May 2, 2023

Vintage Recipe

Chicken Tetrazzini

I had phone in hand to make a photo of this dish just after it came out of the oven. And before I made a picture, the doorbell rang. It was my book club ladies arriving for lunch. You know after that, I totally forgot about photos. But they know me well enough to let me get a quick picture of my plate before we ate lunch. 


I did get this picture as I cleaned up the kitchen later. This chicken tetrazzini recipe is one we've used for over 40 years. It's from the days when condensed "cream of _____" soup was in everything. I don't use much canned soup anymore, but it's works here and I'm not messing with a good thing.


Right after we married, I wrote aunts, uncles and lots of cousins asking for them to send me their favorite recipes. I got recipes from my mom and dad and sister. And I put them together in a family cookbook. This was so long ago that it involved letters with stamps, a typewriter, my secretary at work and a local printer to get this project done. (For those of you too young to remember typewriters, just know that making corrections was a pain in the patootie.) That tells you HOW long ago this was. If I were to to this again that family tree would have many, many more leaves!

]

The recipe was contributed by my sister and over the years, I've made a few adjustments. So this is very version I use now. I had intentions of using fresh mushrooms this time but I was running behind in my prep. The canned mushrooms are acceptable here. I like sliced mushrooms so that if anyone doesn't like mushrooms they are easy to pick out. For years this was the recipe I took to new mothers. And sometimes the little kids in a family could easily avoid the mushrooms. 

Take note...this makes a 2-quart casserole—not a 9x13 dish.

CHICKEN TETRAZZINI


2 tablespoons butter

½ cup grated sharp cheese

1 cup milk

2 tablespoons flour

1 can cream of mushroom soup

1/8 teaspoon oregano

1/8 teaspoon pepper


4-oz. can sliced mushrooms

2 tablespoons chopped green pepper

1 tablespoon chopped pimento

2 cups chopped cooked chicken


8-oz. pkg. spaghetti, cooked (most boxes are 16-oz, so use half)

1 cup buttered bread crumbs


Preheat oven to 350 degrees and spray 2-qt. baking dish with PAM.


Put butter, cheese, flour, milk, soup, oregano and pepper in a large saucepan.  Cook over medium heat until cheese melts, stirring frequently.  Add mushrooms, green pepper, pimentos and chicken.  


Put cooked spaghetti in a 2-qt. baking dish.  Pour sauce over the spaghetti and stir gently.  Sprinkle with bread crumbs.  


Bake for 30 minutes.


You can make this with turkey or ham instead of chicken.


I wasn't sure that the 2-qt recipe was going to be enough for my group so I doubled the recipe this time. FYI, a 9x13-inch dish holds 3 quarts. So a double recipe filled that bigger dish and one smaller one. I put that one in the freezer for later. I did put the bread crumbs in a separate bag and laid it on top of the wrapped dish, then put them both in a zipper freezer bag. 

We actually ate this dish last night. It was just as good as the first time. I took it out of the freezer the day before and moved it to the refrigerator. If I had frozen a larger did, it would need a couple of days to thaw. Bake until internal temp is 165ยบ. If it's not quite thawed it might take a few extra minutes.

~~~~~~~~~~~~~~~~~~~~

And I thought I'd share what spring is looking like here on the farm. Flowers are blooming, brilliant blue skies...and then nearly 6 inches of rain fell in 3-1/2 days. Our farm pasture extends all the way to the river.  Now, watch us have no rain in June and July!


The river has overflowed the banks.


Sunday, April 16, 2023

Long Time, No See

Where have I been? Why haven't I posted? 
It's been busy here for the last couple of months.
No recipes to share because I only cooked my easiest regular things.
You've already seen all of those recipes!

And to be honest, the next several weeks will be equally busy.
There's a college graduation and a week long babysitting stint.

Here are some highlights of the last couple of months.


Presidents' Day holiday—on wheels.


That weekend included lots of outside time.


See the missing headlight? 
A car ran a stop sign and pulled out in front of us.


Baked six loaves of bread for church (plus two for us.)


Beach trip with "the girls."


Substitute pianist at church.


Two birthday celebrations.


Spring break with the smaller grandchildren.


Strawberry picking at the neighbor's u-pick farm.


A visit to the children's museum offered things for all ages.


The museum included a "grocery store" to let the little ones do their shopping...


...and check out at the register.


A first time egg-dyeing experience.


Easter Sunday christening.


Concerts in the music room.


And the family band grew by one.


More piano work for church.


My dependable kitchen helper.


And once everyone headed home,
there was a lovely dinner out—for two.


Saturday, February 11, 2023

Food For The Soul

Buttermilk Pancakes


I asked Daddy-O to cook supper about a week ago. He immediately said, "I can't cook!" But I know better. He is famous—with the grandchildren, at least— for his French toast, and he does a really good job with pancakes. There are nights when pancakes are just what the body...mostly the soul...needs.

And Shrove Tuesday, sometimes called Pancake Tuesday, is fast approaching. (It's the Tuesday before Ash Wednesday, the start of Lent.) So it's a good time to share a pancake recipe. Now, I always keep a box of "only needs water" pancake mix in the pantry. There are a couple of good brands we like. It's nice to know there is something that can be fixed quickly when you are tired. And if you've let yourself run out of eggs and milk and everything else, you can still feed people. Always a good thing.

But homemade pancakes are special. I've posted a pancake recipe here somewhere way back, but this one is made with buttermilk. I like that flavor. And we happened to have buttermilk in the fridge. So here goes.


BUTTERMILK PANCAKES

1 cup all-purpose flour

2 tablespoons granulated sugar

1 teaspoon baking powder

1/2 teaspoon baking soda

1/4 teaspoon salt

1 cup buttermilk

1 large egg, lightly beaten

1 teaspoon vanilla

1 teaspoon canola or vegetable oil, plus enough to lightly coat griddle


Combine flour and dry ingredients. (I like to mix with a whisk.) Make a well in the center.

In a separate bowl, mix buttermilk, eggs, vanilla and oil. Pour into well in the dry ingredients. Mix until smooth.


Preheat nonstick griddle or skillet and brush lightly with oil. Use a 1/4 cup measure to pour each pancake onto griddle. When the tops are covered with bubbles, turn and cook the other side. 


For us, this made 8 pancakes.


So whether you're in need of "brinner" (breakfast for dinner) one night or you plan to observe Shrove Tuesday, hang on to this recipe.


Thursday, January 26, 2023

Can't Get Easier Than This

3 Bean and Sausage Bake


The older I get, the less complicated my cooking becomes. I watch my daughters making wonderful dinners—and they'll say, "but this was easy."—and I know it was, but their recipes will have more steps than I want to take right now.

Last night I made a new recipe that was the epitome of simple. It tasted good. It was the comfort food I needed. And I had all the ingredients on hand—at least with a couple of substitutions, I did. (As far as I'm concerned, canned beans are interchangeable.) I'm keeping this recipe and will do it again.


I had spent a week, thankfully with Daddy-O's help for most of the days, keeping these two little kiddos while their parents had a get-away. I am not the grandmother I was ten years ago when the middle set of grandchildren were this age. (Our grandchildren are in 3 age "sets"—22...12 & 8...3 & 1) Lifting the baby and wrangling two little ones in general kept me on the move. 

I got home late afternoon two days ago and that night we simply had cheese and crackers for supper right before I fell asleep. Last night I figured I should do better.


This printed recipe had been on my kitchen counter for a couple of weeks. I am such a fan of beans and I love sausage, so I knew I was going to try this one. The hardest part of throwing this together was dicing the onion. And I'm speedy with that task. Slice the sausage and open the cans and you're nearly done.


The author of this recipe says it's Weight Watcher friendly. If you don't count the cornbread. I made a couple of less friendly subs because my goal last night was to be super quick. I used 1 tablespoon of olive oil instead of cooking spray to brown the sausage and the onion. And I used shredded cheese from a bag...not reduced fat like she did...because it was easy. 


In her post she said the recipe freezes well. I'm trusting her. We are a household of two, so I divided the recipe into two pan and popped one into the freezer after I covered and labeled it. I know we should have had something green on this plate. But last night it was good just to have food. Check out the original recipe from Recipe Girl here. 

3 BEAN & SAUSAGE BAKE


1 tablespoon olive oil

16-oz turkey kielbasa, sliced

1 medium onion, diced

2 garlic cloves, minced (or 1 tsp from a jar)

1 (15-oz can) great northern beans, drained & rinsed

1 (15-oz can) pinto beans, drained & rinsed (I only had black beans on hand)

1 (15-oz can) light red kidney beans, drained & rinsed

1 cup water

1/2 cup ketchup

1 tablespoon packed brown sugar

1 tablespoon apple cider vinegar

2 tablespoons dijon mustard

1/2 cup shredded cheddar cheese


Preheat oven to 350ยบ. Spray a 3-qt baking dish with cooking spray. 


Heat 1 tablespoon olive oil in skillet. Add kielbasa and cook until brown, stirring occasionally. Add onion and garlic, and cook until onion is tender. Add remaining ingredients and simmer for about 5 minutes to let flavors blend. 


Pour into baking dish and bake, uncovered, for 35-40 minutes until bubbly in the center. Let stand 5 minutes before serving. (Because I divided mine into smaller pans, 30 minutes was enough baking time.)


I made a quick batch of corn muffins from a box of Jiffy mix. I always keep a box on the shelf because it's so easy. Right around New Years, I read a post on Instagram of 24 things to add to Jiffy Mix. And I found the article for you to read here. You can add one more thing to the list. Last night I scraped out the last of the sour cream from a container and added about 1/3 cup to the mix along with the milk and egg that's listed on the box. It was so good. A definite improvement in taste AND texture. 


Friday, January 13, 2023

My, Oh My...That Pie!

Easy Skillet Apple Pie

You've seen this recipe here before but it's worth another appearance. My friend Missy pointed me toward this Southern Living recipe a couple of years ago. If Missy says it's good, it's good. I made it right after she told me about it. Since then I've made it a few more times. My son-in-law made it twice over the holidays. It's that good. And it's that easy.

It also looks impressive. I had my book club friends here for lunch this week. Carol brought soup and corn muffins. Sarah brought cheese, fruit and crackers to nibble on as the girls arrived. And my job was to provide dessert. The seven of us take turns with the food. When they walked in my front door, our house smelled divine. All that cinnamon! 

This is ridiculously easy to make considering the showy result. The hardest part is peeling and slicing four pounds of apple. My mix of apples was what I had in the refrigerator—Macintosh, Red Delicious, a couple of Galas and one lone Granny Smith. That was fine.

I had a friend watching as I made it. She looked at the big bowl of sliced apples, shook her head and told me, "They're never going to fit into that pan." Although I didn't tell her, I wasn't sure they were going to fit either. But I kept piling them up high, tucking them in along the sides. I wish I had made a "before" photo. But they cook down into a normal size pie.

You might need to scoop it out. One time I actually got slices. Either way, it's delicious.

EASY SKILLET APPLE PIE

4 lbs apples, half Granny Smith & half Braeburn or Macintosh

good squeeze of lemon juice

1 teaspoon cinnamon

3/4 cup sugar

pinch of salt

1/2 cup butter (1 stick)

1 cup firmly packed brown sugar

1 box refrigerated pie crust (2 crusts per box)

1 egg white

2 tablespoons sugar


Preheat oven to 350ยบ. Peel and slice apples into 1/2 inch slices. Squeeze lemon juice over apples and toss.  Then toss apples with cinnamon, 3/4 cup sugar and pinch of salt.


Melt butter in 10-inch cast iron skillet over medium heat. Stir in brown sugar and cook, stirring constantly, for 1 to 2 minutes until sugar is melted. Remove from heat and place one pie crust on top of butter mixture. Spoon apples over pie crust. Top with remaining pie crust. (I didn't try to crimp the edges because the pan is hot. Just tuck in anything that hangs over.) 


Whisk egg white until foamy and brush over crust. Sprinkle with sugar. Cut slits in the top crust so the steam can escape. 


Bake for 1 hour to 1 hour 10 minutes, until golden brown and bubbly. If the crust is browning too quickly, shield with foil for the last 10 minutes.


Cool for 30 minutes before serving. And y'all...it begged for a scoop of vanilla ice cream on top!


PS...I slid a pizza pan onto the rack under the pie as it baked. Only one tiny drip. But better than it landed on the pan.


Monday, January 2, 2023

Aiming For An Ordinary New Year


Chloe, your comment on my last blog post meant more to me than you'll ever know. 
We all (I think) wonder if people notice us. It's good to be checked on. 

We said "good riddance" to 2022 and welcomed 2023 with our traditional peas and collards. Notice how basic the plate is? It was a very bare bones meal, with three of us eating at lunch time and the rest having the leftovers for dinner—after they got home from the hospital. 2022 seems to be dragging its feet into this new year. 

We are aiming for "ordinary" this year. There is wonder and comfort in the routine and the regular. We look forward to tucking in special bits in here and there.


We have had nothing catastrophic happen, but the last six months have been nothing like we expected.  So many things happened. Our schedule went wonky. Some health issues were ours. Some belonged to others but impacted us, too. Our church pianist fell right before Christmas and broke her arm. That turned into lots and lots of extra time at the piano to prepare music for several services. I'm learning trying to live within my limits. Piano time took priority over cooking, making photos and blog posting. 


Yesterday I was able to spend several minutes in our beautiful historic sanctuary before I sorted out my music and settled in at the piano. I needed the calm and the peace that was there. 

(It was a different story on Christmas Eve when a squirrel got into the sanctuary and raced around during the service.)


These collards were so good yesterday that I'm sharing this recipe again. It takes a whole morning or afternoon to cook them like this—and I put my cooker out on our porch—but it's very easy. Any leftovers can be frozen for a quick vegetable side dish later. 

COLLARD GREENS

1/2 lb. smoked meat (ham hocks, smoked turkey wings or smoked neck bones--I use turkey wings)
2-3 teaspoons House Seasoning*
1-2 teaspoons Lawrys' Seasoning Salt
2 (16- oz) bags frozen chopped collards (or 1 large bunch of fresh collards, cleaned and sliced)
1 tablespoon butter

In a large pot, bring 3 quarts of water to a boil and add smoked meat, house seasoning and seasoned salt. Reduce heat to medium and cook for 1 hour.
Add frozen greens and butter. Cook for 1 to 2 hours, stirring occasionally. Adjust seasoning to taste.

*House Seasoning: 1 cup salt, 1/4  cup black pepper, 1/4 cup garlic powder. Mix together and store in airtight container.


How regular will I be posting in 2023? I really have no clue. Maybe not at often as in years past (do I dare admit I have nothing left to say?) but I'm aiming for at least once a month, with extra posts when there is something worth sharing. 

This blog space has become a much used resource for storing my recipes. It's accessible to family and friends. It can be pulled up while standing in the grocery aisle. So you may see and occasional post that is only a recipe. That lets me add it to the index. 

Just a reminder, if you can't find a recipe in the index, you can use the little search box at the top left of the web version of the blog. Type in a key word and it should pull up any posts related to it. I find I use that more often than the index. The trick is to open the web version .