Tuesday, December 29, 2015

The Nuts And Bolts Of It


Friend Missy (who is now a Mimi herself) shared her Mimi's recipe for Nuts & Bolts with me weeks ago. There are so many versions of Chex party mix online—some make smaller amounts, some cook faster, and most have more seasonings. But I wanted to try this family favorite, just like Missy has made it for years.

Mommy mixed it up for me one day while she was here at the farm wrapping gifts and we were out running those last errands. This isn't a hard recipe, but it takes hours in the oven. I did get one text from Mommy when she poured the butter mixture over the cereals, asking if she should make more of the butter mix. She thought maybe the cereal wasn't coated enough. I trusted Missy's recipe to be perfect just like she wrote it. It was. The butter mix and cereal amounts are just right.

This makes an enormous amount. Perfect at the holiday season because we've had plenty to eat, we've given several jars as gifts, and there is enough to get us through all the bowl games on TV this coming weekend. I used jars for giving, just because I had them. Those fun tins you can get just before Christmas would work, too. Plastic bags are fine, but might not keep the mix fresh as long as storage in glass—not a problem, though, if you are eating it up pretty quickly.


Here is the old family recipe, complete with Missy's notes. She also told me that she adds more Worcestershire and Tabasco because they like it spicy. We stuck to the original recipe this time and have loved it that way. I did follow her suggestions for less pretzels and using pecan halves.

NUTS & BOLTS (Missy's Mimi's recipe)

1 box Wheat Chex
1 box Rice Chex
1 box Cheerios (large)
1 (16-oz) bag pretzel sticks (I think 8 oz. is plenty)
1-1/2 lb mixed nuts (I use 1 lb mixed nuts and 1/2 lb pecan halves)
1-1/4 lb. butter (5 sticks)
3 tablespoons Tabasco
4 tablespoons Worcestershire

Preheat oven to 200 degrees. Mix first five ingredients together in a VERY large bowl. Bring butter, Tabasco, Worcestershire sauce to a boil. Pour over the dry ingredients and stir gently to coat everything.

Pour into two large roasting pans (I use the disposable ones) and put on middle racks in ovens if you have a double oven, or put both in one oven and alternate positions a few times while cooking. Cook for 4-1/2 to 5 hours, stirring gently every 45 minutes.

Let cool and seal in airtight containers. (Each batch makes twelve 8-oz bags.) If sealed well, this Chex mix stays crunchy for a long time.


Christmas has come and gone. But our little people are still with us for several more days. That means there is not much time to write at the moment. I am still in baby chasing/meal cooking/toy picking up/story reading/un-decorating mode. I'll catch up with you in 2016!


Wednesday, December 23, 2015

Merry Christmas To You!


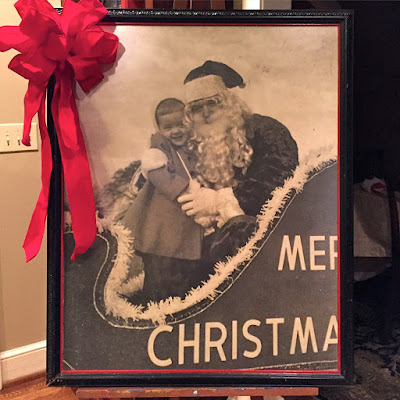
Way back in the 1950s, my mother was friends with the editor of our small town newspaper. For reasons I don't know, he decided to make a photo of me and my sister with Santa just before the Christmas parade started. I was five. My sister was three and not a fan of Santa at all at that point. She wanted no part of this photo shoot. So it was just me and Santa.

I don't know if there was a plan when the photo was made, or if the idea came later. But the newspaper editor made a huge print of that photo and used it for a Christmas decoration in the window of the newspaper office. After a year or two, he gave that giant photo to my mother. And of course, it passed on to me later.

Years ago, to tease me, Daddy-O put it out as part of our decoration. It's a tradition now. A few days before Christmas, he hauls Santa and me up from the basement and puts us on an easel.

So when we see this photograph, we know Christmas is almost here. The tree has been decorated. That gifts are wrapped. The family is all tucked in here at the farm. The music has been rehearsed. (Mommy and Big Sister are singing at the Christmas Eve service, with me accompanying them.) Little Sister just put her list for Santa on the hearth. ("So he will see it first thing when he comes down the chimney.") All the crazy preparation is over. All the work is done. And now we wait.

It is time to close the lid on this computer and focus on the faces in front of me for the next few days. I hope your celebration, whether big or small, brings you joy.

Merry Christmas 
from all of us at the farm
to you!


Monday, December 21, 2015

Last Minute Recipe


I'm sitting here this morning, enjoying the fire—our last morning cool enough to have one—and another Christmas movie, while I'm working on menus for this week and the grocery list. One chick is back home in the nest already. More arrive today, and the last ones tomorrow.

We are planning to have appetizers on Christmas Eve after we get home from church. And I wanted to make the hot chicken dip we enjoyed a couple of years ago. I went to the recipe index here on the blog to find the recipe. And it WASN'T THERE! I have never posted this easy recipe. I'm fixing that right now.

My cousin Lynn shared this recipe with me and told me that whole family loves it. It was a hit with our folks, too. It's one of those stir-it-up-and-leave-it kind of recipes. I'm putting it here, without a photo (because I won't make it until Christmas Eve.) Now I'll be able to find it easily next time.

CHICKEN DIP

2 (8-oz) blocks of cream cheese
2 (12.5-oz) cans chicken, drained (mine were 10-oz)
1 cup Ranch dressing
1/2 medium bottle Texas Pete, or to taste

Mix all ingredients together in a crockpot. Serve with Scoops or Fritos.

The gentleman who gave Lynn the recipe told her that he melts the cream cheese in the crockpot, then adds the other ingredients.


Keep this recipe in mind in you need a quick easy recipe for your holiday feasting. Thanks, Lynn!


Thursday, December 17, 2015

What Makes Christmas "Christmas?"


I went to visit the grandchildren last weekend. I got to watch Little Sister cheer at a basketball game. ("You know, that game where you try to throw a ball through the hoola hoop.") I heard the magnificent Christmas concert at church where Big Sister sings in the choir. I saw the Night of Lights in their neighborhood. And I stayed an extra night so that I could watch the preschool Christmas program. Little Sister was Mary in the play. Her line was, "It was a long journey. I didn't think we'd EVER get here!"

I got home late yesterday. It's pretty obvious at this point, that everything on my list is not going to get done. The ingredients for the party mix are sitting on the kitchen table where they have been waiting on me for days. Most of the gifts are wrapped, but not all of them. There are two stocking that are completely empty as of this minute.

So? Does it matter? Some of it does. (You know I can't have two people with empty stockings on Christmas morning.) Most of it won't matter at all, except to me.


Last year our Christmas took a turn of its own. Like so many people who find that there is no "jolly" in their "holly," ours was a little on the bleak side. Baby Girl was spending her first Christmas in the hospital in the midwest where they lived. Big Sister and Little Sister were here at the farm with us and Little Sister was crying for her mommy. Mommy was far away from the rest of her family at Christmas.


But we found that Christmas came anyway. So many people helped Mommy and Baby Girl have a special Christmas at the hospital. Strangers came with gifts. One family had experienced a similar Christmas years ago and made it their mission each year to bring a little cheer to sick children spending the holiday attached to tubes and monitors in the hospital. Nurses brought handmade gifts for each tiny patient—blankets, caps, pillows. The church family made sure that Mommy had a Christmas dinner. Meanwhile at the farm, Aunt Jessica made things fun for the older sisters, keeping them busy in the kitchen and wrapping gifts and playing games. 


Mommy and J-Daddy, even before the hospital stay, had decided to skip a tree last year since they were all coming home for Christmas. They didn't want to leave a live tree to dry out for two weeks. So sweet Little Sister (who was 4 last Christmas) made a tree for her family. She found the little Charlie Brown tree whose single ornament had broken the year before. She decorated it with the baby's teething ring, one of her hair bows and wrapped a doll blanket around the base and put it in the corner where the tree usually sat.

Now, when I looked at the photo of this sad tree this week, I saw a reminder of last Christmas when things were not going so well. But Little Sister was hanging on my shoulder looking with me. When she saw this, she exclaimed, "Oh! That was a pretty tree. I remember that." I should take lessons from her.

Yes, Christmas did come last year. In its own way. In a way that was probably closer to the original Christmas. And it will come again this year for all of us, just like it has for two thousand years. In this last week as things seem to speed up, let us try to keep our focus on what's important. And remind ourselves that it's not about the decorations. It's not about the gifts. It's not about the food. It's about caring. And kindness. And friends. And family. And love.

As we celebrate the birth of Christ, let us be the hands and feet of Christ to others. Just like those special people who brought Christmas to a hospital room last year. Just like a tiny child who found a way for her family to have a Christmas tree. Let us shine Christmas love on someone who needs it this year.


Monday, December 14, 2015

Christmas Cookie Party


I think I lived an entire year's worth of life last week. I'm not even telling what the whole week held because listing it would make me tired all over again. Let's just say I've come out here on the other side still upright. Last week's crazy/busy was mostly good things, but just too much crammed in together. 

Last night's cookie party that Mommy hosted was a nice end to the week and I only had to help—light duties compared to the other full days. Their neighborhood has an annual "Night Of Lights" and everyone in a three-county radius must know to drive through and look at the decorated houses. One house even had a live nativity scene in their yard, complete with a camel and donkeys and chickens. There was a major traffic backup on the highway to get into this neighborhood.

Mommy had invited a few friends to drop by for cookies, hot cider and cocoa when they came to see the lights. Turns out it was really hard to get here in all the traffic (this is Mommy's first Christmas here and they had no clue what a big deal this night was) but persistence paid off and before it was over, little people filled the house with laughter and shrieking and lots of running about. Then they ate cookies. God bless the mamas of these sugar-filled kiddos today.


Mommy baked and baked and baked to get ready for the party. This new recipe was a big hit with everyone. I want to make these at home soon. Or, maybe after Christmas. I'm kind of full of cookies right now.

BROWNIE COOKIES

2 ounces baking chocolate (semi-sweet or unsweetened or bittersweet)
2 sticks softened butter
2 cups sugar
2 large eggs
1 tablespoon vanilla extract
2-1/4 all-purpose flour
1/4 cup + 1 tablespoon cocoa powder
1 teaspoon baking powder
1/2  teaspoon salt
powdered sugar, for dusting

Preheat oven to 350 degrees.

Melt the chocolate in the microwave, stir, and let it cool.

Cream the butter and sugar together until totally combined. With the mixer on low, slowly drizzle in the cooled chocolate. Scrape the bowl and mix again. Mix in the eggs one at a time, then the vanilla. Scrape the bowl once more and mix.

Combine the flour, cocoa powder, baking powder and salt in a bowl. Stir it together, then add it in large spoonfuls to the mixing bowl, with the mixer running on low. Scrape the bowl again and mix again until all combined.

Scoop generous tablespoons onto a baking sheet lined with parchment, then bake for 11 minutes until puffed and set. Remove them from the oven and let them sit on the pan for 1 to 2 minutes, then remove them to a baking rack to cool completely. Once cool, sprinkle generously with powdered sugar.


This recipe came from one of Mommy's good college friends. It's wonderful how these recipes remind us of friends from years ago.

SPICED APPLE CIDER

4 cups water
2 cups sugar
Bring to a boil in a big pot, them simmer for 15 minutes. Take off heat.

Add:
3 cinnamon sticks
8 whole allspice balls
10 whole cloves
Let sit for 1 hour. Remove cinnamon sticks, allspice and cloves.

Add:
1/2 gallon apple cider
4 cups orange juice
1 (7.5 oz) bottle Minute Maid lemon juice (in frozen juice section)

Stir and heat slowly. Serve hot. Refrigerate leftovers. You can put this in a large crockpot to keep it warm for serving at a party.


I have given beverages as gifts. Your friends and neighbors  might a welcome change from a plate of cookies. Pour cider into a pretty bottle. Use one saved when you empty a bottle of juice or purchase an inexpensive carafe at the grocery store. Add a festive label with heating directions and tie on a bow. What a treat to have homemade hot cider on a cold day!


To help you find the frozen lemon juice, this is the bottle Mommy used. The bottle was packaged in a box in the freezer section. The bottle says it is equal to the juice of 7 lemons. You could certainly use fresh if you've got the time and energy.


Thursday, December 10, 2015

So Simple So Good


Several weeks ago I was zooming down I-85 (that's the only way people drive on I-85—it's scary) and my phone whistled at me. That's my alert sound for a text message. Now I do not text and drive. But I was really close to the halfway point in my drive. That exit has a Starbucks. So I stopped to get coffee and check my message.

It was from my sister. She was asking me about a recipe she got from me years ago. I called her to see what she needed. She said she had made it many times, but her aging brain didn't remember the cooking time.

Well, I guess we know who is the oldest, because my ancient brain didn't even remember this recipe at all! She told me what she was doing and how good it was and I did know the basic cooking time for a pork tenderloin, which answered her question. But I still have no recollection of ever making this. I do remember making a recipe that is first cousin to this one—Pepperoncini Beef. We liked that one. This pork recipe is similar but milder and tamer.


I trusted her that "my" recipe was a good one and made it for our supper last night. Two ingredients in a slow cooker. Can't get much easier than that. I needed easy because I had of other things to do as I try to get ready for the family to get here in less than two weeks. 

SLOW COOKER PORK TENDERLOIN w/BANANA PEPPERS

2 pork tenderloins (that's how mine are always packaged)
1 (16-oz) jar of mild banana pepper rings

Place pork tenderloins the the slow cooker. Pour banana peppers and the juice over the pork. Cook on LOW for 6-8 hours. Remove meat and shred with two forks. Serve with (or without) the banana peppers.


I checked the pork after about 6-1/2 hours. It wasn't quite tender enough (these were large tenderloins) so I cooked it another hour. Just be sure not to overcook the tenderloins. Pork tenderloins to do not need to cook a really long time, like some beef recipes that I might cook for 10 hours or longer. I found this out the hard way with another recipe. Cook it too long and the texture of the pork isn't good. Years ago I thought you should never take the lid off a crockpot during the cooking. But this quick check (about 30 seconds) was okay.


The pork was tender and flavorful. We liked eating the pork with the banana peppers. It's easy to skip them if you don't. This is good for sandwiches or you can serve it over rice. I put some in the freezer for later. I will happily take credit for this recipe.

This may be the shortest recipe I've posted here. It balances out the complicated bread recipe I put on the blog earlier this week. I am glad my sister's younger brain remembered this recipe. I'm posting it here so I won't forget it again.


Tuesday, December 8, 2015

The Christmas Bread


Jessica came home last weekend and she and I stayed in the kitchen for a good part of her time here. She wanted to learn how to make these yeast-raised coffee cakes that I have been baking for years. Her lucky co-workers are getting these today for a Christmas treat.


This recipe is based on one I found in a booklet I ordered from Fleischmann's in 1984. That little booklet is wonderful. The pages in mine are brittle and crumbling. I really should scan each page while I can. All of the recipes are great. It is an education in different ways to mix yeast breads. Brown 'n serve, dough for the freezer, rapid mix, cool rise. Who knew there were so many ways to mix a dough?


This is most likely the longest recipe I'll ever post here. But it's a good one. And a couple of folks have asked for the recipe. I only make it at Christmas. It typically is part of our Christmas breakfast. Over the years, we have taken it to junior high teachers, to security guards, to friends, to pastors, and to our choir director. I even made it for bake sales.

I love it because it's delicious. I love it because it is beautiful. And I love it because it is "brown 'n serve." That means you can make it up to a week ahead of serving it or gifting it. You pop in into the oven for a few minutes to finish browning it at the last minute.


It really isn't that hard to make, but it does take time. I often use Rapid Rise yeast and that shortens the process by about an hour. (*Directions for using Rapid Rise yeast is at the bottom of the recipe.) The recipe makes two coffee cakes. But I have also divided the dough into thirds before shaping and made three smaller "cakes" when I needed to give more than two.

When you get to the shaping part, you can do it any way you like. The braid is the most labor intense, but it's lovely. You can also use other fillings instead of cinnamon-sugar and nuts. The original recipe called for toasted coconut and brown sugar.

If you use PAM to grease your bowl for rising, spray the top of the dough with PAM also. If you use oil to grease the bowl, just turn the dough over in the bowl to grease the top.  This is to keep the dough from drying out while it rises.

To test to see if the dough has risen enough, lightly press your fingertip into the dough. If it springs back, it needs to rise a little longer. If the dent stays in, it's ready for the next step.


BRAIDED CINNAMON COFFEE CAKE (BROWN 'n SERVE)

4 to 5 cups unsifted bread flour
1/2 cup sugar
1-1/2 teaspoon salt
2 packages Fleischmann's Active Dry Yeast
1/2 cup milk
1/2 cup water
1/4 cup butter (that's 1/2 stick)
2 eggs, at room temp
     ~~~~
3/4 cup sugar
2 teaspoons ground cinnamon
chopped nuts (I just stir some in--the mix is mostly sugar/cinnamon)
melted butter, for brushing the strips
powdered sugar (about 1 cup) for the glaze

In a large bowl, thoroughly mix 1-1/4 cups of the flour, 1/2 cup sugar, salt and undissolved dry yeast.
Combine milk, water, and 1/4 cup butter in a saucepan. Heat over low heat, until liquids are very warm (120-130 degrees F.) Butter does not need to melt. Gradually add to dry ingredients and beat 2 minutes at medium speed of electric mixer, scraping bowl occasionally. Add eggs and 1/4 cup flour. Beat at high speed 2 minutes, scraping bowl occasionally.

Stir in enough additional flour to make a stiff dough. Turn out onto lightly floured board; knead until smooth and elastic, about 8-10 minutes. Place in greased bowl, turning dough to grease top. Cover; let rise in warm place, free from draft, until doubled in bulk, about 1 hour.

Mix filling and set aside:  Combine 3/4 cup sugar, 2 teaspoons cinnamon and chopped nuts.

Punch dough down; divide in half. (Cover the dough that is "waiting" with a towel so that it doesn't dry out.) Divide first half into three equal pieces of dough. Roll each ball of dough between hands to make a “rope.” Roll each rope-shape with a rolling pin to flatten into a strip.

Brush strip generously with melted margarine, leaving edges dry, then spoon the cinnamon-nut mixture down the center of each strip. Pull dough up over cinnamon-nut mixture and pinch dough together to seal. (You are making a "cinnamon sugar-filled rope.") On your work surface, put ends of all three filled strips together, seam-side down. Loosely braid the strips. Tuck under each end of braided loaf and pinch to seal. Carefully place braided loaf on a greased baking sheet. Cover with a towel. Repeat with other half of dough. 

Let rise in warm place, free from draft, until doubled in bulk, about 1 hour.

Bake at 250 degrees for 40 minutes. Remove from baking sheets and cool on wire racks. Wrap well in plastic wrap. Store in refrigerator up to 7 days.

When ready to serve, place on ungreased baking sheets. Bake at 375 degrees about 12 minutes, or until browned. Remove from baking sheets and cool on wire racks. 

While bread is cooling, mix glaze: Mix together about 1 cup powdered sugar, adding water a spoonful at a time, until you reach desired consistency. Drizzle over top of each cooled loaf.  Remember, this has no preservatives like most bought breads, so eat it quickly!

*You can use Rapid Rise yeast to eliminate the first rising.  Mix according to recipe up through the kneading. Instead of putting dough in a greased bowl to rise, leave the dough on the work surface, cover with a towel and let it "rest" for 10 minutes. Proceed to the shaping step and continue with the recipe as written.


For Christmas giving, I like to decorate with candied red and green cherries. Cut a green cherry into four pieces and place 2 or 3 pieces around the red cherries, like leaves. Before Christmas, you can find candied cherries at the supermarket with the fruit cake ingredients. 
                                                                         
After reading all of this, I know your eyes are glazed over. Later, I will give you instructions—maybe even diagrams—for some other ways to shape this dough. I think all of the other ways I know to shape this are faster than the braid. All the shapes taste the same, of course, but I love this braid at Christmas time. Maybe I should learn to love one of the faster shapes. 


Saturday, December 5, 2015

Getting Ready

Pattern: A Good Plain Sock by Stephanie Pearl-McPhee
Yarn: ONline Supersocke 100
Needle Size:  1.5

It's early on Saturday morning. Cold and frosty outside. A good day for slipping on the warm socks that I finished a few days ago. Now I started them months ago. Not sure why it took so long to get to the end. But I am glad to be wearing them today.

Jessica is home for the weekend and we are about to start a marathon day of Christmas preparation—decorating, baking, wrapping. I won't have her again to help until a few days before Christmas. So I plan to take advantage today of having extra hands.

I am always on the lookout for EASY holiday ideas. Saw this felt tree somewhere online. Perfect for the little people in the family. No sewing. No pattern. Just cutting. I folded a yard of green felt in half and drew a freehand outline of a Christmas tree and cut it out.


We used a soup can, a hand lotion bottle and a soft drink cap to trace circles onto more felt. I cut a few "vintage shaped" ornaments free hand by folding squares of felt in half before cutting. That makes sure the two sides match.


Mommy posted this photo yesterday. She had taped the tree to a wall and added some felt packages under the tree. Looks like my "vintage" ornaments may have been lost already! That tells me that the little granddaughters have been decorating and un-decorating and decorating this tree again.


Yesterday I stopped by to visit some dear friends who are home bound now. Pulled a few applesauce muffins and a small loaf of my banana bread from the freezer. The only small tray I had here still needed one more thing to fill it up. Tea bags! It was just a small gift, but one that was much appreciated. Remember, you don't have to take a whole batch of muffins, or the large loaf of a quick bread as a gift.

Like everyone else, I don't have enough time to do all I would like to do. So, I baked banana bread a couple of times last week, making each recipe into three or four 5-inch loaves. The applesauce muffin recipe makes two dozen. Divide those things into smaller packages and you've quickly got several Christmas trays to give. You know it's really more about taking the time to visit a few minutes than it is about a gift.

Now. Time to get cracking, or it won't all get done!


Friday, December 4, 2015

Finding Christmas

Forgive me if you are tired of reading this story. I have posted it a couple of times before. But it is part of our family Christmas lore. And Jessica is coming home today to celebrate Daddy-O's birthday this weekend. This is such a good reminder of the true Christmas spirit.

Be sure in these busy weeks to watch out for those around you who might need a kind word, or a smile or good deed. Give a little extra to someone who needs it. Not everyone finds this "the most wonderful time of the year" and maybe you can brighten their season. If you are the one who is struggling to find the Christmas spirit, doing those very things can help you as much as the one on the other end of that kindness.


...originally posted in 2011...

I was rummaging through a drawer last week looking for something and I found this little stocking at the bottom of the drawer. It's a reminder of what wonderful children I have.

Many Christmases ago, just as we were leaving for the Christmas Eve service at church, Jessica asked us to wait just a minute. She wasn't quite finished. I knew she was making something but we were busy and I didn't exactly know what she was doing. In a couple of minutes she was ready and had this little stocking in her hand. You can see that the tag says "To Needing." 

When we went up for communion that night, she placed this little stocking on the altar rail. I didn't know what was in it but thought that it was nice that she wanted to leave something. The adults often left a dollar or two there. That money was used for people who came to the church needing help with things like paying the heating bill, or getting their car repaired. The money was always collected after the service and given to the pastor. That little stocking was gathered up along with the dollar bills and that's the last we saw of it.

Weeks later I got a phone call from the pastor telling me that the that little stocking been laying on his office desk since Christmas. The top was stapled together (with lots of staples.) It was stuffed full and it had the tag written in a small child's writing. One day his wife was in the office and picked the stocking up. She asked what it was. He told her that Jessica had left it on the altar Christmas Eve, that it was probably filled with candy and she could throw it away. She weighed it in her hand and said she thought it was awfully heavy for candy. She undid the staples and poured out lots of coins and some rolled up bills. The pastor was astounded. They counted the money and said it held just over $17. 

Jessica had emptied her bank and given it all to the "needing." He was moved by her generosity.  He said he had learned a lesson, too. He had learned not to judge what was on the inside by how the outside looked. When you make up your mind before looking further, it's easy to miss something special. The other bills left on the altar that night were all ones and fives. This little second grader had given more than anyone. She gave all she had. And he had almost thrown the stocking away.

This little stocking is one of my Christmas treasures. 


Monday, November 30, 2015

Leftovers

 Baked Ziti

Thanksgiving has come and gone. We are still enjoying some of the leftovers—ziti, tacos, cranberry apple crunch, salad and banana pudding. Plus, we are feasting on the memories. It's like having "seconds" as we talk about all that happened here last week.

Baby Girl has become a comedian, telling "knock knock" jokes as only a 19-month-old can. She can plainly say, "Knock, knock" and wait for someone to ask "Who's there?" And she responds with some word that only she knows and then throws her head back and laughs hard. That's how she sees her sister telling knock-knock jokes. I'm not sure whose jokes are funnier.

Big Sister has a science project due this week. Part of it involved making a leaf press. While she was here, Daddy-O taught her how to use a radial arm saw to cut the boards and then she drilled holes for the screws. And she finished it (she wanted it to be beautiful) by using a wood burner to make a design on the top. She had never heard of a wood burner. Lucky for her, that was a popular craft when I was growing up. She declared wood burning, "Cool!" Her leaf press is a work of art.

This is what happened when Little Sister "occupied" herself.

Little Sister was her usual happy self, as she sang and danced her way through the week. She was my constant helper. On the last day I still had to hem a chorus dress for Big Sister. Black dress. Black thread. Hard to see. And my helper was right at my side. I called for her mommy to come to the sewing room. Little Sister asked why I was calling Mommy. I told her that I wanted Mommy to come occupy her so I could work. She protested immediately and loudly. "Don't occupy me! Don't occupy me! I don't want to be occupied!" I don't think she really knew what "occupy" meant. But she knew that she wanted no part of it.

Personally, I am still giving thanks. Thanks for family being here together for an entire week. Thanks that they made it safely back home. And thanks for good memories and good food. The actual turkey dinner was not held at my house, so I didn't have to cook the turkey and make dressing and gravy. But my kitchen stayed very busy anyway. One day I ran the dishwasher three times. Yes, three times in one day. And it was full every time.

My overflowing dish, ready for the oven.

Because this visit was for six nights, I had to cook things besides the Thanksgiving side dishes. The night before Thanksgiving, I made this baked ziti. The recipe has been here on the blog before as "Rotini Noodles with Beef." This time I rewrote the recipe according to how I did it last week. You might find yourself making your own changes!

 My supper of leftover baked ziti & cranberry apple crunch.
Don't judge my combination. I was proud there was a little salad left.

This time I used ground turkey (regular kind, not the extra lean white pack.) This recipe is truly good with either beef or turkey. I have found that where I shop, ground turkey comes in 1-pound packages. And a package of ground beef usually is more like 1.3 lbs. I just use whatever is in the package. Make this when you need to feed a crowd. This gets a two-thumbs-up rating from Big Sister, Little Sister and Baby Girl.

BAKED ZITI

1 (16-oz) box ziti, cooked as directed on box
1 (24-oz) jar spaghetti sauce
1 (14-oz) can seasoned diced tomatoes (I used tomatoes w/green pepper-onion-celery)
1 (8-oz) container sour cream
1 (15-oz) container cottage cheese
1 lb. ground beef or ground turkey (a little more is okay)
lots of shredded Mozzarella cheese
salt & pepper to taste

Brown ground beef or turkey, season with salt and pepper, and drain. Stir in spaghetti sauce and tomatoes and let simmer while you do the other prep.
Mix together sour cream and cottage cheese.
Cook ziti until al dente.  (Basically, put this together the way you would do lasagna.)

Put a small amount of meat sauce in a 9x13-inch dish, then a layer of ziti, half the cottage cheese mixture, a handful of Mozzarella, and half of the remaining meat sauce. Repeat steps above, adding lots of mozzarella on top.

Bake, covered, at 350 degrees for 45 minutes. (Spray your foil with PAM so the cheese doesn't stick.) Take out of oven, remove cover and bake for 15 minutes more.


If you have a lasagna pan (which is slightly deeper than a standard 9x13 pan) you could use it here. Every time I've made this, it is full TO THE TOP!

After this was baked, I realized there was no way we would eat all of it. We still had the big turkey dinner the next day. So I cut a large portion of ziti and put it into a 1-quart Pyrex dish and popped it into the freezer. Daddy-O will be glad I did when I'm away for a couple of nights during the coming weeks. He can have an easy hot meal. I'm thinking he will thaw it in the refrigerator, then heat it in the microwave.


Sunday, November 22, 2015

Being Thankful


For a long time, I kept a gratitude journal. Every night before I went to bed, I wrote down five things I was grateful for. Just a simple list of five things. Of course, I'm always thankful for God's love, family, friends, food and shelter, good health, etc. Writing those in my journal was easy.

But after a few days, I had written the obvious things. It got harder to find things to write down. It was my goal not repeat items on my list. How on earth could I find five different things every day for months and months? Then I started looking at my day differently. I began seeing the small things—things that were part of my daily existence, things that didn't always register in my brain.

I learned I was very thankful for the colors in the morning sky. For the smell of bacon frying. For warm socks. I was more than grateful for a refrigerator. And books. And the sound of leaves crunching under my feet. 

Pretty soon I was going through my day with more awareness, loving the hunt for something to add to my list. I would make a mental note of the "thankful things" all day long—a cup of hot tea, clean towels, silence—and I looked forward to those few minutes at bedtime when I could write them in my book. The smell of lemons and limes. A wild turkey walking across the road. Swinging.

On hard days, I would go back and look over my lists. New windshield wipers. Sharp scissors. Candlelight. There were pages and pages of my "five things." Southern voices. A thank you note in the mail. The person who picks up our trash every week. What a reminder of my many blessings. Crisp apples. Light that comes on with the flip of a switch. Purple yarn.

When you've lived long enough to reach the grandmother stage, you know that there are some days when it is not easy to be thankful. That is part of life. On those days, it is more important than ever to to find those "five things." Five small things. And to give thanks. Always give thanks.

~~~~~~~~~~

I am taking a Thanksgiving blog break. Family arrives tonight and my focus will be on keeping everyone fed, reading bedtimes stories, listening to grandchildren and keeping things out of Baby Girl's reach. I'll be back in about a week.


Saturday, November 21, 2015

Jack Be Nimble, Jack Be Quick


Pattern:  Sunny Baby Blanket
Yarn:  Berroco Comfort, Turquoise
Needles:  size 8

The two knits I've finished this week are both for new babies named Jack. What are the odds? Baby gifts comprise a sizable amount of my knitting. Sometimes the babies are new additions to our family. Sometimes the parents are dear friends. And sometimes I don't know the recipient at all. I've done many baby hats for Jessica's co-workers and for son-in-law's work mates and Mommy's friends. I have the cutest collection of baby photos from those office babies wearing hats I've knitted. So much fun!

The first baby Jack came a little early and was born on my birthday last week! (Remember? I gave his mom two-thirds of this blanket at her baby shower a few weeks ago.) His mother was at my house so much during her growing up years. She's like part of the family, so sharing a birthday with her baby Jack means a lot to me.


Pattern:  Kid's Fruit Hat by Ann Norling
Yarn: Debbie Bliss Baby Cashmerino, Silver
Needles:  size 6

The second baby Jack is one of the babies I don't know. But when the text came, "Will you make another hat? And put it in the mail for us?" I picked up the needles and cast on a little hat and just after lunch the following day, that hat was on its way to Florida.

I love making these baby things. But please, family and friends....no more babies until after Christmas!


Thursday, November 19, 2015

Deep South November


Thanksgiving is next week. And there is green grass in the pastures.


The azaleas are still in bloom.


There are a few daisies left in our front yard.


The roses have put on a few buds in the last several days.


The leaves have turned brown, but the cherry blossoms are hanging on.

Summer just doesn't want to give up. 


Wednesday, November 18, 2015

Make Mine Meatballs


I couldn't do it—I couldn't post a new recipe here before I had fully tested it. Or, at least one of my daughters had made it. Or, I had eaten the finished product. Last night I pulled a few meatballs from the freezer and made supper. I browned the frozen meatballs in the skillet. They stuck a little. Poured a partial jar of spaghetti sauce over it to finish cooking. Didn't watch that close enough and nearly burned it all. Moved it all to a non-stick skillet and added in some canned diced tomatoes w/garlic, basil, oregano and let this simmer, covered, until the meatballs were done. I checked them with a thermometer. Next time I'll start with a non-stick skillet.


I am going out on a limb here. I have made these meatballs and they are in the freezer. But I have not cooked them yet. I am trusting the many reviewers who have said they are very good. I am really trying to get a jump on my cooking—especially things that my non-red-meat-eating daughter can have. We will have the family here for Thanksgiving and again for Christmas. And I want to play with grandchildren then, not spend all my time in the kitchen.


This recipe came from Martha Stewart. If you check the recipe here, there are links to several ways to use these meatballs. One recipe calls for the meatballs to be cooked from the frozen state in a skillet. Another one cooks them under the broiler and doesn't mention being frozen. One reviewer said that they held together better after they had been frozen. I'm sure I will be using this recipe as a freezer recipe.

My own changes and hints? I doubled the recipe. If I was going to squish my hands in raw ground turkey, I might as well make enough at one time.  I used a little less pepper than the original recipe because the suggested amount just looked like a lot to me. Make that suit your family. I used green onions instead of scallions. That's what my store sells.

I think my meatballs might be a little bigger than they should be. I actually measured out the first one and tried to make the rest of them match. But I didn't get quite the yield that the recipe states. My double batch gave me 56 meatballs. (According to Martha's recipe, I should have had 70.)  Should you decide to triple this recipe like some of the reviewers did, you'll need a HUGE mixing bowl. The doubled recipe filled my biggest bowl.


From the lesson-learned-the-hard-way department (years ago—not this time,) use a pot holder to remove the baking sheets from your freezer. A frozen pan hurts your fingers almost as much as an oven burn.

This is a good recipe. But you need to remember that these meatballs are made with turkey and not ground beef. The texture is a little different. But I will make these again.

TURKEY MEATBALLS
    adapted from Martha Stewart

3 slices whole-wheat sandwich bread
1/4 cup whole milk
1-1/2 lbs. ground turkey (lean, dark meat)
3 green onions, finely chopped
2 small garlic cloves, minced (I used 2 tsp. from a jar)
2 tablespoons chopped parsley
1 large egg
coarse salt and pepper to taste

Place bread in food processor; pulse until fine crumbs form. In a small bowl, mix breadcrumbs with milk; set aside at least 5 minutes.

In a large bowl, combine turkey, green onions, garlic, parsley, egg, salt (1-1/2 tsp) and pepper (1/4 tsp) and breadcrumb mixture. Mix gently with a fork.

With your hands, form into meatballs (1 meatball = 2 level tablespoons). Arrange in a single layer on a baking sheet with sides. Line the baking sheet with parchment paper.

To freeze: place meatballs on baking sheet in freezer for 1 hour. Move meatballs to a ziplock freezer bag. Lable and date. Store frozen up to 3 months.

Makes about 30 meatballs.


I forget how old I am most of the time. But when I pulled out the food processor for this recipe, I saw that it didn't have a polarized plug—that's the kind with one prong wider than the other. You know, it only goes into the outlet in one direction. Bet some of you have never seen an appliance without one of those.


Tuesday, November 17, 2015

Soup In Seconds--900 Seconds To Be Exact

Tomato & Red Pepper Soup

You are going to need this recipe between now and Christmas. And then you'll need it after Christmas when you've used up all of your cooking mojo. Wish I had thought this recipe up, but I'll take credit for ripping a page out of Southern Living magazine—the page with this recipe.

When you can make two boo-boos in a super simple recipe and decide it's STILL very good, it's got to be a recipe worth keeping. I didn't realize I had left things out until after we had eaten it for supper. And it's done in 15 minutes. That is 900 seconds. Pretty speedy for homemade soup. Another reason to hang on to the recipe.

I saw this recipe, tore the page out and added it to my stack. I was saving it for a night when I needed a 'mergency meal. Little Sister knows about 'mergencies. I like the way she says it. Tonight wasn't an emergency, but I didn't feel like cooking a big supper. Sometimes we (honestly it's mostly me) like a soup and sandwich supper if we've had a bigger lunch.

When I typed the recipe here, I realized that I forgot to add the garlic. I did this in a big hurry. And then I saw that I didn't add the water. It was listed in the directions but not in the ingredient list. All that my mind absorbed was "process all ingredients." I wrote it into the recipe for next time. No more mistakes is the goal.

Well, you know what? It was delicious! Maybe I'll add garlic next time. Maybe not. It was pretty good like it was. And the water was only a quarter cup. Left as it was, it was a thick, creamy soup, much like you get in restaurants. I think restaurant soups are always on the thick side. You can add a little water to make the consistency suit you. Because of the roasted peppers, the soup has a more complex, mellow flavor than plain ol' tomato soup.

Homemade soup in 15 minutes. For real. I made grilled cheese sandwiches while the soup heated. Here's something I learned at the knitting retreat last week—brush the bread with olive oil instead of butter before grilling. That eliminates the need to soften the butter. Tastes really good, too.


TOMATO & RED PEPPER SOUP

1 (28-oz) can peeled, whole tomatoes with the juice
1 (12-oz) jar roasted red peppers, drained (my jar was 16-oz, so I used 3/4 of it)
1/4 cup half-and-half
1/4 cup water
1-1/2 teaspoon kosher salt (or, to taste)
1 teaspoon sugar
1/2 teaspoon freshly ground black pepper (or, to taste)
2 garlic cloves (which I totally forgot to add)

Process all ingredients in food processor or blender until smooth.
Pour into medium saucepan and cook over medium-high heat for about 8 minutes, stirring often, until hot. Serve immediately.

Serves 4-6


Monday, November 16, 2015

Back Down The Mountain


I had the opportunity and the privilege this past weekend to spend three days in the North Carolina mountains with women from across the South at the Carolina Fiber Frolic. It is a weekend retreat—a retreat from everyday cares and responsibilities. This particular retreat offered no classes. But I still learned much, coming home with many notes jotted down in my small notebook.

There were accomplished knitters and spinners of yarn. There were discussions of sheep breeds and knitting patterns. "What did you say the name of that pattern was?" "And there is a difference between UK fleeces and American fleeces?" There was laughter and conversation. "Oh, you don't live very far from me!" "OH NO!!! That really didn't happen, did it?!?"

There was lots of knitting—there was always knitting—on socks, sweaters, shawls and blankets. But the goal was not to come home with a finished project but to come home with new friends. And to come home rested and relaxed.

There were old friends I had met at other knitting retreats. And new friends waiting to be made. How wonderful to spend time together. Thanks to Instagram and text messages and email and Ravelry, it is easy to stay in touch.

Our meals were provided and so many times I heard someone say, "Isn't it wonderful to have a little time away from cooking, from laundry, from all the chores we'd be doing if we were at home?" There was plenty of time to sit by a fire (there was more than one fireplace) and just BE.

This morning, I AM back at home—with the laundry and cleaning and cooking all waiting for me. But I am back, refreshed in body and refreshed in spirit.


Friday, November 13, 2015

Cook It Easy, Cook It Slow


For the next couple of weeks I am trying to cook things for the freezer. Things so that we can have quick and easy meals when it gets hectic during the holiday weeks. I know there will be extra activities and maybe a trip or two to see the grandchildren perform in their Christmas concerts.

I have made this barbecue before. It's one of the easiest recipes ever. Just put everything into the slow cooker and turn it on. When I saw boneless pork butt roasts were on sale this week, I decided it was time to make this again. This time I used a jar of Bone Suckin' Sauce. That's a barbecue sauce. I know I bought it for a specific recipe—but I couldn't for the life of me remember what that recipe was. So I used the sauce here. It was great.

We had sandwiches for supper last night. I left enough out for Daddy-O to eat again while I'm away. And I put a couple of bags in the freezer for later. Did you see the "Holiday Freezer List" on the sidebar? I'm using it to keep track of what I put in the freezer in the coming weeks. Do you have an freezer favorites that you'd share? I'm always on the lookout for good new freezer recipes.


PULLED PORK BBQ

3-4 lb pork roast
2 large onions
1 cup ginger ale
1 (18-oz) bottle BBQ sauce
extra barbecue sauce for serving 

Slice one onion and place in crockpot. Remove the strings or net from roast and trim fat if necessarly.  Place roast on onion layer. Top with the other sliced onion. Pour the ginger ale and barbecue sauce over. Cover and cook on LOW for 8-10 hours.

Remove meat and onions from pot to a large pan*. With two forks, shred the meat, discarding any remaining fat.  Discard excess cooking liquid.

Serve with extra sauce.

*This time I just dipped out most of the cooking liquid and shredded the meat right in the crockpot. One less pan to wash.


Thursday, November 12, 2015

Starting The Sourdough

Sourdough Bread

It's time. Thanksgiving is in two weeks. I know. I'm surprised, too. I am surprised every year. It's like "how did November get here so fast?" Are you thinking the same thing?

For years and years—since before I was married—I've taken homemade bread to the family Thanksgiving dinner. After nearly 40 years of providing the bread, my cousins would all be in shock if I didn't bring it. I have used a few different recipes over the years, but mostly it's this sourdough bread that people look for. I even take a few extra loaves for the cousins who love it most. They get to take some home.

It takes a few days to get the starter going, so this morning I mixed it up and set it on the counter to do its thing. While I was mixing, I snapped a few photos of things I've found helpful over the years.


For this recipe that I've done so many times, I had my copy laminated about 20 years ago. I can wipe it off when I spill something on it. You'd think I would know the recipe by heart. And by Christmas, I will. But then when the bread baking slacks off, and then stops after the holidays, I have forgotten it by the next year.


You need to keep your starter in a glass or plastic bowl. I use a large Cool Whip bowl and cut slits in the lid to let it breath. The Cool Whip containers have a flexible plastic lid that is easy to cut. You can see that I used a Sharpie and wrote the "feed the starter" ingredients on the lid to make that easy.


This starter is fed with instant potato flakes. To make measuring easy, I pour the flakes into a container that makes it easy to scoop and measure. Measuring out of that opening in the top of the box is hard. I even keep a measuring spoon (a measuring tablespoon left over from an old set) in the canister.


A couple of years ago, I figured out that I could bag up the feeder mix in snack size bags. Then I can just dump in the starter, add water and stir. Yes, around Christmas things can get so crazy that I don't have time to measure two things. Jessica usually takes a bowl of starter back to the city and she will bake bread between Thanksgiving and Christmas. For her, having the bags of the feeding mix is quick and easy.


If you don't have measuring cups with a 2/3 and a 3/4 cup in the set, you might add that to your Christmas wish list. I love having those extra cups. These are from Tupperware. They still sell them but they look a little different now. There are other ones out there, too. I came of age during the era of Tupperware parties. Just discovered that you can order these cups from Amazon, too.


Last thing I did this morning was to add a note to the lid—a reminder to add the yeast on Monday. I am leaving nothing to memory.

I should be able to bake bread by the middle of next week. This bread freezes beautifully. I like to take it freshly baked on Thanksgiving, but I'll put some in the freezer before that. Insurance.

One year, my starter was bad and I had to throw it out and start over. This year I have barely allowed enough time to make a second batch. In over 30 years of doing this, that only happened that one time. At one point in our lives, I kept the starter going for five years. Now, I tend to make bread during the holidays and during the winter. Then I stop and start over the next fall. With just two of us here, we don't need that much bread!

If you start now, you have time to do this for Thanksgiving. The directions for making the starter are at the bottom of the recipe.

SOURDOUGH BREAD

1 cup starter
1/4 cup sugar
1/4 cup oil
1-1/2 teaspoon salt
1-1/2 cups warm water
6 or more cups bread flour (use the extra to flour the surface for kneading) 

Mix the bread ingredients. (I use a wire whisk to mix in the first 3 cups, then use a sturdy spoon for the rest.) Place in a large bowl, sprayed with PAM. Lightly spray the dough with PAM. Cover with plastic wrap. Let stand and rise at least 8 hours.

Punch down dough. Knead on floured board about 10 times. Divide into 3 parts. Spray three 8-inch loaf pans with PAM. Shape dough and place in pans. Cover loosely with plastic wrap. Let stand and rise until pans are full, about 5 to 6 hours.

Bake at 350 degrees for 30-40 minutes, or until brown and bottom of loaf sounds hollow when tapped. Cool on a wire rack.

Whole wheat bread: Use 2 cups whole wheat flour and 4 cups bread flour.

To feed starter: Remove 1 cup for baking (or discard) and feed with 1/3 cup sugar, 3 tbsp. instant potato flakes and 1 cup warm water. Mix well and let stand 8-12 hours. Then refrigerate. Store in plastic container with slits cut in lid. Feed every 3-7 days.

To make starter:  Double the feeding recipe. Put in a glass or plastic container, loosely covered. Let set out on counter for 4 days. Then add 1 envelope dry yeast. Let stand another 24 hours. Use 1 cup for first batch of bread or store in refrigerator for up to 7 days.

This bread freezes beautifully. It makes a great gift.


Just so you know–the photo at the top was bread I baked last year.