Monday, April 29, 2019

Be An Honest Knitter


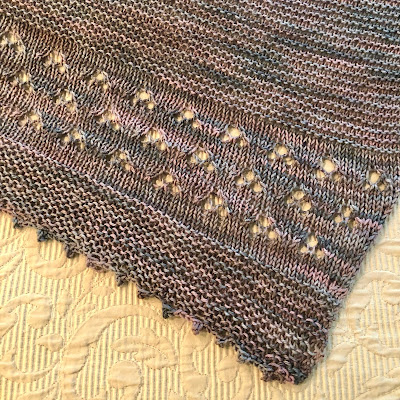
Pattern:  Rewinding Shawl, by Helen Stewart
Yarn:  Cascade Heritage Paints, Woodland color way
Needles:  size 7

If my mental abilities are to be determined by the number of knitting mistakes I make, I might be in trouble. I started this pattern (Rewilding by Helen Stewart) a few weeks ago. Picked out some yarn I'd held on to for way too long. (It had tried to be another of Helen's patterns a couple of years ago, but that didn't work out.) It was a simple pattern that I thought I'd whip up in a hurry.


Then the sinus/respiratory/allergy mess started. At least I'm blaming all the mistakes I made in a very simple pattern on that. The illness and the meds.


It was only "knit...knit...knit...increase" at the end of the row. Except on every 4th row, you didn't increase. But more than once I forgot to knit a plain row. Understand that it's the kind of pattern where I could have "adjusted" and kept going. I was in no hurry to finish this since the colors scream autumn. So I chose to undo and redo. Because I'm like that.

Waiting on the tassels, then this pattern will be complete..

There are two schools of thought on knitting mistakes. 
  1. "Don't worry. Keep going. No one will notice when you are wearing it." And that's totally valid. Just don't point out your mistakes to everyone who looks at it.
  2. "This is going to bother me forever, even if no one else sees it." And that's okay, too. If you are a #2 knitter, just go with it and fix it. 

But I am #3 knitter. I know WHICH mistakes will bug the bejeezus out of me. So I will fix those. But there are other mistakes I can ignore or adjust and keep going.

Be honest about which kind of knitter you are. Because if you are in the #2 school, the faster you stop and pull out the knitting and reknit, the quicker you will get to the end. I have spent way to much time trying to talk myself into "I don't think that will bother me. It will be okay" when I knew deep down that I would never ever be happy with it. 

This entire thought process started when I did spy a missing "hole" (more accurately a NO hole) in the lace pattern. That's a mistake I couldn't live with. I thought I could do a quick fix. I'm a really good knit doctor. And if I had seen my mistake sooner, I could have done a little correction. But by the time I noticed that blasted "hole", there was no easy fix. Believe me, I tried. I thought it would take too long to rip back. And goodness...the time I lost while I was trying to save time!

In the end, I pulled out inches and inches, carefully winding up the kinky yarn as I went. I pulled out stitches until I could find a good place to start the pattern again. And soon I was back on track. The lace pattern is perfect now. I am so glad I bit the bullet and pulled all of that out. I just wish I had done so sooner.


Friday, April 26, 2019

Music Makers Dinner

Carol's Marinated Veggies

A few weeks ago, I was invited to a friend's house to sit in with a jam. It's a monthly jam session of all women who play old time music. I don't play old time music, but it sounded like fun. And I know how to listen and follow chords changes. And I know not to play too loudly when I don't know the music. Jam sessions are all about good manners. I told her I'd love to come.


I asked my friend to remind me when the time came. So she sent me three numbered reminders as the days counted down. It's been busy around here and those multiple reminders were appreciated. The day before the jam I got the final reminder. And I told her I planned to be there and asked if I should bring anything. She told me it was pot luck but not to worry. There was always plenty of food.


Now, it's not in my DNA to show up empty handed. I had just cooked a meal for my Monday night friends so I wanted something quick and easy to make for this musical gathering. Plus, my friend is vegan and I wanted something she could eat. Then I remembered a marinated vegetable salad that another friend is famous for. Quick to stir together. Vegan. (I think.) And it pretty much goes with anything. 

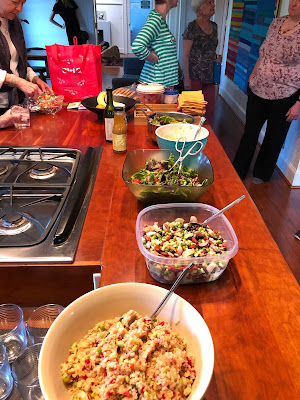
I had no clue what kind of food these musicians would bring. It turns out it was an all salad night. My bowl of colorful veggies sat proudly in the lineup that included tabouli, chickpea salad, mixed greens and a delicious turnip salad. Turnips stood in for potatoes to make a low-carb salad.


After sharing a meal, we settled in for a night of music making. It's been quite a while since I have played like this. I was happy that I could keep up with these lively tunes. There was also a little singing. And a lot of fun. 

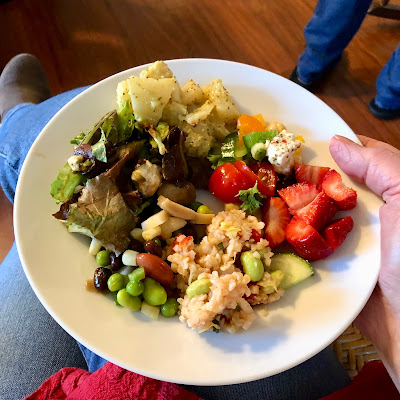
My dinner of assorted salads.

The last time I made this salad, I remember thinking maybe I could use less sugar in the marinade. I know I love how Carol makes it, so I texted her to ask if she used the 3/4 cup of sugar in the marinade. That's what the recipe called for. I told her that I think hers is always better than mine. Here is her reply:
Sometimes I do and sometimes I don’t. I don’t stick to recipes very well. I do drain and rinse all canned veggies. Use dark red kidney beans. Have been using small butter beans lately instead of edamame beans. Sometimes use canned corn.  I’m sure yours is just as good, though.
Daddy-O asked to taste this as I was packing up to leave. "You can make this for us anytime." Luckily for him, I brought back leftovers. 

CAROL'S MARINATED VEGGIES

1 (15.5 oz.) can light red kidney beans
1 (15.5 oz.) can black beans
1 (6.5 oz.) can mushroom stems & pieces
1 (8 oz.) can sliced water chestnuts (I cut into smaller pieces)
1 (2 oz. ) jar diced pimento
frozen white corn (amount about equal to the kidney beans)
frozen green peas (amount about equal to the kidney beans)
1 bag frozen shelled edamame beans, cooked according to package directions
1 rib celery, finely chopped, optional (I used this)

1/4 cup canola oil
1/2 cup apple cider vinegar
1/2  to 3/4 cup sugar (I used 1/2 cup)
1/2 teaspoon salt

Drain and rinse canned vegetables. Cook and cool edamame beans. In a large bowl, mix drained beans, pimento, mushrooms, and water chestnuts. 

Combine oil, vinegar, sugar and salt in a small saucepan and bring to a boil. When cool, pour over vegetables and refrigerate. Vegetables will keep in refrigerator for up to two weeks.


Yes, you add the corn and peas frozen. No cooking. I did cut the slices of water chestnuts into smaller pieces. I'm sure if there is something that you don't like here, you can leave it out


Wednesday, April 24, 2019

Girls Night Out

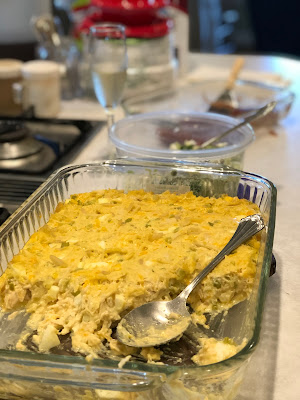
Hot Chicken Salad

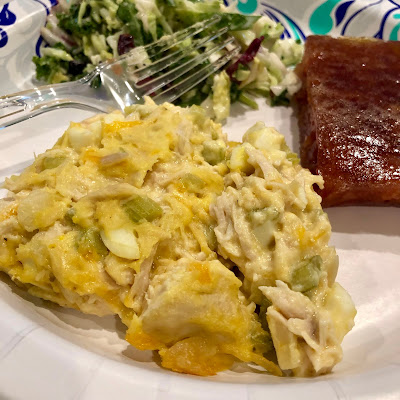
It was my turn to take dinner to book club this week. I chose a recipe I've used many times for luncheons, but I had not made it in years. There are many variations on hot chicken salad—all good—but this is the one I always use. I cooked the chicken and the eggs (in the Instant Pot) the night before. I had the celery scrubbed and ready to chop. Then the next afternoon, it was quite simple to stir it together.

I think I might have told the girls that I would make something healthy for this week. Well. I left off the sour cream muffins that I usually serve with this hot salad. That counts for something, doesn't it? Here is the luncheon menu my mother and I used many times...Hot Chicken Salad, Cranberry Frosty Salad, *Roasted Asparagus, and Sour Cream Muffins.


I made a double recipe this time so that I would have plenty for the girls and some to leave some for Daddy-O's supper. I put three-fourths of the double recipe in a 9x13-inch baking dish. And then I filled a small 1-qt. baking dish to leave at home.

HOT CHICKEN SALAD

 2-3 cups cut up cooked chicken
1 cup chopped celery
2 tablespoons minced onion
1 can condensed cream of chicken soup, undiluted
1/2 cup mayonnaise
2 hard cooked eggs, chopped
1/2 cup chopped nuts, such as almonds or pecans (optional)
1/2 cup grated cheddar cheese
salt & pepper to taste

Mix all ingredients. Put into an oblong 2-qt baking dish. (Spray with PAM for easy clean up.)
Bake at 350º for 30 minutes, or until bubbly around the edges.


I was surprised that several of the ladies in our group had never had hot chicken salad of any kind. This was a recipe from my kitchen archives and I thought it was pretty common years ago. I did take a few minutes yesterday to do a Google search for other hot chicken salad recipes. Sour cream instead of cream soup. Mayonnaise only. Crumb topping or not. Now I want to try some of the others


*ROASTED ASPARAGUS

1 bunch of asparagus, washed and tough ends trimmed off
olive oil
House Seasoning (or salt & pepper)

Lay asparagus spears in a single layer on a baking sheet. Drizzle with olive oil. (I use my hands and roll the spears around to coat with oil.) Sprinkle with house seasoning. Roast in hot oven (400-425 degrees) for 18-20 minutes, or until beginning to brown. 


Monday, April 22, 2019

Call It By Another Name If You Need To

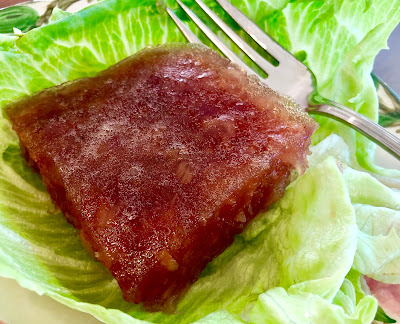
Cranberry Frosty Salad

It's possible that you need to be over 60 to like a congealed salad. (If you aren't familiar with the term, congealed salad is a mixture of Jello and fruit and likely other ingredients.) I'm sure what the actual cut-off age is, but I cannot think of one person the age of my grown children who would want to eat it. They not only won't eat it, but they will tell you in no uncertain terms what they think of the concept. They do not hold back when telling you what they think. Let's just leave it at they are not in favor of them.

When I grew up, there was one on every Sunday dinner table. From the classy tomato aspic to the simplest orange jello with canned fruit cocktail stirred in. There was something for everyone. There are the fancier salads with pretzel crusts and some folks love concoctions of lime jello, cream cheese, crushed pineapple and nuts. Variations of congealed salads include ones that mix dry jello, cottage cheese, Cool Whip and fruit, plus the fruit/cream cheese mixtures that are served frozen. Confession...I like them all. I must be the right age.

And molded Jello salads. Do they still exist? I gave away all of my Tupperware salad molds—a large ring mold and a set of individual molds—a long time ago. When and if I make a congealed salad now, it goes into an oblong dish where it can be cut into squares for serving. If you've never had congealed salad, you need to know that it is served as a side dish, like macaroni and cheese or rice and gravy. Side dishes that are not vegetables. I saw banana pudding listed as a side on a menu this week. It's a southern thing.  

I'll admit that writing this down, I might understand why millennials don't crave these. Maybe it's the word "congealed." But I still like a good gelatin salad. (Yes. There ARE many good ones.) They still show up on every church covered dish dinner in a rainbow of colors. At least they do here in the South.

Will congealed salads ever make a come back? Most things do at some point. Maybe the salads will have a new name. If that happens. and you don't have a recipe of your own, try this one. Or, check out old church or community cookbooks. (They are more fun than Google.) I looked at a few of mine today. All are filled with congealed salad recipes. And all of those cookbooks are 40-50 years old. 

Even though I do like a congealed salad, I rarely make them. But this particular recipe pairs so well with my Hot Chicken Salad that I'm serving tonight for book club, that I needed to make it. This is like a dressed up cranberry sauce. And all of us are of a proper age to eat it. I'll share the chicken salad recipe later this week.


I usually leave off the "frosty" part when I make this. It's delicious, but it's nearly a dessert when served with the topping. Plus, without the topping, it's only four ingredients. How easy is that? But I will say that it's prettier with the topping. So it's your choice.

CRANBERRY FROSTY SALAD

1 (14-oz) can crushed pineapple
2 (3-oz) boxes lemon jello
1 cup ginger ale
1 (14-oz) can jellied cranberry sauce

1 (8-oz) block cream cheese, softened
1 (2-oz) package dessert topping mix, such as Dream Whip
1/2 cup chopped pecans

Drain pineapple, reserving juice. Add water to juice to make 1 cup. Heat until juice/water mix is boiling. Dissolve jello in hot liquid. Cool. Gently stir in ginger ale. Chill until partially set.
Meanwhile, blend drained pineapple and cranberry sauce. Fold into partially set jello mixture. Pour into 9x9x2-inch dish. Or, you can use a 2-qt oblong dish. Chill until firm.

Prepare dessert topping according to package directions. Fold in cream cheese. Spread over firm jello mixture. Toast pecans in 1 tablespoon butter in 350º oven for about 10 minutes. (Watch carefully! Don't burn!) Sprinkle cooled nuts over salad. Chill.


This salad is in my little red plaid handwritten cookbook that I started using in the early 1970s. It's near the beginning of the book, so I'm guessing I added it soon after I got the book. Since then, ingredients have changed a little. Today I couldn't find crushed pineapple in syrup. I never buy it anymore. Maybe no one else does either. So I changed the recipe to use pineapple in juice. And canned cranberry sauce? It's now comes in a 14-oz can, not 16-oz. (I'm pretty sure you can still buy Dream Whip.) I've rewritten the recipe to match the current products.

So many recipes I have used and loved call for packaged or canned ingredients that either no longer exist, or the sizes have changed substantially. To me it's a sign that we really should focus on real ingredients. An onion is an onion forever. Like flour, sugar, vegetables, fruits, nuts. The recipes that call for those won't change unless we want them to. Just a thought.


Friday, April 19, 2019

Dinner Was Possible, Thanks To The Impossible Pie


Impossible Taco Pie

Have you ever played that game of "how long can I skip going to the grocery store?" I didn't plan to play this game, but Monday when I meant to go grocery shopping I didn't get there. And Tuesday I was going early but Daddy-O had other plans, so I thought, "One more day won't matter." I found a container of Swiss beef in the freezer and made cheese grits to put with that.

By Wednesday my sinus woes had kicked up again and I didn't feel like cooking. I still had to go to handbell practice so I picked up something from a drive-thru on the way home. When we wished for something sweet and there was no ice cream in the freezer, I made a deep dive in the pantry and found a box of chocolate pudding. I haven't made pudding in ages. But the date was still good and I used the microwave directions on the box and we had dessert.

By last night when I didn't get home until suppertime, I was having to look harder for something to make. I found taco meat in the freezer but couldn't find any tacos shells. Well, other than an opened package that I know had been there far too long. No tortillas, either. But while I was in the pantry, I spied a box of Bisquick that was near the end of its shelf life. It needed to be used. And I remembered I could do the "impossible."  I also had a couple of romaine leaves in the fridge, a packet of taco sauce left from a taco kit and a few "if you don't use these right now, they need to go in the trash" tomatoes. Ta da, supper!

My impossible pie isn't exactly like the one you find if you google "impossibly easy taco pie." I looked up Impossible Cheeseburger Pie here on my blog and adjusted the filling to use what I had here. I liked the corn and beans mixed into this. Because I had the taco meat already prepared in the freezer, this was a really quick dinner last night.

IMPOSSIBLY EASY TACO PIE

1 lb. lean ground beef or ground turkey 

1 packet taco seasoningsmall onion, chopped (1/2 cup)
1/3 cup black beans
1/3 cup corn1 cup shredded Monterey Jack cheese (or other kind)
1/2 cup original Bisquick mix
1 cup milk
2 eggs
optional toppings: sour cream, shredded lettuce, chopped tomatoes, taco sauce

Heat oven to 400 degrees. Spray a 9-inch glass pie plate with PAM.

In a large skillet, cook ground beef over medium heat until brown, breaking meat apart as you cook it. Prepare taco meat according to directions on taco seasoning packet. Spread in pie plate. Sprinkle with onion, black beans and corn. Sprinkle with cheese.

In a small bowl, stir milk, egg and Bisquick with a fork or whisk until blended. (I used an immersion blender in a tall container.) Pour into pie plate over meat and cheese. Bake about 25-30 minutes, or until golden brown and knife inserted in center comes and clean. Let it stand for about 10-15 minutes before cutting.


These impossible pies can be a life saver. I've used all kinds of fillings, usually leftovers, and assorted cheeses for the topping. But the Bisquick mix stays the same. Google "impossibly easy pies" to find

My refrigerator is basically empty now. Except for milk and eggs and cheese. Today will be a good time to wipe it all out. As I searched the pantry I threw out some expired items. It's good to take a few days and play this "no shopping game" every so often. Our freezer still has a few choices in it but it was good to eat some of the food that had been there the longest. Frozen cooked food doesn't become unsafe if it stays frozen a long time, but the quality will decrease. Find a way to keep up with and use what you have frozen.

Could I play this game longer? Sure. We might not be eating what we want, but I could still make dinner. But I can't avoid the store much long. I'm running out of paper products. 


Monday, April 15, 2019

The Spartans

Starting line

What a fun weekend! Our son-in-law had the thought, way back around Thanksgiving, that it might be fun to run the Spartan race in the spring. So he and Jessica signed up and invited Big Sister and her boyfriend, both high school seniors, to join them. And as we sat around the kitchen table, Jessica said, "Mom, y'all ought to come watch us." And right that minute I made reservations for us to go for that weekend.


And then we all forgot about it. Until suddenly THE weekend was upon us. All of us were thinking, "Now whose idea was this?" "Why are we doing this?" But it turned out to be a great weekend. I had never heard of the Spartan Races. But these events are held in different locations around the globe and there are people who do many of them. The folks in the red headbands were the serious competitors, most of whom had completed the course before the black headband competitors (like our family) had even begun.

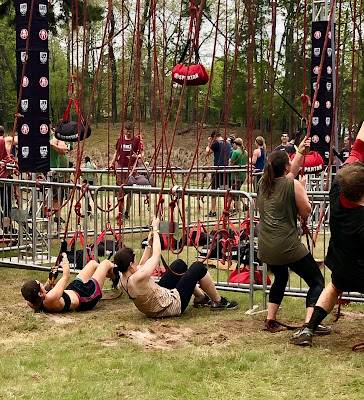
This course was 3+ miles with 22 obstacles. Every fifteen minutes, from early morning to mid-afternoon, a large group of racers started the course. As spectators and cheerleaders, we could only see a few of the obstacles. The really muddy ones were not accessible to us. And as a mother/grandmother, it's probably just as well I couldn't see everything they were doing.

Ring that bell!

We found a spot to watch and waited for our spartans to get to these obstacles. These were near the end of the course so everyone was getting tired by this point. We saw people of all ages, all shapes and sizes and in nearly every state of fitness taking part. Some zipped through this part. Others struggled mightily. If you were not able to complete an obstacle, there was a "make up" option to do instead.


It was fun to watch as people tried and tried. Competitors cheered each other on. And we saw some instruction happening, too. The experienced people helped the first timers. The next day Little Sister asked us, "Who won?" This wasn't that kind of event.


This event is about struggling and pushing yourself. It's about not giving up when it gets hard. It's about having fun while being challenged. It is a way to learn about yourself and what you are made of.


I loved that it was such a positive, affirmative event. We live in a world filled with so much negative news, but on this day all we heard was "You can do it!" "Good try!" "You're almost there. Keep going!" "Just one more pull!" It was easy to get caught up in the spirit and we cheered for people we didn't know. We wanted them to succeed. Huge crowd cheers would go up when someone achieved the almost impossible. I am so glad that we went and watched. We spent a day outside in a beautiful location on a day with perfect weather.


A few hours after the starting bell rang, our family made it to the end. With blisters, bruises, sore muscles and huge sense of accomplishment. The challenge was met. No one gave up. There are no quitters in our family.

No participation awards here.
You must complete the course to receive the medal.


Friday, April 12, 2019

Lemon Bundt Cake

Lemon Bundt Cake

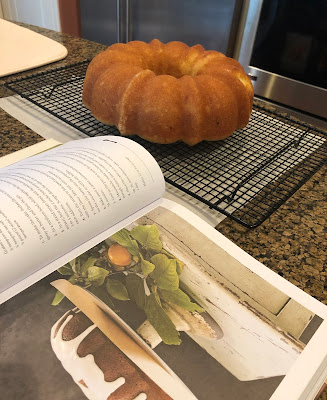
If you need a dessert for this weekend, here is an easy cake from a new cookbook. When we went down for Baby Girl's birthday party, I flipped through a cookbook that Mommy was giving to Jessica for HER birthday. (Baby Girl's party was held on her aunt's actual birthday.) It looked like a good one and I said I thought I'd pick one up for myself at the bookstore before we left town. Fast forward a few days and I found myself babysitting a sick child for the rest of that week. I never got to the bookstore.


I was greatly surprised to receive a package in the mail a couple of days after I got home from the intensive babysitting. Mommy had sent this to me as a "thank you for rescuing us" gift. I have the most thoughtful daughter. If you still buy cookbooks, this is a good one. Recipes are family friendly. Real food for real people. (Jessica has already tried several of the recipes.) I think the recipes are very well written.


A few days after that, Jessica came home for the weekend. By then I was in full blown sick mode, spending my days curled up under a blanket. So to entertain herself, she baked a cake from the new cookbook. She had already looked through hers and picked this recipe out. And I had all the ingredients on hand. She cautioned, "Be careful not to over bake this one." She thought she could have backed off the baking time a couple of minutes. But, like the banana bread that we love, the moistness improved after a day or two. 

My banana bread recipe says to let the loaf "ripen" overnight before you slice it. And I know my pound cake is like that, too. It's better if I make it a day or two ahead. I do not know the science behind this, but I know these baked goods do improve after resting. The big plus is these make great recipes when a make-ahead dessert is needed. 


I have made similar recipes using a cake mix. Homemade is better. And truly not much harder. That gorgeous glaze in the photo? Jessica's glaze was much thinner. Still delicious, but it didn't look like the book picture.

LEMON BUNDT CAKE

3 cups all-purpose flour
grated zest of 2 lemons
1/2 teaspoon baking soda
1/2 teaspoon salt
2 sticks (1/2 lb) unsalted butter, softened
2 cups sugar
4 large eggs
1 cup buttermilk

Lemon Glaze
1 cup powdered sugar, sifted
1 to 2 tablespoons fresh lemon juice (more if needed)

Preheat oven to 350º. Spray 12-cup bundt pan with baking spray.

In a medium bowl, whisk together flour, lemon zest, baking soda and salt. Set aside. With mixer, cream butter and sugar together until light and fluffy about 3-5 minutes. Add eggs one at a time, beating well after each addition. With mixer on LOW, alternately add flour and buttermilk, beginning and ending with the flour mixture. Mix until just incorporated.

Spoon batter into greased bundt pan. Drop pan lightly on countertop to remove any bubbles.
Bake about 50-55 minutes, until toothpick in cake comes out clean. (Start with lesser time. Check and bake more if needed.)

Cool in pan, on rack for 20 minutes. Turn out onto rack and cool completely. While cake is cooling, make glaze. Whisk lemon juice into powdered sugar, adding more juice as needed to make a soft glaze. Place cake on serving plate and drizzle glaze over it,


As I said, this was even better on the second day. Thanks to Jessica for baking us a treat while she was home. And now, bless her heart, she is the one home with the same crud that we have all had. Summer cannot come too soon if it means a break in this pass-the-germs-around game we seem to be playing!


Wednesday, April 10, 2019

Creeping Back To Normal

Instant Pot Spaghetti

After a couple of weeks of passing germs around, being the caregiver, being the patient, I'm beginning to see daylight. Still not back to full speed, but I'm getting there. I did cook the easiest supper last night (after I woke up from a nap) and I'll share the recipe down below.


On Monday night I got together with my friends again to see the end—they all lived happily ever after—of the TV series we've been watching. We've taken turns providing supper. This week was a surprise. Açaí bowls!


Joanne brought a blender and frozen packets of the super berries and bowls she had stashed in the freezer. And the others brought assorted toppings. It was fun to have a make-your-own session. Thinking maybe all the fruit and super food helped me kick the last of the icky stuff I've had.

And now to the spaghetti recipe. I knew I had to do something for supper last night. If there had been a reasonable something to pick up in the city and bring home I would have done it. Daddy-O said we could go out if I didn't want to cook. But he had a meeting right at supper time. So I figured spaghetti was the easiest thing I could make at home. By the time I got home, I had used up my energy for the day, so I looked for a one-pot way to make spaghetti so I wouldn't have to dirty up so many pots. I wanted a streamlined dinner.

The recipe that looked the most promising was done in the Instant Pot. I've done pasta in it before with so-so results. These directions...not the ingredients...were enough different that I wanted to try again. Please, please, PLEASE go to the A Pinch of Healthy blog and read her post about how she makes it. She has lots of photos, answers questions and tells you exactly how to do it.

But I'm putting the basic directions here so that I can find this recipe. I've said before this blog is like my own recipe box. This was like comfort food spaghetti. I think it would be very kid friendly. Using the Instant Pot made for really easy clean up. Another big plus.

INSTANT POT SPAGHETTI

1 lb. box spaghetti, uncooked (regular spaghetti, not angel hair)
1 lb. extra lean ground beef
1/2 teaspoon House Seasoning (or salt & pepper)
4-1/3 cups water
24-oz jar marinara sauce (I used Rao's)
parmesan, for topping

Turn Instant Pot on to Sauté. When pot is hot, add ground beef and House Seasoning and brown meat. When brown, remove meat and drain. Pour any excess liquid out of pot. Set meat aside.

Pour water into pot. (No need to clean anything out.) Break spaghetti in half and lay crisscross into pot. (Do this in 3 handfuls, alternating direction you put spaghetti in pot.) Use spoon and press noodles into water to make sure they all get wet. Don't stir. If some float, that's okay,

Put cooked beef on top of noodles. Don't stir. Pour jar of sauce over meat. Don't stir.

Put lid on. Use Manual and set to High Pressure for 4 minutes, closing vent. When time is up, NPR (natural pressure release) for 5 minutes. Then release remaining pressure. Remove lid and use tongs to stir noodles and sauce. Pick apart any stuck noodles. Let sit for a few minutes to thicken sauce. Serve with a little parmesan sprinkled on top.


Again, go see the whole process on A Pinch Of Healthy. I found that so helpful. NOW...let me tell you my one change from her recipe. I only had thin spaghetti here. I had two brands, so I looked to see if maybe one cooked longer than the other. And yes, the Ronzi took a little longer to cook than the Barilla. I figured that was a closer match to regular spaghetti. So I used that one and shortened the NPR time. When I do this again I might even shave another minute off the NPR. This was definitely acceptable, but it was more done than I usually cook pasta. And I will take the inner pot out of the cooker when it's done, so it won't keep cooking.

Using the Instant Pot just takes practice. And having the confidence to make some common sense adjustments. And then just do it. I'm getting better at it!

~~~~~~~~~~~~~~~~~~~~~

I always keep a jar of house seasoning on the shelf. Sometimes I make a big batch. Most times I make it in this smaller proportion.

 *House Seasoning:  
1/4 cup salt 
1 tbsp. black pepper
1 tbsp. garlic powder

Mix well. Store in an air-tight container, such as an empty spice bottle or small jar. 


This morning's sunrise.


Monday, April 8, 2019

The Week That Wasn't

Kale Sausage Soup

Remember when I said that I hoped "love" would keep me from catching Baby Girl's germs when I stayed with her when she was sick? Well, that was wishful thinking. Last week was a miserable one, mostly coughing and hacking and sniffing. When I'm sick enough to cancel my hair cut appointment and make one with the doctor instead, it's a pretty serious.

When I sent a text to my dinner/TV night friends that I wasn't coming last Monday, they also knew I was really sick. We were almost at the end of 800 Words. Missing in the middle is bad enough, but missing the end of a series is awful. All those weeks of keeping up. Will George end up with Katie or Fiona? Will Ike complete his spiritual quest? What will happen between Arlo and Linsday and Poppy? I'll get to see the very last episode tonight. I'll fill in the gaps later.

I got a text from one of those friends saying, "Just made soup. Planning to bring you a quart." Bringing me soup was wonderful. Driving the distance to where I live was even more wonderful. Her soup was loaded with healthy things. It was good to just heat up a bowl when I was hungry.

And then the next text came. "I'm dropping off dinner for y'all. You don't even have to answer the doorbell. I'll leave it at the door." I don't blame her. I wouldn't want to breath near me either. I did have a quick chat when she came. But she kept her distance. She delivered an oven-ready casserole, salad and dessert.

Another friend did a dinner on short notice the night I missed. It was my turn to provide supper. And that surely didn't happen. All these friends. They were like the rescue rangers last week. Counting my blessings.


Before I got sick—and I was really convinced that I would not catch a thing when I stayed at their house—plans had been made for the little girls to stay here for a few days of their spring break so Mommy and J-Daddy could have a get-away. They ended up not going as far as they might have. But we did keep the girls. With the understanding that there would be more TV than usual. I could sit still while they sat still.


And we had a good time. They are big enough to tend to themselves. Sort of. They know where the dress-up box is. They put on shows and dance performances. They stayed outside on wheels as much as possible. And we re-discovered The Magic School Bus on Netflix. (Ms. Frizzle is voiced by Lily Tomlin.) Jessica suggested this one. Turns out Little Sister sees it sometimes at school. Baby Girl had never seen it but she said, "I love this. And I'm learning. I didn't know a rotten log had so much interesting things in it." 

We also took magic bus trips though the digestive system. And the blood vessels. And made a trip around the solar system. I was as interested as they were. Especially when they looked at how the body fights infection. I think that magic bus could have been inside ME!

We may have sent home some wild children because we didn't stick to our usual schedule. But they didn't go hungry. They went to bed clean. Their teeth were brushed. And there were only minor injuries. (Scraped knee. Pinched finger.) It actually was a good several days.

I asked Linda if I could share her soup recipe here. That was a sneaky way for me to get the recipe. Linda sent a photo of the recipe card. The original handwritten recipe had a name in the "from the kitchen of..." line, followed by "adapted by..." with ingredients crossed out and changed. Then Linda told about the changes they have made to that recipe. This version is what she brought me. Remember, it's SOUP. You can adjust it to suit your kitchen.

KALE SAUSAGE SOUP

5 links sweet Italian sausage
3/4 cups chopped onion
2-4 medium potatoes, large dice
1-1/2 teaspoon minced garlic
8 cups roughly chopped kale
2 cans navy beans, drained & rinsed
2 quarts chicken broth, plus more if needed

Cook sausage in Dutch oven until done. Remove sausage and drain excess grease. Slice sausage lengthwise, then chop into 1/2-inch pieces. Add onion to Dutch oven and cook until soft, about 10 minutes. Add garlic and cook until fragrant, about 30 seconds.

Add chicken broth, and potatoes and kale. Simmer until potatoes are fork tender, about 20 minutes. Add sausage and beans and simmer another 10 minutes.

This recipe freezes well.


Monday, April 1, 2019

Mimi's Joy


One of the great joys of grandmothering is seeing your grandchildren share your interests. When they love what I love, it makes my heart full. We've cooked and baked together since they were big enough to peep over the kitchen counter. But as they grow and their world expands, we have even more things to share.


I started taking piano lessons just before I started first grade, so I've been playing a long time. But truly nothing has been any more fun than playing duets with Little Sister. We are now playing a rockin' bluesy version of Give Me That Ol' Time Religion. When I happen to be at their house on a piano lesson day, I love listening to her teacher. If my teacher had used the methods that this gifted teachers does, I would be a better pianist now. Little Sister has taken to playing  piano like a duck takes to water. Combine that with an excellent teacher and she will go far.


One of the birthday gifts I gave to Baby Girl was a knitting spool. When I was a child I used a homemade version (wooden thread spool with four finishing nails tapped into the top) and made a few things with it.


I know I was older than this little one when I worked with a knitting spool, but she has asked to knit so many times that I thought maybe she could do this. Boy, did she!


When the piano teacher was leaving this week, Baby Girl told her, "When you come back, I'll teach you how to knit." It's good to be confident in your abilities. And she has reason to be. 


The day I was to leave, she finished her necklace and then quickly made a bracelet...with a bow so it will be "fancy"...to go with it. (Understand that I get it started and then close it up. She's just turned 5.) She proudly wore her new jewelry to a school program to see Little Sister make a presentation. 

The piano teacher did ask what you could make with this kind of knitting. My too-quick answer was "not much." The Wonder Knitter makes a tube of knitting. But a quick Google search will show you many ways to make more sophisticated projects. They are still primarily in the jewelry category, but they are beautiful pieces. If you happen to have a grandmother with a wide range of leftover yarns to play with and maybe some beads left from a fleeting interest in that craft, there are many possibilities. I do remember, when I was about 10, coiling up the knitting tube and stitching it together to make a doll house rug. 


While I was there, Baby Girl also asked me to knit a hat for her doll Camille. She has a Wellie Wisher (a 14-inch doll.) I had yarn left from a baby hat, so I whipped up a hat that evening, making it up as I knitted.


Here is the pattern I made up. I tried a different decrease for the top of this hat and really like how it worked out. Camille was happy with her hat. Baby Girl liked it, too. Now she wants a blue one. With a sweater to match.

WELLIE WISHER HAT  ...for Camille

MATERIALS:
DK yarn, size 5 DPNs, yarn needle

INSTRUCTIONS:
Cast on 60. 

Knit K2 P2 for 6 rounds. 

Next round, knit all and increasing 4 stitches, evenly spaced. (64 st)  
Knit in stockinette until hat measures 2-1/2  to 3 inches from cast on edge. 

K2tog all the way around. (32 st.)
Knit one round. 
K2tog all the way around. (16 st.)
Knit one round. 
K2tog all the way around. (8 st.)

Cut yarn leaving 7 inch tail. Run yarn through stitches on needles and pull snug to close. 

Take yarn to wrong side and weave it in. Weave in cast on yarn. 


If I had other needles handy, I might go down a needle size for the ribbing.