Thursday, November 10, 2016

When You Need Cookies Fast

Glorified Grahams

This has been one busy week. I drove into my driveway late yesterday. And I'm headed out again today. This time to a knitting retreat in the mountains. Looks like the temperatures will be much cooler than anything we've seen so far this fall. Which means I need to think about packing more carefully than my usual throw-a-few-things-in-a-bag approach. This is the first time I've had to think about jackets and socks and sweaters in a very long time.

My information also said to bring something for the snack table. Snacks are a big deal at knitting retreats. Snack foods, coffee, knitting and friends. Maybe not in that order, but that's what knitting retreats are about.

It just isn't in my soul to take store bought cookies to a retreat, but goodness I didn't have time to bake. And then I remembered this recipe. It is as old as the hills. I found it years ago in my 1971 Better Homes & Garden New Cookbook in the section marked "Easy Cookies."


Man, I don't know how many times this recipe has saved the day for us. Mommy who is our family's expert baker made a cake for a church function a few weeks ago and the cake was a "throw away" (her words.) So she quickly whipped up a batch of these and sent them instead. Every time we've every taken these, someone wants the recipe. Many of you may already have it. But if you don't, here you go.

 
I usually have the four ingredients on hand. It only takes minutes to put together. The note in my own cookbook says, "This is my go-to recipe when I need just one more thing to serve."


I feel better about my snack contribution now.

GLORIFIED GRAHAMS

24 graham cracker squares, divided into "sticks"(that's about two packs from the box)
1/2 cup butter, melted
1/2 cup light brown sugar
1 cup chopped pecans

Line a 15-1/2x 10-1/2x1-inch pan with aluminum foil. Then line up the the graham crackers on the bottom of the pan. Mix butter and brown sugar. Spoon over graham crackers and spread to cover if necessary. Sprinkle with chopped nuts. Bake at 350 degrees for about 12 minutes. Let cool. Break apart.

I lift the foil from the pan to easily remove cookies. One pan of these fills an 8-inch square foil pan if you are taking them somewhere.


Tuesday, November 8, 2016

So Who Is Lillian Hellman And Did She Make This Roast?

Lillian Hellman's Pot Roast

Since last year when Mommy and her family moved 11 hours closer to us, I have spent much time driving up and down a very busy interstate highway when I go to visit and babysit. Three hours down there. Three hours back. (In fact, I'm sitting at their kitchen table right this minute.) Satellite radio is wonderful for long trips because I don't lose radio stations as I travel.

But in the last several months, I added audio books to my listening. Pride And Prejudice was terrific entertainment for a couple of trips. It was about 13 hours of listening. And it had me laughing from the first few sentences. People haven't changed much over the years. I have seen the movie more than once, but I had never read the book. Listening to it was great fun.

I listened to The Martian (11 hours.) I still haven't seen the award winning movie but can't imagine it's better than the book. This one kept me....well, I can't say "on the edge of my seat" because I was driving. But you get the idea. It was a thriller. I also listen to non-fiction books and feel more informed. I am listening to Just Mercy right now.

But when I had a chance to get a free book several weeks ago, I picked Nora Ephron's Heartburn because, (#1) it was much shorter than the others—under 6 hours, and (#2) Meryl Streep was the reader. Meryl Streep rode in the car with me for hours! If you don't know Nora Ephron from her books, you'll know some of her movies—Sleepless In Seattle, When Harry Met Sally, and her last film, Julie & Julia.

While the book Heartburn is very 1980s, it was pleasant entertainment for one trip down and back. What I had not expected when I chose it, was that it was filled with recipes. As Meryl Streep read the book and read the recipes, I kept thinking, "That sounds good. I would make that." But this was an AUDIO book. I couldn't go back and look at the recipe. And I was driving. I couldn't jot them down as I listened.

The very last recipe in the book did sound good and easy. It was nearly easy enough to remember, but I wasn't sure about the herbs. Thanks to the powers of Google, I found the recipe easily. One blogger said this recipe was "just this side of white trash." I'm guessing she said that because of use of condensed soup and dry onion soup mix. I think I feel insulted. Those ingredients are still in use where I live. (Although people do use them less and less now.)

Well, I had to try this recipe. And you know I often tinker with a recipe when I use it. I could not find a 4-lb roast at my store, so I bought the biggest chuck roast they had. It was 3 pounds, so I reduced the amount of liquid a little. My changes are in italics. And years ago I found that browning a roast before cooking improved the color and the flavor. But if I were running short on time, I still might skip that and just put everything in the pot, like the recipe says.


So, who was Lillian Hellman? And did she really make this pot roast? She was a dramatist and screenwriter at a time when "writers were celebrities and their recklessness was admirable." You can google her name and read more if you're interested. And did she really make this roast—who knows? All I can tell you is that it's good.

LILLIAN HELLMAN'S POT ROAST (from the book Heartburn)

4-lb beef roast, the more expensive the better (I used a 3-lb chuck roast)
1 can cream of mushroom soup
1 envelope dry onion soup mix
1 large onion, chopped
3 cloves garlic, chopped (I used 1-1/2 tsp jarred minced garlic)
2 cups red wine (I used one soup can wine)
2 cups water (I used one soup can water)
1 bay leaf
1 teaspoon dried thyme
1 teaspoon dried basil

Put ingredients in a large good pot and cover. Bake at 350 for 3-1/2 hours until tender. Remove bay leaf before serving.

How I cooked it:  Now, I browned the meat first in a heavy Dutch oven. I tossed the onion in on top of the roast, then mixed soups, wine, water and herbs and poured over all. I put the lid on the Dutch oven and baked it. I turned the roast over about halfway through the cooking time.


Daddy-O, who loved the roast, asked if I could have used the slow cooker. When you use a slow cooker, the big difference is that the liquids aren't reduced. See the photo above with the roast still in the pot? You can see that the soup/water/wine mix has cooked down into a thick rich gravy. I don't think the end result would be the same if you go the crockpot route. Probably still good, but not the same.


If you have tender ears, be forewarned that The Martian uses words that are not in my own vocabulary. Kind of surprised me. But if I had been stranded alone on Mars, I might have needed some of those words.


Friday, November 4, 2016

Light And Luscious Cake

Pumpkin Angel Food Cake

For years I have had a standing lunch date on Wednesdays with cousins who are among my favorite people on earth. We skip nearly as many Wednesdays as we meet because of schedule conflicts. These are busy people! But when we have Wednesdays without other obligations, we will spend an hour over a Chick Fil A lunch catching up on family news.

This week when I met them, I had a treat for Jack. I had baked this angel food cake just for him. Many years ago, Jack had a major heart attack. When he came home from the hospital, he came with the instructions from the doctor to "follow a low-fat diet." Jack is one of four people in this country who has followed those instructions to the letter for years and years. (You know I totally made up the "one of four people" thing. There might be seven or eight.) He has been committed to this in a way most people are not.

Most other people (a) try hard and start backsliding after a few months, (b) do it halfheartedly, or (c) never try because they don't want to give up food they like. But I've watched Jack and Audrey change how they shop, how they cook, and how they eat. And it was a good decision. Jack is 82 now. It's been about 25 years since that frightening heart attack.


But a "legal" treat for him has always been angel food cake. So when I saw this recipe I knew I had to try it for him. Because they are family, I cut out a slice before I took the cake to him. I wanted to make sure it really did taste as good as the pictures looked. And I needed to make photos for this post. Let me say this is a first for me—delivering a cake with a slice missing!


Some things you need to know about angel food cake...
  • Mix your cake mix in a large glass or metal bowl—not plastic. (Don't forget you can use the bowl from your stand mixer. It's big.) Plastic will retain a film of grease or oil from your last recipe no matter how well you wash it. I just used my hand mixer to mix up the angel food cake mix.
  • Use an ungreased cake pan because the cake rises by "crawling" up the sides of the pan. 
  • I like to use an angel food tube cake pan—the kind that has a removable bottom. You'll need to use a knife to go around the sides of the pan and around the tube to be able to turn it out. Then run the knife between the cake and the bottom of the pan. My pan is ancient, but you can still buy a tube pan with the removable bottom. They cost anywhere from $12-20 and should be fairly easy to find.
  • You can bake angel food cake in other pans  Read the cake mix box. It gives baking times for other pan shapes. I've made the Mock Macaroon Cake (angel food + pineapple + coconut) in a 9x13-inch baking dish and baked it for 25-30 minutes.
  • Fold in 1/4 of cake batter into the pumpkin first. That lightens the heavy pumpkin, making it easier to fold in the remaining batter.
  • Use a serrated knife, cutting with a sawing motion, to cut angel food cake. A regular knife will just smash it.


Final thoughts? This cake was delicious. I got an excited email from Audrey late the night I took the cake to them. She said, "I wasn't expecting to like it. But it is REALLY REALLY good!" It's a beautiful color. And it gives you a light dessert option for a season that focuses on rich, heavy foods. Remember, we aim for balance.

PUMPKIN ANGEL FOOD CAKE

1 box angel food cake mix
1 cup canned pumpkin
1 teaspoon vanilla
1/2 teaspoon cinnamon
1/2 teaspoon nutmeg
1/4 teaspoon ground cloves
1/8 teaspoon ground ginger

Preheat oven to 350 degrees.

In a large bowl, combine pumpkin, vanilla and spices. Mix thoroughly.  In another large mixing bowl (glass or metal) mix the angel food cake according to directions on box.

Carefully fold in 1/4 of the cake batter into pumpkin. (This lightens the heavy pumpkin, making it easier to blend.) Then gently fold in the rest of the batter. Pour into ungreased 10-inch angel food cake pan.

Place in oven on lowest rack possible (Remove the other rack.) Bake for 38-45 minutes, or until cake is golden brown and springs back when touched. Immediately invert cake pan on a wire rack or place upside down on top of a glass soda bottle.

Cool for 1-2 hours, until completely cool. Run knife around sides of cake pan and around the center tube, then turn out. If you have a pan with a removable bottom, run knife between cake and pan bottom. Remove to a serving plate.


In my typical fashion, I made this when I was in a hurry and didn't read the recipe thoroughly until I wrote it up here. Then realized I didn't exactly follow the directions. I did fold some cake batter into the pumpkin (which I had mixed with spices in a small bowl) and then folded the pumpkin into the big bowl of batter. Thinking about it now, I think it would be easier to do it properly. But it still worked when I did it backwards.


Tuesday, November 1, 2016

Homemade Dinner Rolls - Take #2

Homemade Dinner Rolls

I have made yeast breads for years and years, but I had never made rolls. And all of a sudden I had an urge to make them. Like right now. Maybe because Thanksgiving is racing toward us? I wanted to master homemade rolls. I found the recipe for The Best Homemade Dinner Rolls Ever! online. She said she worked for years to perfect her recipe. Sounded like a good recipe to start with.

So last week while I was Mommy's house, we mixed up these rolls. (Take #1) They were not what I was hoping for. Not bad, but I knew I could do better. I needed to add a considerable amount of extra flour to get the dough to pull away from the bowl at all. And that much extra flour made for a dry roll, although they were beautiful. I also knew this would be easier in my own kitchen. I know how my oven works. (Mine browns faster in the front.) Mommy's oven bakes with gas which is a little different.

THEN I remembered Jessica having similar trouble with the cinnamon rolls we like so much. We finally figured out it was the flour that we were using. Where we live, the common flour brands are White Lily and Martha White. Southern flours perfect for making biscuits. But for yeast rolls, King Arthur (which is now readily available in our stores) is infinitely better. It has to do with the protein content of the different flours. If you live up north, I'm sure there are other brands that work, but I only know about King Arthur.

When I was in college (home economics major here) I remember a professor saying that cooking was all chemistry and physics. I think the chemistry and physics of the different flours do make the difference here. I don't know where the creator of the original recipe lives, but I'm guessing it's not where White Lily flour dominates the store shelves.

You should take the time to look at her recipe and watch her video if you are new to yeast dough and read all of the questions & answers about the recipe. She has great tips there.

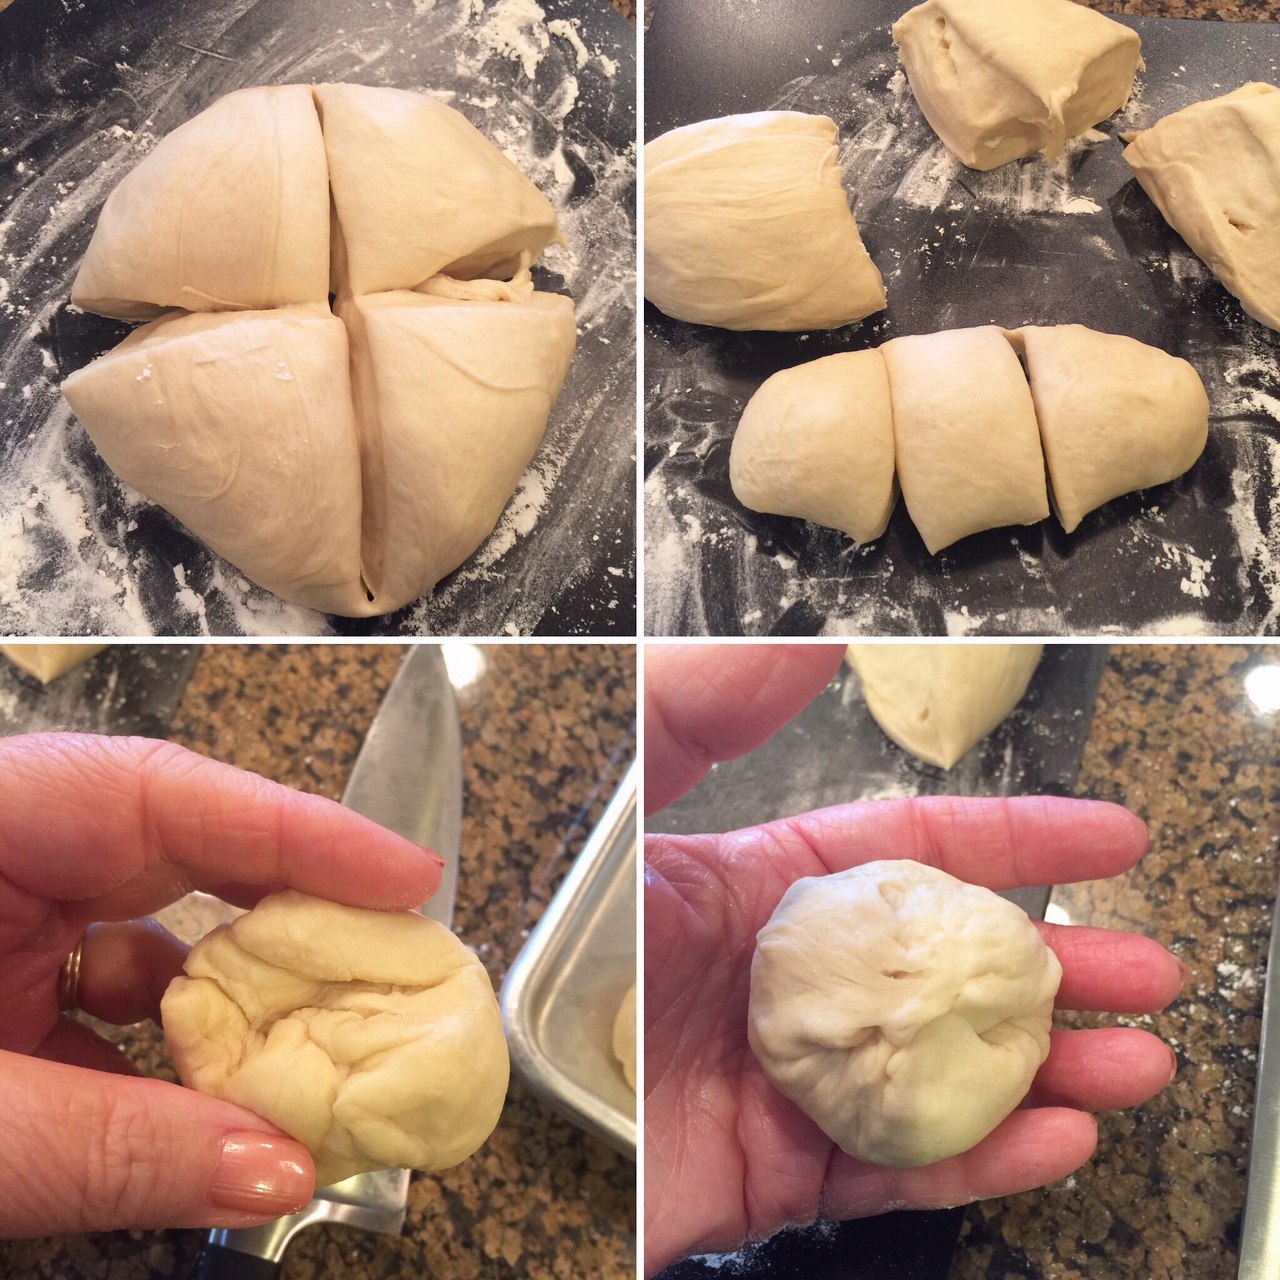
She makes 24 rolls. I cut the amount in half here. If you have never made breads before, it's easier to work with a smaller amount. And if you don't need two dozen rolls, make this smaller batch. The hands-on time is not that huge, but I allowed a morning for the entire process. (Takes about 3-1/2 hours, beginning to end.) Daddy-O got hot rolls for lunch!

Here are a few photos I made along the way that might be helpful:


Top left:  The dough should be sticky to the touch after adding the last of the flour.
Top right:  Dough put into large greased bowl.
Bottom left:  Dough after rising 90 minutes.
Bottom right:  Push into the dough and when it's ready, it will leave a dent and not spring back.


Top left:  Shape dough into an even circle and cut into quarters.
Top right:  Divide each quarter of dough into even thirds.
Bottom left:  Pull edges of dough to the bottom, leaving the top smooth.
Bottom right:  Pinch edges together and place in pan, smooth side up.

Shaped and on the pan
Second rising, ready to bake

These are tremendously better than my first attempt...which weren't bad. These were wonderful. I give credit to the improvement to changing flours. Yes, it matters that much. I could feel the difference in the dough. And next time, I'm switching to a dark baking sheet so that the bottoms cook more. Then I think I'll have it!

Yum...

If you've ever wanted to make yeast rolls, just do it. This is the easiest yeast dough recipe I have ever made. And you've got time to practice before Thanksgiving. If you have a crowd coming, go back to the original recipe that makes two dozen rolls.

HOMEMADE DINNER ROLLS

1 cup warm milk
1 tablespoon instant dry yeast (I used a jar of Fleishmann's Bread Machine Instant Yeast)
2 tablespoons sugar
1 teaspoon salt
3 tablespoons butter, softened
1 large egg
3 cups King Arthur all-purpose flour
1 tablespoon melted butter, for brushing tops

In the bowl of a stand mixer, combine warm milk, yeast, sugar, salt, butter and egg.

Add in 2-1/2 cups flour. Using dough hook, turn the mixer on to a low speed (don't want to throw flour all over the kitchen!) Once the flour starts to mix into the dought, increase the speed to medium. Slowly add the remaining 1/2 cup flour until dough pulls away from sides of bowl. The dough should be slightly sticky and soft.

Transfer dough to a lightly greased mixing bowl. Turn dough in bowl so that the oiled side is up. Cover with a towel and let rise in a warm place for 90 minutes.

Lightly grease baking sheet. (Use a quarter sheet pan, about 9x13 inches.) Punch down the dough, turn out onto a lightly floured surface. Form into 12 rolls. (Divide dough in half. Divide each half in half again. Then make three rolls from each of those pieces.) Place rolls, smooth side up, on greased baking sheet in rows—three across, four down. Cover and let rise 1 hour.

Preheat oven to 375 degrees. (Turn on the oven during the last 10 minutes of rising time.) Bake the rolls for 12 to 14 minutes, until lightly browned.

Remove from oven and brush tops with melted butter. Serve warm. Or, to cool, let them rest on the pan for 15 minutes, then move to wire rack and cool completely. After they are completely cook, store in a plastic bag.

It's a Daddy-O approved recipe!
LAST WORDS...
  • Yeast dough is not fragile. Don't be afraid to handle it. And if the first batch isn't perfect, don't be afraid to try again.
  • I took the egg out of the refrigerator when I took the butter out to soften it. Then it wasn't so cold when I used it.
  • To warm milk, put in microwave for 30 seconds, stir, microwave another 30 seconds. Should feel as warm as baby bath water.
  • Measure all the dry ingredients before you start. It's just easier that way.
  • Take time to smooth the rolls when shaping to make prettier rolls.
  • I used a quarter sheet pan. If you don't have one, use a 9x13-inch baking dish.
  • Keep your jar of yeast in refrigerator after opening.
  • If you don't have a mixer with a dough hook, you can mix this by hand and knead it some. Start with a spoon until it's too stiff to stir, then finish with your hands.
  • Next time I'll use a dark baking sheet so that the bottoms brown a little. This was a new shiny baking sheet. There is a difference between dark and shiny pans. This time I turned the cooled rolls (after we ate three) over and put them under the broiler for just a bit. Cooking is about making adjustments when you need to. 
  • Find a good spot for letting the dough rise. I put my bowl on top of our cold toaster oven. That puts the dough close to the under-cabinet lights which give off a little heat. You can turn your oven on low for 3 minutes, then turn it off and place your bowl in the oven. If you need to know more, look at these tips on best places to let bread rise.
  • Make a note of how long the rolls cook in your oven. Mine took 14-15 minutes.
  • Understand that even though this is easy, you might need a couple of times before you get it just right. It has to do with understanding your oven, and learning which pan you like best, etc. Give yourself permission to mess up—but I'm betting you won't!



Friday, October 28, 2016

She Calls It Squish Squash

Sauteed Squash & Tomatoes

I've dipped into the preschool trick-or-treat bag a couple of times in the last two days. I'm lucky it wasn't more than that. So I feel compelled to share a vegetable recipe from my week here at Mommy's to get my mind off the Twix and Snicker Fun Bars and Tootsie Rolls. Last night Mommy made a turkey meatloaf, mashed potatoes and this squash medley. It was different from any I've eaten. Different in a very good way.


I didn't come down here for the costume parade, but the appointments that required my babysitting expertise fell on either side of the parade day. Of course I was going! What is cuter than two year olds in costumes? Not much. They all trick-or-treated down the hallways after their parade. That's where the candy stash came from. It's probably just as well that I will head home before the actual Halloween trick-or-treating (with MORE candy) takes place.

And I'm taking this squash recipe with me. Baby Girl calls it "squish squash." That is a pretty accurate description of summer squash texture. I think that is why Daddy-O is not a fan. He doesn't like the "squish" factor. But I like squash. In this recipe, it's dressed up enough for a company table. The hint of vinegar was a good combination with the squash. If you try it, let me know what you think.

SAUTEED SQUASH & TOMATOES

3 slices bacon
1 cup chopped sweet onion
1-1/2 teaspoons minced jarred garlic (or 3 cloves, minced)
1 teaspoon dried thyme (or a hardy shake)
1/4 teaspoon dried oregano (again, shake some in)
1 whole bay leaf (she left it whole and removed it later)
2 large zucchini, sliced
2 yellow squash, sliced (not the tiny ones)
2 cups cherry tomatoes, halved
2 tablespoons butter
1 tablespoon red wine vinegar
salt & pepper, to taste

Saute bacon in large skillet until crisp. Remove bacon and drain. Leave 2 tablespoons dripping in pan. Saute onion, garlic, thyme, oregano and bay leaf until onion is tender.

Add zucchini and squash and cook about 10 minutes, stirring often. Stir in tomatoes and cook another 10 minutes, stirring occasionally.

Remove from heat. Remove bay leaf and stir in butter and vinegar. Add salt and pepper to taste. Crumble bacon over top. Serve.


Thursday, October 27, 2016

Those Long Mommy Days


I have been grandmother-in-residence here for a full week now. Still a couple of days to go before I head home. I am in awe of how Mommy gets it all done. And I am in awe of all the mommies everywhere. The ones who stay at home. The ones who work outside the home. It is a 24/7 kind of world where one never stops, never sits down for more than a minute or two.

I have watched Mommy eat dinner (more or less) while jumping up from the table a dozen times during the meal. I've watched her wrangling those wiggly, squirming little bodies into car seats multiple times a day as they head off to school, dance lessons, choir practice, etc. I have watched her calmly take one to the after hours urgent care for a silly emergency—but still one that needed attention.

I have watched her be referee, peacemaker, chauffeur, nurse, counselor, costume designer, librarian, chef, busboy, and teacher. I have watched her firmly send one or the other to time out and lovingly welcome them back after a few minutes of quiet time. I have watched her patiently listen to a teenager who is navigating high school.

And I have watched her manage a meal schedule that might have killed me. (In reality, I did this, too, but have blocked it from my memory.) Eating healthy foods is important in this household, so supper from a drive-thru doesn't happen. That means Mommy has tried to figured out a plan that gets supper on the table even on the days when they walk back in the door at 6:30 pm. She relies on slow cooker meals, make ahead meals, and meals like this one that can be done in about 30 minutes.


When she married, Mommy barely cooked, but goodness how she's learned. I smile when I see her working confidently in her kitchen. All while monitoring the little ones who are playing and possibly squabbling. She has come a long way.


Last night I was home while she took the littles to choir practice and could help a little with the prep. (I sliced the veggies and preheated the oven.) But whether you have a grandmother helper or not, this is an incrediably easy meal to prepare. It is delicious. It is healthy. And it is beautiful. You may have seen it here on the blog before but it's worthy of another post.


GRILLED CHICKEN w/ROASTED TOMATOES & ONIONS

2 cups halved cherry tomatoes
1 medium red onion, sliced (white works, too)
4 large garlic cloves, minced (or 2 tsp. of jarred minced garlic)
2 teaspoons olive oil
1 teaspoon herbs de Provence
salt & pepper, to taste
olive oil for coating pan
about 4 thinly sliced boneless, skinless chicken breasts or chicken cutlets (we had 5)
2 tablespoons chopped fresh basil

Combine tomatoes, onions, garlic, olive oil, herbs de Provence and salt & pepper in a medium bowl. Stir to coat veggies. Spread onto a lightly oiled sheet pan. Roast at 400 degrees for 20-25 minutes, or until tomatoes have softened and onion is a little brown.

Meanwhile, season both sides of chicken with salt & pepper. Cook in oiled grill pan or skillet over medium-high heat until done. (Or, grill them outside.)

To serve, spoon vegetables over cooked chicken. Garnish with fresh basil.

Serves 4   


We decided last night that the roasted tomato topping would also be delicious spooned over grilled and sliced flank steak. Or, I think I would be happy to spoon the tomatoes onto my baked potato along with a little cheese for a meatless meal.


You know....while it doesn't feel like it now, those long mommy days will be over in a blink. All of the endless days and nights will be a memory. And then the grandmother days start.


Monday, October 24, 2016

Baking With The Littles

Pumpkin Spice Doughnuts

Dunkin' Donuts need not worry. Our doughnuts are not going to win a competition with them. And in terms of mess, this might rank right up there with play-dough or finger paint, but it was a grand way to spend an afternoon in the kitchen with Little Sister. I put Baby Girl in the bed for her nap and we went to work.


I saw a recipe video last week and thought it was perfect for grandchild baking. It's so simple that I didn't even save the video. It's easy enough to remember without writing it down. It uses only two ingredients, plus whatever you use for a topping.


Mix the dry cake mix and the can of pumpkin together "until it's all orange," advises Little Sister. Be smarter than I was and use a big bowl. I knew when we started that I should have pulled out the bigger bowl, but this one was on top. And it was orange which matched the pumpkin color. I couldn't resist. Next time, I'd use the hand mixer, too, just to speed things along. But it totally doable with a spoon.


Spoon the very thick batter into a gallon ziplock bag and snip off a corner. Squeeze the batter into rings in a greased doughnut pan. Yes. She really did this by herself.


Bake at 350 degrees for 13-17 minutes, or until done. Test by gently pressing the top of a doughnut with your fingertip. If it springs back, it's ready. I must admit, I took them out, thinking they were done, removed three from the pan and decided they needed a couple of minutes more in the oven. Even with all of that manhandling, they turned out fine.


Let cool in the pan for a few minutes, then remove to a rack and cool. Little Sister looked at these and squealed, "Mimi! They look like giant cheerios!" I think she was right.


By this time, Baby Girl had shouted the words guaranteed to make me go upstairs and get her out of the crib. "Mimi! I need to go potty!!!" And once she was up, there was no going back. We were almost finished with our doughnuts anyway. We decided to use powdered sugar for our finish. Put some powdered sugar in a bag and add a few doughnuts and shake to coat. Little Sister did them two at a time.

You could also make a simple glaze and pour over the doughnuts. Or, sift a little powdered sugar on top and drizzle with a little caramel topping. We tried one rolled in cinnamon sugar. It tasted good, but the cinnamon sugar didn't want to stick to the doughnut.


Baby Girl was ready to get in the game by now. We let her tap the sugared doughnuts to remove the excess sugar. That seemed to be a good two-year-old job.


After tapping the sugar off two of them, she decided that helping wasn't much fun as she thought. It was more fun to eat them. You might also notice that during her faux nap, she had taken off her shirt, turned it inside out and put it back on. Clever girl can dress herself now.


After her afternoon's work, Little Sister finally sat down to try her very own pumpkin spice doughnut. And she gave it a thumbs up. We all agreed with her.


PUMPKIN SPICE DOUGHNUTS

1 box spice cake mix (or yellow or chocolate cake mix—your choice)
1 (15-oz) can pumpkin (not pumpkin pie mix)

Mix dry cake mix and canned pumpkin in a large bowl until thoroughly blended. Batter will be very thick. Spoon batter into a gallon ziplock bag. Snip off a corner of the bag. Squeeze to pipe batter into the greased doughnut pan. (I sprayed it with Baker's Joy.)

Bake at 350 degrees for 13 to 17 minutes, until done. (The size of your doughnut "cups" and amount of batter you add will determine the baking time.) To test, press the top of a doughnut gently with your fingertip. It will spring back when it's done. Remove doughnuts to a cooling rack.

Put about a half cup of powdered sugar in another bag. Add cooled doughnuts, a few at a time and shake to coat. Remove from bag and tap gently to remove excess sugar.

Let the small baker eat a doughnut. Turn on Nick Jr. or Disney Channel and let the littles watch TV while you clean up the kitchen.


 For us, this recipe yielded 12 doughnuts and four muffins.


Last words about these doughnuts:

  • Eat them sitting at the table. If you eat one while walking around, you'll leave a trail of powdered  sugar behind you. Mommy has dark wood floors in her house. There was no sneaking a doughnut yesterday. The sugar trail gave me away.
  •  If you aren't eating them all within a few hours, shake them in the sugar just before you plan to eat them. This morning, all of the pretty white sugar coating had been absorbed by the doughnuts. Now they are looking kind of naked
  • If you don't own a doughnut pan (and how many people do?) you can buy them at kitchen stores and discount stores with a decent kitchen wear selection. They are also available to order online from places like Walmart, Amazon, Target, Bed/Bath/And/Beyond, etc. I found this one for $10 at a kitchen store at an outlet mall. Ours made a dozen doughnuts. The ones I saw online varied in size. And while it sounded like a crazy purchase, I really do think we will use it again. It was easy to make these and the pan was easy to clean. Easier than a muffin pan. No corners.