Showing posts sorted by date for query pizza. Sort by relevance Show all posts

Wednesday, June 12, 2024

What's Happening In My Kitchen? Not Much.


In the last couple of weeks I've had local people say to me, "You haven't posted much on your blog lately. I really enjoy reading it." That made me smile. I don't read the statistics that I could find somewhere on this platform to see how many views a post has had. I don't keep up with how many subscribers I have. I have never monetized the blog. Notice there are no pesky ads? 

All these years I've written it because I enjoy the process of writing. And the length of these posts suit me well. (Did I tell you that I wrote a newspaper column back in the day?) Occasionally I will look back through the 13 years of blog entries and I can see how my family has changed. How it's grown. I frequently look up recipes here—both with the index and the little search box that lives in the top left corner of each post.


My days are different now than they were way back when I started this blog. I think I said last blog post that I haven't tried new recipes lately Because I just don't cook as much as I did. We don't eat as much as we did. Sometimes now instead of cooking supper, we have a snacky supper.

Charcuterie boards or food boards, if you will, are so popular now. In my house these "boards" often coincide with cleaning out the refrigerator. Or making do the night before I grocery shop. I'm trying to squeak one more meal out of what's on hand.


When I arrange my bits and bobs of what's in the fridge on a tray, it's looks like fun. It looks like a treat. Picture what it would look like if I set the bag of pretzel chips, the box of crackers, the jar of jam and the bottle of ranch dressing out. Same foods. But I can guarantee those bags and boxes wouldn't get an "Oh, wow!" from Daddy-O. It's all in the presentation.

I love trays and own so many sizes and shapes. But sometimes I will just grab a cookie sheet or a pizza pan because it's handy. Choose your board or pan, arrange your food neatly, think about the colors when you lay it out. And if possible make sure to have different textures, like crunchy crackers and celery and creamy dip, soft cheese and hard carrot sticks. 

If I were doing this for a party or gathering, I would be much more intentional about on what goes on the board. But the photo above was our actual "dinner for two" a couple of weeks ago. It's as basic as you can get.


Here is another meal suitable for an "I don't want to cook" night. Last week I swore there was nothing here to cook. Daddy-O offered to take me out, but I couldn't think of one restaurant that tempted me. So I looked around the kitchen and spied a container of grape tomatoes. 

And in just under 30 minutes we were sitting down to dinner. This recipe calls for ingredients that are staples in my kitchen—spaghetti, olive oil, garlic, etc. I didn't have the fresh mozzarella it calls for so I subbed shredded mozzarella. Not quite as good, but it worked. If I had not had basil growing in our yard I might have sprinkled on some dried basil. Think beyond the recipe!!!

Be aware that this recipe doesn't make a lot. It feeds the two of us. I have stretched it to feed three by making a big salad to serve along with it.

GRAPE TOMATOES & PASTA (serves 2 to 3)

1/4 cup olive oil
2 cloves garlic, minced
3 cups grape tomatoes
1/4 cup fresh basil leaves, cut in thin strips
salt & pepper to taste
pinch of sugar (optional)
3 tablespoon fresh grated parmesan 
1 tablespoon balsamic vinegar
fresh mozzarella pearls
8 oz. thin spaghetti

Heat oil in a large skillet to low. Add garlic, stir and cook about 2 minutes, being careful not to burn it. Add whole grape tomatoes. Cook over medium heat about 5 minutes until tomatoes begin to soften. Break up some of the tomatoes. (I used a potato masher to mash up some of the tomatoes—maybe half of them. This releases juices that will help make a sauce.) Season with salt and pepper, add a pinch of sugar if tomatoes are very acidic. Stir in basil.

Cover and let simmer 10-15 minutes until the tomatoes are soft. Grate fresh parmesan over the sauce. Add balsamic vinegar. Stir to combine.

While sauce is simmering, cook spaghetti to al dente. Using tongs lift cooked spaghetti straight into the sauce. (Save a little pasta cooking water and add a spoonful or two to thin sauce if you need to.) Remove skillet from heat. Toss cooked spaghetti with tomato sauce. Poke mozzarella pearls down into the pasta. Cover and let sit a few minutes to let mozzarella melt.

Top with more Parmesan and garnish with basil. Serve.


And our last resort dinner when the fridge is empty is some kind of breakfast food. We spent one night at the lake last weekend. Now THAT is a truly empty kitchen. We have barely been down there this year. But the previous visit I had left a loaf of cinnamon bread in the freezer and I had bought a half dozen eggs that were still good. Daddy-O made French toast that night. He first told me that he couldn't make it because we didn't have any milk (he usually adds milk to the eggs.) I told him to splash a little water in the eggs instead. Think beyond the recipe!!! Beyond your usual. 

There is a little knitting still going on. These delightfully cool days are perfect for porch knitting.  We try to spend as much time on the porch as possible on these perfect days. Knitting. Reading. I even take a keyboard out there and practice piano sometimes.


Some of you have been interested in my jazz journey. The online piano platform I enjoy offers a monthly song "challenge." Four weeks to learn a new tune. I don't always do the monthly song but I love this month's choice, Blue Skies. I'm working on the piano version, but my ukulele version is ready now.


Thursday, November 2, 2023

Doing Mimi Things

Sock Pumpkins

I got home last weekend after staying with the middle grandchildren while the parents traveled. At ages 9 and 13, they are easy to care for. The hardest part is all of the chauffeuring that age requires. I had forgotten at that stage of mothering how much of the day is spent in the car.

But on the weekend we stayed put. Before I left home I saw a craft I wanted to try with the girls, The first morning while they were at school I made a trip to buy supplies—one pack of kids socks, some cinnamon sticks, heavy duty thread and long tapestry needles. I brought a small bag of fiberfill from home.


All of the adorable pumpkins in the bowl were made from the same size socks. The amount of stuffing and the length of cuff you cut off makes the difference. The girls kept making them bigger and bigger.


It's all done with a tiny bit of hand sewing. The girls had learned some basic sewing stitches this summer during Mimi Camp, so they were ready. The hardest part of sewing during Mimi Camp was making the knot in the end of the thread. This is one time a big lumpy knot is what you need to keep the thread from pulling through. We used our thread doubled, too. 


If you google "sock pumpkins" you'll find many links to directions. As you'd expect, they are all slightly different. But you only need the basics. I saw a quick how-to reel on Instagram and that was all I needed. I'd share the link but I can't find the one I watched. Trust me, it's really easy. 


Remember the lavash crackers I told you about in the last blog post? Baby Girl asked if we could make some with cinnamon sugar. Man, was she on to something. These little crackers are super crispy and slightly sweet. Then I discovered this pumpkin pie spice hummus at their grocery store. As a life long pumpkin pie lover, let me say this was awesome! A perfect dip for these little crackers. 

Miss that recipe? Here is is again. Yes, this one is good enough to share two times in a row.

LAVASH CRACKERS

 1 package Joseph's Lavash Bread
 Pam olive oil spray
 Seasoning of your choice, such as cinnamon sugar, Everything but the Bagel or Ranch 

Preheat oven to 375º.
Put one sheet of lavash onto a sheet of parchment paper. Use pizza cutter to cut into cracker size pieces. Spray with olive oil spray. Sprinkle with seasoning. Carefully slide parchment paper onto a baking sheet. Bake for 5 to 6 minutes until lightly browned.  
Watch closely because they can burn easily! I rotate the sheet while baking.


Anthology Throw, by Curious Handmade

And I finally finished this circular blanket! I took the giant basket holding this work-in-progress with me to babysit. I was happy to get some extra knitting time while the girls were in school.

I started it last November so it was nearly a year from beginning to end. I will confess that it spent a good while in time out as my interest lagged. For you knitters out there, this is made of fingering weight yarn, nearly 500g. It's 5 ft. in diameter. So very glad to be finished. So very happy with the finished blanket. 


Monday, October 16, 2023

The Kindness Of Knitters

Finished with love. ❤️
This little heart marks where Bev's knitting ended and the new knitting started. 
We will mark each project like this, to honor the work she did.

I am moving in slow motion this morning after an intense—but totally wonderful—weekend. Two knitting friends drove up from Atlanta to help make and carry out a plan to deal with all the yarn left when our dear friend Bev passed away a couple of years ago. We had all met at a knitting retreat years ago and attended other retreats together. Knitting retreats are meant for learning new skills and making new friends. If you're lucky, these friendships will last a lifetime.  

This was a fraction of the yarn we sorted. If you knit and are like most knitters, you have accumulated a yarn stash. Likely more yarn than you could possibly knit in your lifetime.

Luxury yarns bought on travels around the globe, souvenir yarns, and yarns bought with specific projects in mind. Those were often bagged along with the pattern and needles. So much yarn. And so many memories. We had fun telling stories and laughing about the experiences we shared. 

In addition to sorting the yarns, these amazing friends also worked to complete unfinished projects, like this colorful blanket. There are multiple names for this blanket pattern, but I like the one that calls it "The Kindness of Knitters Blanket." This one truly is. We are still working on some other projects that could be taken home and finished after our weekend was over. But they will all be done soon and returned to her family.

Porch knitting before dawn.

The first night we watched a movie while the blanket knitting was happening. The last morning the knitted started before the sun came up as we raced to complete what we wanted to do. And in between the first night and the last morning, it was non-stop yarn sorting.


These knitting friends were also wonderful houseguests. They knew we had a lot of work to do. And to make the weekend easier for me, they brought food. Homemade muffins and fruit for breakfast, butternut squash soup and chicken salad for lunches. 


I made these crackers in case we needed an afternoon snack. (We did.) I have loved these! If you count WW points, an entire sheet of lavash made into crackers is 2 points. I never eat that many at one time.

LAVASH CRACKERS

 1 package Joseph's Lavash Bread
 Pam olive oil spray
 Seasoning of your choice, such as Everything but the Bagel or Ranch

Preheat oven to 375º.
Put one sheet of lavash onto a sheet of parchment paper. Use pizza cutter to cut into cracker size pieces. Spray with olive oil spray. Sprinkle with seasoning. Carefully slide parchment paper onto a baking sheet. Bake for 5 to 6 minutes until lightly browned.  
Watch closely because they can burn easily! I rotate the sheet while baking.

These are so crisp and they stay that way. Such a good snack when you want a crunch in your mouth.


There were nearly as many knitting notions as there was yarn. That was all sorted and packaged in to 40 sets to be used for goodies at a knitting retreat.


And while they were hard at work sorting and counting and packaging, I was busy in the kitchen. We took a break in the late afternoon, sharing good memories of our friend as we shared an appetizer.


These ladies brought breakfast and lunches. My job was to provide dinner. I tried to keep it easy and healthy. All of the food I made is here on the blog and I've linked the recipes. The first night I made Chicken Taco Soup and baked the Artisan Bread that I love. (I originally got the recipe from one of these friends!) 

The next night we invited another local knitting friend to join us for dinner. After the baked brie, I made Tuscan Garlic Chicken, roasted potatoes, watermelon feta salad...and these girls twisted my arm and I baked another loaf of bread!

The entire weekend we felt Bev smiling down on us, chuckling from time to time as we tired to figure out what she was doing...forensic knitting, detective work, mind reading. It took all of our skills. And I am sure that she would approve of how we shared the yarn—some went to friends who knew and loved her, some went to high school knitters who have not experienced the pleasure of using "good" yarn, and some went to knitters with limited budgets for indulging their hobby. Another batch was packaged for use later at an event. My dining room no longer looks like a yarn shop. The table is finally empty! 


**If you are looking for the lavash, this is what the package looks like. I found it in the deli section, near the pita breads and wraps.


Friday, June 16, 2023

Experimenting In The Kitchen

Sausage, Potatoes & Green Beans

Wouldn't you know it? The week I decide start learning more about my instant pot I read that the Instant Brands—maker of the Instant Pot—has filed for Chapter 11 bankruptcy.  Hopefully it's one of those things that the powers-that-be figure out and the regular workers keep on going. And now I hope that my own Instant Pot lasts forever.

I've had an Instant Pot for several years now. I have used it from time to time, but I've said more than once that if it died, I probably wouldn't replace it. But for reasons I can't explain I decided it was time to get bold with using it. I started with this Instant Pot recipe for dinner because I had a smoked sausage in the refrigerator. And I needed to start emptying the fridge before family arrives tomorrow and the groceries I stock will change over to groceries more suitable to larger families.

Let me say upfront that this is the kind of recipe that puts "instant" in the instant pot. So many Instant Pot recipes really aren't faster that a stovetop version. But they can cook unattended and that's reason enough for many people to embrace one.

I knew this was a gamble for out supper. I figured my husband might not want this. But I told him we had frozen pizza if supper was a dud. After we finished eating Daddy-O said, "Be sure to tell them that I really liked this. And I wasn't too sure when you told me what we were having for dinner. But this is really good!"  

Here is the recipe. So simple. So quick. So yummy. The green beans were perfectly cooked. I'll try cooking only green beans another time, using this cooking time.


SAUSAGE, POTATOES & GREEN BEANS


1 cup low-sodium chicken broth

24-oz bag small red potatoes, cut into 1-inch chunks

1-1/2 lb fresh green beans, washed & ends trimmed

13-oz package turkey smoked sausage, sliced into 1/4-inch slices

2 teaspoons Montreal Chicken Seasoning, or to taste

4 tablespoons butter, cut into 8 pieces. (That’s a 1/2 stick)


Pour broth into pot. Add the prepared potatoes, beans and sausage and sprinkle with Montreal seasoning. Give it a stir. Put butter pieces on top.


Place lid on pot. Turn valve to “seal” and press Manual button. 

Set timer to 3 minutes. (High pressure) 

When time it up, do a Quick Release. Give it all a gentle stir.


  • To make this super easy, I chose a 24-oz “steam in the bag” package of red potatoes. They are prewashed. I quartered them. 
  • Do not use canned green beans for this. They would be mushy after cooking.
  • I didn’t weigh the green beans. Bought a bag of fresh ones and trimmed ends until it looked like enough.
  • I used a 6-qt pot. 


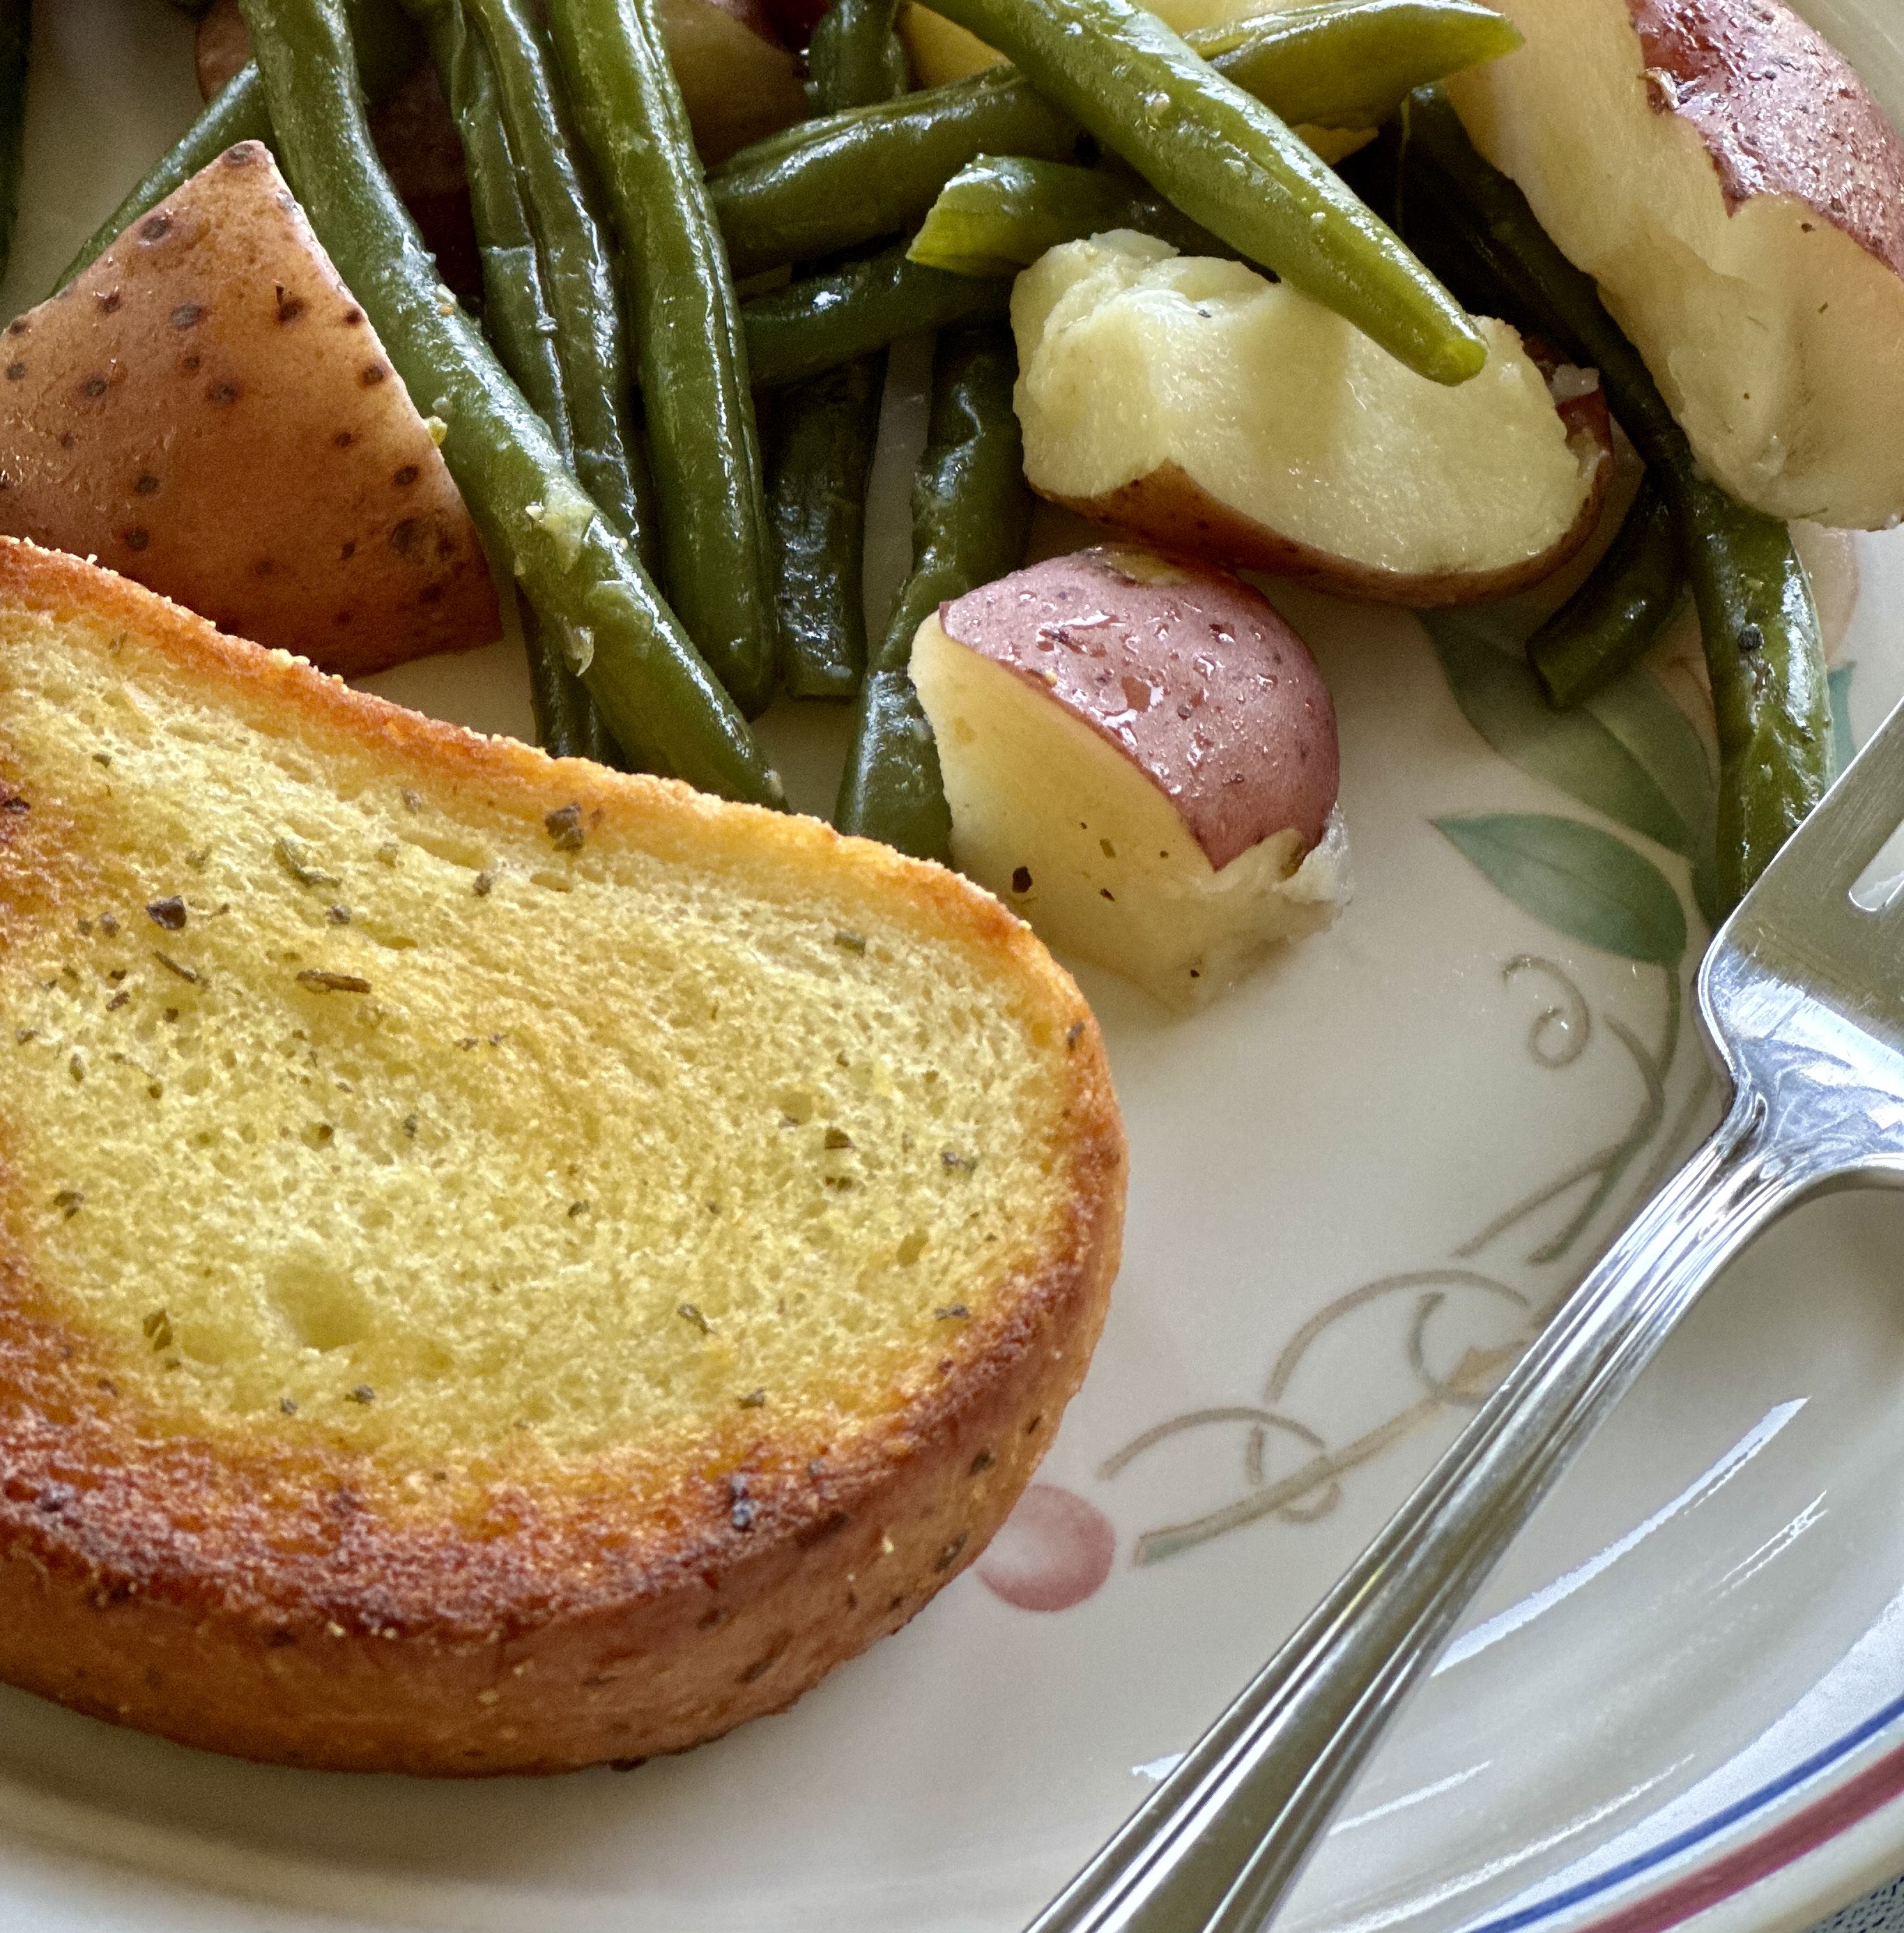
For as much as Daddy-O liked the main dish, his first words at the supper table were, "This toast is OUTSTANDING!" I won't argue. It was really good. And I used my new little air fryer. 


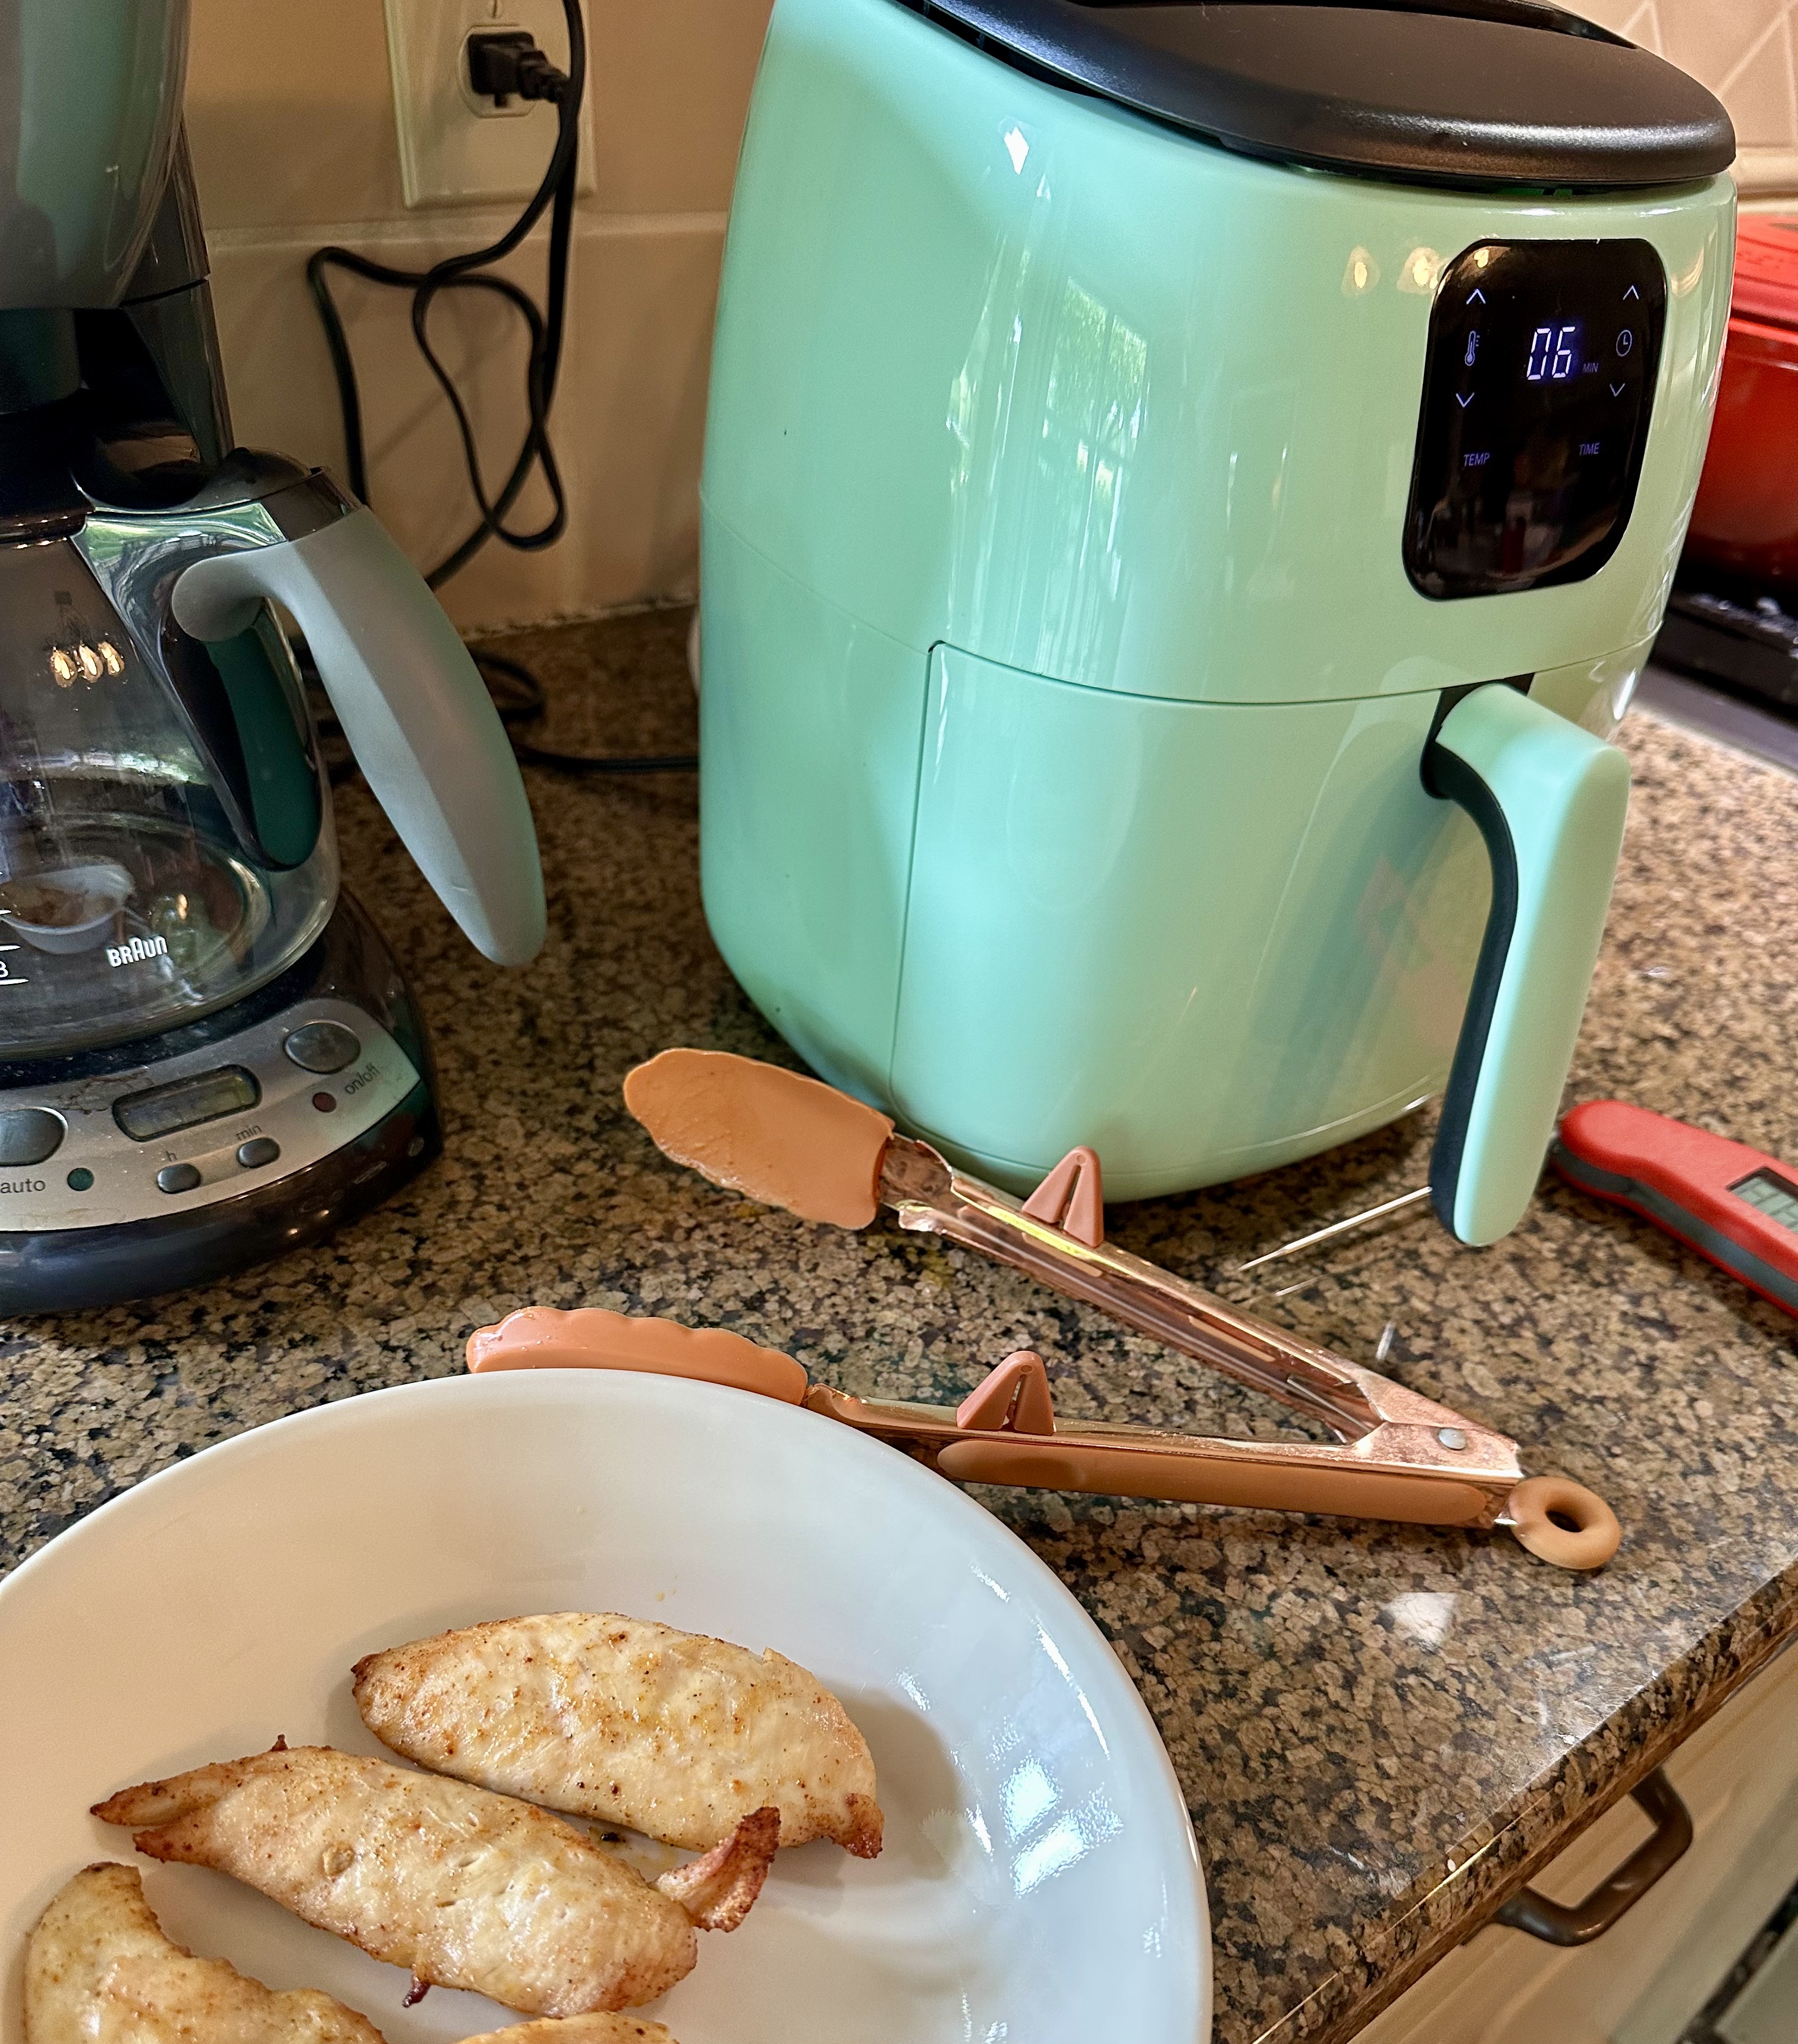
I have resisted buying one for ages when all around me raved about them. Last week I ordered Dash Mini 2.6-qt. air fryer. I've only had it long enough to try a couple of things. I had resisted an air fryer because I didn't want to have to learn to use another appliance. And I didn't want another big thing sitting on the counter. This one is small, suitable for 1 or 2 servings. And that's fine for our household. 


After looking at a few recipes, I cooked chicken strips. And when I realized I could take the basket out and look at the food. Just like looking at food in the oven to see when it's ready.  I relaxed about figuring out the exact cooking time. 


So tonight I popped a couple of slices of frozen garlic bread in the air fryer set to 400º. I checked in about 3 minutes and it looked nice and brown, but when I picked it up the bottom was soggy. So I turned it over and let it cook for another couple of minutes. And as Daddy-O said....OUTSTANDING! It was golden brown and crunchy. And it was all done in less time that it takes to preheat my oven. 


This little air fryer would only hold 2 slices, but that's all we needed.


Friday, January 13, 2023

My, Oh My...That Pie!

Easy Skillet Apple Pie

You've seen this recipe here before but it's worth another appearance. My friend Missy pointed me toward this Southern Living recipe a couple of years ago. If Missy says it's good, it's good. I made it right after she told me about it. Since then I've made it a few more times. My son-in-law made it twice over the holidays. It's that good. And it's that easy.

It also looks impressive. I had my book club friends here for lunch this week. Carol brought soup and corn muffins. Sarah brought cheese, fruit and crackers to nibble on as the girls arrived. And my job was to provide dessert. The seven of us take turns with the food. When they walked in my front door, our house smelled divine. All that cinnamon! 

This is ridiculously easy to make considering the showy result. The hardest part is peeling and slicing four pounds of apple. My mix of apples was what I had in the refrigerator—Macintosh, Red Delicious, a couple of Galas and one lone Granny Smith. That was fine.

I had a friend watching as I made it. She looked at the big bowl of sliced apples, shook her head and told me, "They're never going to fit into that pan." Although I didn't tell her, I wasn't sure they were going to fit either. But I kept piling them up high, tucking them in along the sides. I wish I had made a "before" photo. But they cook down into a normal size pie.

You might need to scoop it out. One time I actually got slices. Either way, it's delicious.

EASY SKILLET APPLE PIE

4 lbs apples, half Granny Smith & half Braeburn or Macintosh

good squeeze of lemon juice

1 teaspoon cinnamon

3/4 cup sugar

pinch of salt

1/2 cup butter (1 stick)

1 cup firmly packed brown sugar

1 box refrigerated pie crust (2 crusts per box)

1 egg white

2 tablespoons sugar


Preheat oven to 350º. Peel and slice apples into 1/2 inch slices. Squeeze lemon juice over apples and toss.  Then toss apples with cinnamon, 3/4 cup sugar and pinch of salt.


Melt butter in 10-inch cast iron skillet over medium heat. Stir in brown sugar and cook, stirring constantly, for 1 to 2 minutes until sugar is melted. Remove from heat and place one pie crust on top of butter mixture. Spoon apples over pie crust. Top with remaining pie crust. (I didn't try to crimp the edges because the pan is hot. Just tuck in anything that hangs over.) 


Whisk egg white until foamy and brush over crust. Sprinkle with sugar. Cut slits in the top crust so the steam can escape. 


Bake for 1 hour to 1 hour 10 minutes, until golden brown and bubbly. If the crust is browning too quickly, shield with foil for the last 10 minutes.


Cool for 30 minutes before serving. And y'all...it begged for a scoop of vanilla ice cream on top!


PS...I slid a pizza pan onto the rack under the pie as it baked. Only one tiny drip. But better than it landed on the pan.


Tuesday, April 20, 2021

Our Book Club Salad Supper

Our salad supper

We all have our favorite recipes that we use again and again. Today's post is about several of those recipes that go together really well. I'm documenting this combination so that when I need a supper plan again, I'll have this list ready. (I've linked each recipe title to the previous blog post if you want to see better photos, or read more about the recipe.)

Surely I have mentioned our book club here before—a small group of friends gather most weeks to chat, to catch up on the news, to knit, to share a meal...and occasionally we talk about books. This book club has also done pool walking, hula hooped and hiked. We are a versatile group. 

We take turns providing supper. Sometimes it's an adventure—like making açaí bowls. Supper has also been as simple as frozen pizza. It doesn't really matter as long as we get to eat together. I'm so sorry I didn't make photos of last week's meal. It included the best key lime pie for dessert. All I know is that Joanne needs to make one again so that I can get a photo and share the recipe here. And we would get to eat it again! 


Last night it was my turn. As I was setting out the food, I overheard someone saying, "The hardest part about bringing the food is deciding what to make." That's usually the case with me, but this time I knew exactly what I wanted to bring. All of these recipes are favorites of mine. All are easy to make. And all are served cold, so I could pack it all in coolers and not worrying about transporting hot foods or heating things up there. Even though these are favorite recipes, I don't think I've ever served them all at once. But I did love how these dishes went together.

I prepared the bean salad the day before so that the flavors could blend. And I cooked the chicken the day before, too. I told Carol I felt like I was guilty of "recipe appropriation" because we all think of the bean salad as "her" recipe. So happy she shared it with all of us years ago.


1 (15.5 oz.) can light red kidney beans
1 (15.5 oz.) can black beans
1 (6.5 oz.) can mushroom stems & pieces
1 (8 oz.) can sliced water chestnuts (I cut into smaller pieces)
1 (2 oz. ) jar diced pimento
frozen white corn (amount about equal to the kidney beans)
frozen green peas (amount about equal to the kidney beans)
1 bag frozen shelled edamame beans, cooked according to package directions
1 rib celery, finely chopped, optional (I used this)

1/4 cup canola oil
1/2 cup apple cider vinegar
1/2  to 3/4 cup sugar (I used 1/2 cup)
1/2 teaspoon salt

Drain and rinse canned vegetables. Cook and cool edamame beans. In a large bowl, mix drained beans, pimento, mushrooms, and water chestnuts. 

Combine oil, vinegar, sugar and salt in a small saucepan and bring to a boil. When cool, pour over vegetables and refrigerate. Vegetables will keep in refrigerator for up to two weeks.

Yes, you add the corn and peas frozen. No cooking. I did cut the slices of water chestnuts into smaller pieces. I'm sure if there is something that you don't like here, you can leave it out. 

The next morning (day of the supper) I mixed up the orzo salad first. The hardest thing about making this is chopping the baby spinach. I like to take the large stems off and that can be done while the water comes to a boil and the orzo cooks. Then it's just all stirred together. My usual recipe, posted here, is actually half a recipe. This time I doubled everything since I was feeding more than the two of us. That might have been overkill, but we will happily eat leftovers for the rest of the week. 

ORZO SPINACH SALAD

1/2  box (16-oz) orzo, cooked according to package directions
1/2 bag (5-oz) baby spinach, roughly chopped
1/3 cup chopped red onion (use the amount that you want)
4-oz. container crumbled feta cheese
1/4 cup olive oil
1/4 cup balsamic vinegar
1/2 teaspoon dried basil
1/4 teaspoon pepper (I used a few grinds of fresh pepper)

While orzo is cooking, mix the dressing--oil, vinegar, basil, pepper. Set aside.
Drain orzo thoroughly when done. Stir in chopped onion, spinach and feta. Whisk dressing again. Pour dressing over the pasta and mix to coat thoroughly. Cover and refrigerate until chilled.


After I put the orzo salad in the refrigerator, I chopped the chicken for the chicken salad. There are hundreds of ways to make chicken salad. And I've never had one I didn't like. I've made several versions, including a hot chicken salad. The yogurt version on the blog is delicious, too. But this time I just made the one I make most often. Because I make it regularly I can mix it up in a hurry. When I'm in a big hurry, I use a 12-oz can of chicken breast, well drained and broken up. It's surprisingly good. It makes great sandwiches. Make the celery, apple and cheese match the amount of chicken.

CHICKEN SALAD

3 boneless, skinless chicken breasts (that's 1 package at my store)
1/2 - 1 teaspoon Lawry's seasoning salt (I just give it a good shake)
1 large rib celery, diced fine
1 medium red apple, diced (I leave the peel on for color)
1/2—3/4 cup shredded sharp cheddar cheese
sprinkle of salt
a good squeeze of fresh lemon juice
enough Duke's mayonnaise (or other good quality mayo) to make it spreadable

Cook chicken in water with seasoning salt added until tender, about 40-45 minutes. Let cool in broth, until cool enough to handle. Chop chicken medium-fine. In a large bowl, add in celery, apple and cheese. Add in enough mayonnaise to make it spreadable. I start with 3 or 4 big tablespoons full and stir and then add more, one spoonful at a time, until I get the right amount. (Because chicken breasts and celery and apples are different sizes, it's hard to be precise with a mayo measurement.) Stir until well blended.

Cheddar Beer Bread

Before lunch, all the salads were done with plenty of time to chill before I packed it in late afternoon for travel. After lunch I decided to stir up some cheese bread. If you say "but I can't bake bread" this recipe is for you. It stirs up like muffin batter. No yeast. No kneading. No rising time. And it's so so good. 

CHEDDAR BEER BREAD

3 cups all-purpose flour

1 tablespoon baking powder

3 tablespoons sugar

1/2 teaspoon salt 

1/4 teaspoon black pepper

1 cup shredded sharp yellow cheddar cheese, divided 

1/4 cup melted butter, divided

1 (12-oz) bottle or can of beer

Preheat oven to 375º. Spray an 8-1/2-inch loaf pan with PAM (or similar) cooking spray. 

In a large bowl, mix together flour, baking powder, sugar, salt, pepper, 3/4 cup shredded cheese, and 3 tablespoons of the melted butter. Add the beer and stir well. Batter will be sticky. Pour batter into loaf pan.

Top with remaining shredded cheese and drizzle with the remaining butter.

Bake bread for 45-55 minutes, or until top is golden and a toothpick inserted in center comes out clean.

General rule is to check the bread at the shortest baking time and see if it needs more. All ovens are different.


I used my favorite set of nesting bowl to serve everything. These are melamine bowls with lids so they are perfect for packing. Because I was determined to use all five bowls, I put lettuce leaf cups for the chicken salad into one and found a box of gluten-free cheese crackers (Good Thins, Three Cheese flavor) to put in the tiny one. A well-known restaurateur told me years ago that food service is all about presentation. He was right. I really think that supper last night tasted better because of the pretty bowls. It's the first time I've used them all together. 


NOTICE:  If you subscribe to this blog by using the email widget on the sidebar (I have removed it,) that feedburner service is being retired in July 2021. It is not being replaced. There are other ways to sign up for an RSS feed. I do not know how to do that, but maybe you (or a grandchild) know how. If I can find someone to help me migrate the email list of over 1200 to a different service I'll do so. But at the moment, that is way above my skill set.