Tuesday, October 27, 2020

Apple Cake w/Brown Sugar Frosting

Old-Fashioned Apple Cake w/Brown Sugar Frosting


This morning I'm putting this recipe on the blog so that we don't lose it. It's straight from King Arthur, who says it's their most requested apple cake recipe. It tastes like fall. It was good enough that Jessica made it twice. In one weekend. She made one so that we would have a treat. And two days later, the cake was gone but Todd was here, and he asked, "Can you make another one?" One of those times she measured the dry ingredients ahead of time. That made it so easy. Peeling the apples is the labor intense part. 

We did decide that the frosting is really sweet. Almost too sweet for us Southerners who love sweet. (And we live in the land of Krispie Kreme.) It's almost like brown sugar fudge. But did she change it on cake #2? No. Made it exactly like the first one. And the second cake disappeared as fast at the first one. 

Find the original recipe here. There are more mixing tips, including how to make a gluten-free version, and how to make a less sweet frosting. I am posting it here just like Jessica made it.

OLD-FASHIONED APPLE CAKE w/BROWN SUGAR FROSTING

Cake:

2-2/3 cups all-purpose flour

1-2/3 cups sugar

3/4 teaspoon salt

1-1/2 teaspoon apple pie spice*

2 large eggs, room temp

1 stick (8 tbsp) butter

4 cups peeled, finely chopped apples

1 cup chopped toasted pecans, optional

Frosting:

7 tablespoons butter

2/3 cups brown sugar, packed

1/4 teaspoon salt

1/4 cup milk

2-1/4 cup powdered sugar

3/4 teaspoon vanilla

Preheat oven to 375º. Spray a 9x13-inch pan with cooking spray. Mix all cake ingredients, except apples and nuts, in large mixer bowl. Mix just until mixture comes together and becomes uniformly crumbly. Stop mixing at this point. You don't want the mixture to turn into a cohesive mass.

Add apples and nuts if using. Mix until apples release some juice and stiff mixture becomes thick batter. (Dough will be between cookie dough and brownie batter.) It may take about 3 minutes using a stand mixer. (Jessica says you need a stand mixer for this. Don't try to mix by hand.)

Spread batter into greased pan, using wet fingers to spread it if necessary. Bake cake for 45 minutes, or until toothpick put in center comes out clean. (Or with just a few crumbs clinging to it.)

Remove cake from oven and place on rack to cool while you make frosting.

To make frosting:  Melt butter in medium saucepan over medium heat. Stir in brown sugar and salt and cook, stirring until sugar starts to melt and mixture becomes fairly smooth. Add milk and bring to a boil.

Remove syrup from heat and pour into a medium mixing bowl (but large enough to hold all the powdered sugar.) Let syrup cool for 10 minutes. 

Pour powdered sugar into warm syrup, then add vanilla. Whisk everything together until thoroughly combined. Work fast because frosting stiffens up quickly as it cools.

Pour warm frosting onto cake, spreading it quickly over entire surface. (Have an offset spatula ready to spread. Don't lose time digging through the drawer to find it.)

Serve cake warm or at room temp. Store, covered, at room temp for several days. (Ours didn't last that long.)

* No apple pie spice in your pantry? Mix 1 tsp. cinnamon, 1/4 tsp. ginger and 1/4 tsp. nutmeg to make your own.


It is awfully quiet here this week. Like grandparents everywhere we would love to see the little ones more than we do. But we are thankful for photos and good memories. This is Little Lady playing with the decades old Fisher-Price farm that belonged to her mommy and aunt when they were the little girls here. I didn't save all the toys, of course, but I'm happy I did hang on to a few. It's fun to see them in use again.


Tuesday, October 20, 2020

Food And Family

Cheddar Beer Bread

What a week we had! For the first time in months we got to spend time with our sweet smallest granddaughter. She and her mommy were here for over a week. We cooked. We ate. We crawled around in the floor behind her. We played blocks. We sang songs. It was heaven.


We made so many good recipes while they were here. It's the most cooking I've done in ages. Now, you know I cook a lot. But I don't always cook every day. With just two of us here, we count on leftovers for dinner at least a couple of days a week. 

I'll share a few of the favorite recipes in the coming weeks. Maybe the most favorite...and the easiest...was this cheddar beer bread. Mommy sent the recipe to me and Jessica several weeks ago. And before she came to visit, Jessica made it twice at her house. We SHOULD have made it twice here. Yes. It's that good. It is perfect to serve along side a bowl of chili or soup. Or, toast slices for breakfast. It's good by itself.

If your first thought is "I can't bake bread. I don't know how to do yeast recipes." don't skip this recipe. This is a quick bread. It's more like stirring up a batch of muffins. Trust me. You need to make this.

CHEDDAR BEER BREAD

3 cups all-purpose flour

1 tablespoon baking powder

3 tablespoons sugar

1/2 teaspoon salt 

1/4 teaspoon black pepper

1 cup shredded sharp yellow cheddar cheese, divided 

1/4 cup melted butter, divided

1 (12-oz) bottle or can of beer

Preheat oven to 375º. Spray an 8-1/2-inch loaf pan with PAM (or similar) cooking spray. 

In a large bowl, mix together flour, baking powder, sugar, salt, pepper, 3/4 cup shredded cheese, and 3 tablespoons of the melted butter. Add the beer and stir well. Batter will be sticky. Pour batter into loaf pan.

Top with remaining shredded cheese and drizzle with the remaining butter.

Bake bread for 45-55 minutes, or until top is golden and a toothpick inserted in center comes out clean.

General rule is to check the bread at the shortest baking time and see if it needs more. All ovens are different.


Jessica said she used white cheddar at her house because that is what they buy. I always have yellow cheddar here. She said it tastes the same but the yellow cheese makes a prettier loaf.


Pattern:  Tchaikovsky Hat, size Child
Yarn: Jodie Young Ciao (DK), Nougat colorway
Needles:  4 & 7

Last year I knitted a nice wooly hat for Jessica with a fur pompom on the top. She asked for a matching hat for Little Lady. That particular pattern (Entwined by Susan B. Anderson) didn't include small sizes and recalculating the cable design was more work than I wanted to tackle. So I used a similar color yarn and made one of my most favorite knitting patterns—the Tchaikovsky Hat from Curious Handmade. This pattern from designer Helen Stewart is written for four sizes...Baby, Child, Small Adult, Large Adult. I made the child size for this 9-month old. (We measured her head and it was close to the child size.) She will be able to wear it for a few years, I think.


We are going to miss our little busybody this week. She is crawling everywhere, pulling up and walking as she holds on to furniture and "tasting" absolutely everything she picks up. 


Monday, October 12, 2020

Lesson From My Kitchen


When Daddy-O went out to pull up the straggly garden plants, he harvested a few vegetables instead. He discovered a handful of green beans ready to be picked. there have not been any for some time. This was their last hoorah. He also cut about 6 pods of okra. And well, those little tomatoes...I'm not sure they will ever stop! I suppose frost will get them eventually.

One thing I've pushed myself to do this strange summer is to cook without a "recipe." You don't always need a recipe, but you do need to know some basic cooking directions. Last week I wanted to do the easiest dinner possible and use up these last garden vegetables. Sheet pan dinners are as easy as they come.

 Instead of looking for a recipe, I looked for cooking times and temps for chicken tenders. I had a package that needed to be cooked pronto. I've done sheet pan veggies many times and I knew how they cooked. I searched "chicken tenders sheet pan meal." And a few actual recipes popped up. I was not interested in anything but the cooking time/temp. 

My preferred temperature for oven roasted vegetables is 425º on the convection setting. They roast quickly and get beautifully browned and crispy. I had also done them at 400º, so I knew that was an option. On a few times, I've roasted things at 450. 

I needed to know about cooking the chicken tenders on a sheet pan. So many recipes. So many temperatures and times. But I did find a recipe for chicken tenders on a sheet pan at 425º, cooked for 20 minutes.That fit perfectly with how I like my veggies. I didn't bother with recipe specifics. I only wanted the basics. Here's what I did...

SHEET PAN CHICKEN TENDER VEGGIE MEAL
  • Preheat oven to 425º. Use convection setting if you have it. Without convection, it might take a little longer.
  • Line a sheet pan with parchment paper. Put sliced/cut vegetables on pan, being careful not to crowd. Drizzle a little olive oil over all veggies and use hands to toss them, making sure all are coated. Sprinkle with house seasoning, OR salt, pepper, garlic powder, OR seasoning of your choice. 
  • Rub a little olive oil on the end of pan reserved for chicken tenders. Season tenders and line them up on one end of sheet pan. Brush with a little olive oil (I used my hands and rubbed some on) and season. 
  • Press panko crumbs on each tender and spray with olive oil spray or other cooking spray. Sprinkle a little more seasoning on top.
  • Roast for 20-25 minutes. Watch carefully near the end and check that you are not overcooking. 20 minutes was fine for this pan. 
  • Cut grape or cherry tomatoes in half. Toss with a little oil. 
  • With 10 minutes remaining, add tomatoes to the pan and sprinkle with seasoning. 

I turned Daddy-O's meager harvest into a feast for two. It was delicious! And knowing this was the last of the garden vegetables (not talking about the tomatoes) made it even sweeter.

Remember, THIS IS NOT A RECIPE. It's a starting pace. An idea. A launching pad. I had green beans and okra and little tomatoes to cook. You might have other vegetables. Next time I won't have this combo from the garden . Or you might have even a different meat. Spend a few minutes to check recipes for times and temps to make your combination work. Make sure your veggies are dry before you roast them. Wash them, of course, but pat them dry, or let them sit out a while to dry.

You are free to use any seasoning you like. The seasoning for Sausages & Veggies w/Mustard Sauce would be good to use if you want to make your own. And there are many good  bought seasoning mixes. Just pick your favorite. Or, go a little crazy and sprinkle an assortment of herbs over the pan! Another time, I might just cook the chicken tenders this way and do side dishes on the stove top. Do not get locked into this as a "recipe." 

This turned out better than I expected. The chicken tenders were browned and crispy. I did not turn them over during cooking. The vegetables were nice and crispy. I did stir them when I took the pan out to add the tomatoes. And 10 minutes was plenty of oven time for those little guys.

Please know...you can do this at a different temperature. Sometimes I roast vegetables at 400º if that works better with the rest of my meal. That will take a little longer. Watch and go by color. I did use a meat thermometer to check the chicken. That's the safest way. If you don't have one, cut a piece open to make sure it's cooked through.


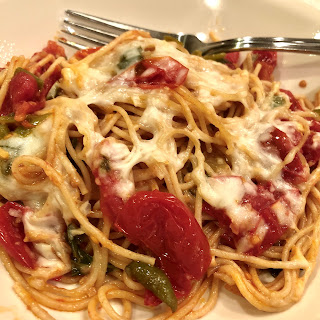
Here is another panful of my most cooked recipe this summer—Grape Tomatoes & Pasta.  It was as good  this weekend as it's been every time I've made it. I've lost count of how many times I've made this during the summer. It's a delicious way to put a dent in the grape tomatoes harvest. And many of my friends have made this and loved it. I know I can buy the tomatoes and the basil in the store all year, but this has been a special recipe for us, knowing the star ingredients came from our back yard.


And here it is for the very last time with our garden tomatoes. It's a little different than usual. Using that same principle above, I used the basic recipe—which really wasn't a recipe—and changed it up to make do with what I had here.

I didn't have any fresh mozzarella. And I did have green peppers from the garden. So this time I sautéed diced peppers and onions a little before adding the tomatoes which I cut in half this time. After I added the cooked spaghetti and stirred it all together. Then I sprinkled shredded mozzarella on top and popped the pan into a 350º oven for about 10 minutes to let the cheese melt. This was so good.

Be brave in the kitchen. Out of an ingredient? See if you can find a reasonable substitute and skip a trip to the store. Or can you leave something out all together? Be brave.


Tuesday, October 6, 2020

Favorite Tip Update


Y'all. Lesson learned. Be careful when you use the word "always." I had a photo from a reader yesterday who was changing sheets at her house after she read my post. And there it is...the tag on her fitted sheet is on the bottom left. So let me correct what I said yesterday:

The tag on the fitted sheet is ALMOST ALWAYS on the bottom right.

I will say that I have checked over a dozen sets of sheets, assorted brands, and all of mine really were located on the bottom right. (Except the one odd set where the tag was located in the center but clearly stated which was the top) 

So I still think this is a helpful tip. And if you find a set of yours that if different, you  can make a mental note of where the tag is and still use it as a marker.

Thanks to the reader who shared this. Sorry folks for any confusion.  Now we know.


Monday, October 5, 2020

My Favorite Household Tip


We were at the lake again this weekend. And this time I needed to do a little housekeeping. My least favorite household chore is changing the sheets on the bed. I know, I know. I am so thankful to HAVE a bed and sheets, but I still am not a fan of fooling with them

Which brings me to a tip I've shared here before. But I know there are always new readers here and it's doubtful that anyone goes back and reads old posts. And you need to know this.

So here is one of my all-time favorite tips. Forever I tried to buy white or off-white sheets with a woven stripe so that I could tell which way to put the sheets on the bed. Which is the top/bottom. Which are the sides. But I do have a couple of sets that are perfectly plain. So when I use those, it was always trial and error which to lay out the bottom sheet. Mostly it was error. First attempt would be turned the wrong way.

Then I learned a couple of years ago that:

        The tag on a fitted sheet ALWAYS goes on the bottom right corner of the mattress.

In the photo above, I am standing at the foot of the bed, looking toward the top. The tag goes on my right side. How easy is that? Glory be!!!  (I do have one set with the tag in the center but it is clearly labeled "top.")

No more spreading the fitted sheet out and then tugging and turning it around the other way. Glory be!!!


We enjoyed a special treat on Saturday afternoon. If you are a Josh Groban fan, you might enjoy the remaining concerts. Go to JoshGroban.com, then go to "tour" to find the info about purchasing a ticket for his live streaming concerts. There are two left—one on Thanksgiving night and one, a holiday program, in mid-December. Next best thing to being in a concert hall. Thanks, Angie, for tell me about this.


We had a cool weekend. I actually got to wear a sweater. Oh, it will be back in the 80s by mid-week but it's nice to have a few days that feel like fall. I love watching early morning fishermen glide by while I'm having my coffee. These three were really bundled up. And I took my coffee back inside where it was warmer. 

Have a good week, y'all!