Showing posts with label freezer. Show all posts

Friday, June 12, 2020

PSA: Check Your Freezer


PUBLIC SERVICE ANNOUNCEMENT: If you stocked up on foods at the beginning of the quarantine, now is a good time to take stock of what is in your freezer. Make sure you are using up foods before you buy more of the same thing. Like I'm guilty of doing. Yes, it happens.

I was making my online grocery order this morning and took a minute to go see what was in the freezer. And promptly took a couple of items out of my cart. 

While you're at it, check the dates of the refrigerator items that have a long shelf life, like smoked sausage, packaged deli meats, sour cream, ricotta, cheese, etc. Nothing lasts forever. And it is painful to find something pushed to the back of the fridge and see that the date ran out two weeks ago. Rearrange them and pull the nearest dates to the front. Shuffle your meals plans a little to use them up.

You can find a freezer storage chart here that tells you the optimum time for freezer storage. Be sure to date the prepared foods that you freeze. It's probably a good idea to print this out and keep it handy.

Happy weekend! Stay safe, people.


Tuesday, August 6, 2019

Oh Happy Day—This Worked!


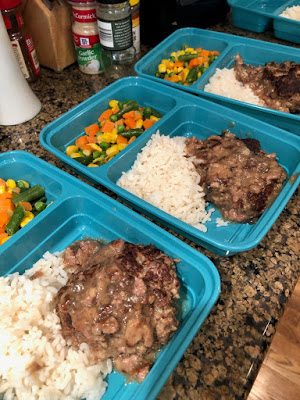
Remember when I made "TV dinners" a couple of weeks ago? I promised to let you know how well they thawed out. Yesterday I pulled two of the Salisbury steak dinners out of the freezer right after I got up in the morning. Then I didn't think about making dinner for the rest of the day.

It was one of those "clean up/put things away" days. All the knitting needles left out after projects were finished are now back where they belong. The birthday presents for this weekend are sitting out with the gift wrap, ready for me to wrap today. The mermaid's flower headband is sewn back on. (That was a Mimi job request from Baby Girl.)  There is no dust under the furniture. The laundry is all done...even folded and put away.

Then 12 hours after I moved the frozen dinners from the freezer to the refrigerator, it was time to see if they passed the test. Would they be as good as I hoped? (I had tasted the frozen dinners from Meals On Wheels years ago when they were delivered to my mother-in-law. I wanted mine to be better than those.) They were so close to being thawed, but there were still ice crystals in the food.   I heated them, one at a time. About 3 minutes on DEFROST to finish the thawing process. Then I heated mine for 1 minute at the regular setting.

 Oh happy day! This was as good as the first time. The rice was perfect. (I always sprinkle a few drops of water over rice before I reheat it.) The vegetables were fine. The meat had a cool spot right in the center, so I broke the patty up and put some of the hot rice on top of it. That's all it needed. Another time I would add a few seconds to the heating.

But this really worked. I freeze foods all the time, but not combinations of food in such small portions. That's the part I wasn't sure about. I think it would be better if I had taken the dinners out of the freezer the night before. Safety reminder:  Always thaw in the refrigerator—not on the countertop. But that last bit of thawing in the microwave worked. Good to know.

For our household of two, making these dinners is a way to deal with leftovers. Now the challenge is to use these dinners up and not let them sit forgotten in the freezer for months. These bright blue containers are so eye-catching that I hope none get pushed to the back. And I really hope that the other food combinations thaw out as well as this one did.


Since I knew I'd have no supper clean up, I baked a treat for us in the afternoon. This was also part of my cleaning out...using up pantry items with an expiration date that was getting close. This recipe was the very first one I posted on this blog way back in 2011. We still enjoy making them.

PUMPKIN SPICE MUFFINS

1 box spice cake mix
1 (15-oz) can pumpkin puree
1/2 cup water

    TOPPING:
    1/2 all-purpose flour
    1/2 brown sugar, packed (I used dark brown sugar) 
    1/2 stick butter

Preheat oven to 350 degrees. Put cupcake papers in a 12-cup muffin tin. Mix cake mix, pumpkin and water until well blended. Using an electric hand mixer is the easiest way to do it. Spoon batter into muffin tins. 

Mix flour and sugar. Cut butter in until crumbly. Sprinkle topping generously over muffin batter, pressing in lightly.  Bake for 25-30 minutes, until done. (My oven took 30 minutes.) Test with a toothpick. It should come out clean when done.

We have made these muffins with yellow cake mix and chocolate cake mix, too. They are all good. But we all like the spice cake mix best. Try them all and decide which is your favorite.


If you live where it's easy to go out for dinner, or where there are plenty of options to pick up to-do meals, or have delivery options, this may not be a big deal for you. But for us, living on a farm in a rural area, these easy dinners are so helpful. I  will keep trying different combinations for individual dinners.


Thursday, July 18, 2019

Trying Something New This Week And BIG NEWS!


Had you given up on me? I nearly gave up on myself. After a hectic family week at the lake, we stayed on a few days more. But both of us were sick. Daddy-O, with one of those "non-specific viruses" that you just have to wait for it to get better. And I had another round of nearly non-stop coughing which has become a frequent problem. After a couple of weeks of listening to myself I gave up and made an appointment with the doctor. New doctor. New diagnosis. New meds. And I'm already feeling better. Enough better to get back in the kitchen. I haven't felt this good in ages.


I always think "next week" life will slow down. But looking at my calendar and jotting down dates my girls need me for Mimi duty, it might be more like next year before that happens. (I also found out after staying some extra days at the lake, that I like busy. It got harder and harder to just be.)

So today I decided to try freezer cooking—with a twist. Because I know I'll be away here and there for the next few weeks, I wanted to try freezing individual dinners. Kind of like the old TV dinners that hit the store shelves back in the 50s. I thought they were so exotic. Probably because we never had them. When I was on my own after college and cooking for one, I got my chance to try them. And to be honest I never found one I really liked. I think I pretended to like a couple of them. But they really weren't very good. The homemade ones will have to be better.

My normal freezing is in larger portions and I usually stick to entrees. By now I know what freezes well. And what we like. I always think the secret is in choosing recipes with a sauce or gravy (that includes soups and stews) to keep food moist and then being very particular about how I package them. Oh, breads and muffins are also good freezer items.

This morning's cooking is an experiment. We are looking for a complete—more or less—meal that Daddy-O can grab out of the freezer and heat for his dinner. He does know that the results will likely be better if he lets it thaw overnight in the refrigerator. We shall see how this goes.


Because this was something I decided to do last night, I made do with what was on hand. I'm not sure these are the ultimate dinners. But it will be better than pouring a bowl of cereal at night after working out on the farm all day. Because we were gone for two weeks at the lake, my cupboard looks a little like Mother Hubbard's. Bare.

I did have one can of mushroom soup and some breadcrumbs I bought a few weeks ago for another recipe. And I hate to say that I had just put eggs in the Instant Pot to cook when I realized I needed one for the Salisbury steak. So I turned the IP off, took out one egg, and started it again. THAT'S how empty my kitchen is.

For freezing purposes, I might double the gravy part of the recipe another time. This is an old, old recipe that I've made a good many times over the years. But with only two of us here, it now makes more than we can eat. So I packed four "steaks" and saved two out for our dinner tonight.

SALISBURY STEAK

1 can (10-3/4 oz.) condensed cream of mushroom soup
1-1/2 lb. lean ground beef (I like extra lean) 
1/2 dry bread crumbs
1/4 cup finely chopped onion
1 egg, slighty beaten
1/3 cup water (for the gravy--not the meat mixture)

Mix thoroughly, 1/4 cup of the soup, ground beef, bread crumbs, onion and egg. (I used my hands to mix it.) Shape firmly into 6 patties. In skillet, brown patties (use a little oil if necessary and pour off excess fat, if there is any.) Blend remaining soup and the water. Pour over patties. Cover and cook for 20 minutes, or until done, stirring occasionally. 

Serve with rice or mashed potatoes.


I bought new "meal prep" containers at Target this week. To fill up that little side compartment I zapped some mixed vegetables in the microwave for one minute less that the recommended cooking time. We will find out if that works out right with reheating. I truly have no clue. I will let you know how it goes when he heats one up.

I found a YouTube video last night that really go me started thinking about this. A Peek Inside. Her video is very real, and very honest. I did get some ideas. (For a totally opposite way to freezer cook, this video was also fun! She cooks huge meals.) This morning I looked through all my freezer cookbooks and only found one that had any guidance for "TV dinners." Most freezer cooking is for the entree. And I'm good with that. So this is just something new for me to learn.

Busy days ahead. School started for the little girls on August 1. Big Sister moves away to college the next week. Jessica and Todd move into a new home that same day. I foresee a fair amount of time spent down their way until things get settled.

And I also anticipate some more knitting coming up. NEWS FLASH!!! It will be baby knitting. 🥰 Jessica and Todd are expecting a baby girl in January. That will be granddaughter #4!





Thursday, March 21, 2019

Time Flies When You're Having Fun


It seems like it's been forever since I posted. That might be because it kind of has been. I have been up and down highways so many times. Down the interstate to see Little Sister sing a solo in the church play. Up the highway—and up a mountain—for a knitting retreat in the neighboring state. And I leave tomorrow to head back down the highway to celebrate two birthdays.

With all the coming and going, we have mostly eaten out of the freezer And it's been good to use things up. If you are a regular here, you know that I love keeping a well-stocked freezer. But sometimes we have to remember to use up the food stash before it has lingered in the freezer too long.

Are there rules for how long to keep frozen foods? Yes. I'm linking a couple of reliable resources if you want to learn more.


A huge part of how long foods can be frozen is related to how well you store those foods in the freezer. Proper packaging is so important. "Freezer burn" can ruin food and it's caused by the freezing process sucking the moisture out of the food. Freezer burn won't make you sick. But the food isn't going to taste as good.

Food should be wrapped air-tight with a freezer appropriate wrap or bag. Use the FREEZER bags, not the storage bags. Use HEAVY-DUTY foil and not regular. Two layers of regular foil do not work as well as one layer of heavy-duty. The freezer products are thicker and made to prevent that moisture loss that causes freezer burn.

Your freezer should stay at 0º. Use a thermometer to check. If you get really picky, a non-self-defrosting freezer is the better choice because self-defrosting freezer are constantly thawing and freezing. It's that cycle that keeps the frost away. I've had the old-style freezer. I'm going to stick with my current frost-free version and live with the consequences. Defrosting a freezer is not fun. Seriously, I have not had a problem. It might be that using the foods up fast enough is the solution.

So, what have we eaten up in the last few weeks?

Chicken Taco Soup
Turkey Pumpkin Chili
Salsa Chicken
3-Packet Pot Roast
Stew Beef
Swiss Beef
Hot Dog Chili
Spaghetti Sauce
Baked Ziti
Bourbon Marinated Pork Tenderloin
Applesauce Muffins
Cinnamon Rolls

Foods, like soups and stews and saucy recipes, are good freezer choices because that extra liquid helps prevent freezer burn. Some casseroles freeze well. We have learned which ones we like. Baked goods freeze well, but they won't keep as long as meats and casseroles. Again--freezing longer won't make you sick, but the quality won't be as good.

When we get home from this trip, it will be time for me to replenish the freezer. I don't do the big freezer cooking sessions that are so popular. (Google if you want to know more.) Since there are only two of us here, I make my regular recipes...sometimes I might double one...and divide it into meal size portions. Or, even single serve portions. Then Daddy-O can grab and thaw something when I'm away.

Now I'm headed to the kitchen to bake a birthday cake. And next week I'll start cooking again. Daddy-O will be happy.

This week's super moon shining on our barn.


Friday, March 31, 2017

Breakfast In A Flash


I'm pretty good at keeping foods for dinner in the freezer. I don't make that much effort with breakfast foods. Breakfast is so quick and easy to make, that I normally don't bother. But Daddy-O likes a bigger breakfast than I do. Like bacon and eggs. Or, sausage biscuits. And those do take more time in the morning.

Last week while I was on my quest to restock the freezer, I added a couple of items that Daddy-O can grab in a hurry. He's on his own for a few days now while I'm at a knitting retreat. With a couple of breakfast options in the freezer, I know he won't be hungry in the mornings.

I baked applesauce muffins which I have made many times. They freeze well. I popped them into the freezer, two to a pint-size freezer ziplock bag. He can take out one pack for breakfast or a snack when he wants something. And because they are packed in "twos," he won't need to thaw out the others until he's ready.

And after applesauce muffins, I made "egg muffins." I made a version of these once with vegetable and remember Daddy-O saying, "These are good. But they'd be better if they had some meat in them." So this sausage/egg/cheese recipe sounded like what he wanted.


These can be eaten as is, or you can smash them flat and tuck into a toasted English muffin or a biscuit. Kind of like homemade fast food!

EGG "MUFFINS"

1 lb turkey sausage (I used pork sausage)
6 large eggs
1 cup egg whites (from 7 large eggs)
1/4 cup minced onion
1 cup shredded Cheddar cheese
1/2 cup shredded mozzarella cheese
salt & pepper to taste

Preheat oven to 350 degrees.

Brown sausage until no pink remains. Drain on paper towels. Spray muffin tins with PAM. Divide the cooked sausage, onion and cheeses between the 12 muffin cups.

In a large bowl, combine eggs, egg whites, and salt & pepper. Pour egg mixture over the sausage and cheese in each cup.

Bake 22-25 minutes, until set and lightly browned.

Remove from pan and serve warm. Or, let cook completely on a wire rack and refrigerate or freeze.

To reheat from refrigerated, microwave about 30 seconds. To reheat from frozen, microwave 45-60 seconds. (Microwave ovens vary, so figure out the time for yours.)


To freeze them, I placed the cooled muffins on a sheet of parchment paper on a baking pan. Freeze for 1-2 hours, and then wrap for freezer storage. You might want to set a timer to remind you to go back and bag them up. It's easy to forget.


I put them into packs of two and labeled with thawing instructions. Then after trying out the "thaw from frozen" directions, Daddy-O discovered that it took him about 75 seconds to thaw his.


And in the interest of full disclosure, this is what mine looked like coming out of the oven. There was some overflow. I just trimmed that off as I removed them from the cups and everything was good.


Monday, March 27, 2017

Freezer Stash


We knitters talk a lot about "stash." That is yarn which is stockpiled for later use. Some knitters have a stash large enough to stock a yarn shop. Other knitters only keep yarn for a couple of upcoming projects on hand. And I supposed somewhere there must be a knitter who has no stash yarn.

This morning as I was taking a few minutes in the early morning to make a weekly to-do list, a grocery list and an outline of weekly menus (I don't always do this, but it's a busy week) I went to the freezer to pull out chili & beans for tonight's supper. I'm thinking taco salad for tonight.

A month ago, this top shelf in my freezer was nearly empty. For about three weeks, I've cooked and then frozen part of what I cooked. There are only two of us here, so most recipes can feed us for for two or three meals.

If you are like me and love having a freezer stash on hand, be sure to take time to take stock every now and then of what's frozen. It's really easy to forget what's there and what needs to be used. Today I did find one small pack of taco meat that's headed for the trash. It was down in the bottom of the plastic bin and got overlooked. It had been there a l-o-n-g time.

You've done all the work of stocking your freezer. Now don't forget to use it. The freezer stash won't last as long as the yarn stash! Frozen food does have an expiration date. It's a busy week here at the farm, so I think I'll be using my freezer stash this week. And when I'm away next week, Daddy-O will not starve.


What is in my freezer right now? 

Taco Meat (a new batch)
Teriyaki Chicken (recipe coming soon)
Chili & Beans


Thursday, January 21, 2016

Second Time's The Charm

Turkey Meatballs

I had this ready to post earlier in the month just after the family when home after the holidays, but other things kept jumping in front of this recipe. But today, while we wait to see if we have frozen weather this weekend, I'll share it. Thankfully, there are still some meatballs in the freezer. Might be perfect for an easy supper if we are here snowed in for a couple of days.

I know I posted this recipe only a few weeks ago, and this is quick to post again, but I changed the cooking method this time and it made all the difference. A lot of difference. We liked them okay the first time. This time everyone loved them! Little ones. Son-in-law. Everyone. The first time I cooked some of these, I did it all in the skillet—browned the meatballs, poured sauce over and cooked them until done. (The original recipe didn't give a cooking method, just the mixing and freezing directions.) When I cooked them on the stovetop, the meatballs kind of fell apart and the texture was softer than I liked. Cooking them in the oven gave a better texture to the meatballs. I won't try another way after this success.

I had a double batch of these in the freezer to help feed the family while they were here for the holiday. This was a favorite dinner of their two week stay. I am always looking for ways to make supper easy when the little girls are here. Pulling things from the freezer really helps.

 This is a double batch, ready for the freezer.

TURKEY MEATBALLS
    adapted from Martha Stewart

3 slices whole-wheat sandwich bread
1/4 cup whole milk
1-1/2 lbs. ground turkey (lean, dark meat)
3 green onions, finely chopped
2 small garlic cloves, minced (I used 2 tsp. from a jar)
2 tablespoons chopped fresh parsley
1 large egg
coarse salt and pepper to taste

Place bread in food processor; pulse until fine crumbs form. In a small bowl, mix breadcrumbs with milk; set aside at least 5 minutes.

In a large bowl, combine turkey, green onions, garlic, parsley, egg, salt (1-1/2 tsp) and pepper (1/4 tsp) and breadcrumb mixture. Mix gently with a fork.

With your hands, form into meatballs (1 meatball = 2 level tablespoons). Arrange in a single layer on a baking sheet with sides. Line the baking sheet with parchment paper.

To freeze: place meatballs on baking sheet in freezer for 1 hour. Move meatballs to a ziplock freezer bag. Label and date. Store frozen up to 3 months.

Makes about 30 meatballs. (I got 28)

To cook frozen meatballs:
This time I heated a large non-stick skillet with olive oil to medium hot. Then I browned the frozen meatballs. Just used my tongs to turn them a couple of times and get a good brown on two or three sides. I don't think any of them were browned all over. I turned them as best I could, but didn't try for complete browning. I didn't want them to break apart.

I moved the browned meatballs into a 8x11-inch baking dish (that's a 2-qt dish) that I had sprayed lightly with PAM. I poured a jar of spaghetti sauce into the warm skillet, then added a can of diced tomatoes and a couple of good shakes of Italian seasoning. Stir that all up and let it simmer a few minutes.

Pour sauce over the meatballs and cover dish with foil. Bake at 350 degrees (preheated) for 1 hour.


This time I served the meatballs with cheese tortellini.  This was a nice change from spaghetti. As we kept talking about how good these are, we said they could also be good for making meatball subs, or meatball sliders. I have enough left in the freezer to cook again. Next time I might pour barbecue sauce over the browned meatballs before baking, then serve them with mashed potatoes.

I also had whole wheat sourdough bread in the freezer. And I just open a can of green beans because I was really looking for easy—and Baby Girl likes green beans. That's as good a reason as any to cook them.

This recipe is now definitely a "keeper."


Wednesday, November 18, 2015

Make Mine Meatballs


I couldn't do it—I couldn't post a new recipe here before I had fully tested it. Or, at least one of my daughters had made it. Or, I had eaten the finished product. Last night I pulled a few meatballs from the freezer and made supper. I browned the frozen meatballs in the skillet. They stuck a little. Poured a partial jar of spaghetti sauce over it to finish cooking. Didn't watch that close enough and nearly burned it all. Moved it all to a non-stick skillet and added in some canned diced tomatoes w/garlic, basil, oregano and let this simmer, covered, until the meatballs were done. I checked them with a thermometer. Next time I'll start with a non-stick skillet.


I am going out on a limb here. I have made these meatballs and they are in the freezer. But I have not cooked them yet. I am trusting the many reviewers who have said they are very good. I am really trying to get a jump on my cooking—especially things that my non-red-meat-eating daughter can have. We will have the family here for Thanksgiving and again for Christmas. And I want to play with grandchildren then, not spend all my time in the kitchen.


This recipe came from Martha Stewart. If you check the recipe here, there are links to several ways to use these meatballs. One recipe calls for the meatballs to be cooked from the frozen state in a skillet. Another one cooks them under the broiler and doesn't mention being frozen. One reviewer said that they held together better after they had been frozen. I'm sure I will be using this recipe as a freezer recipe.

My own changes and hints? I doubled the recipe. If I was going to squish my hands in raw ground turkey, I might as well make enough at one time.  I used a little less pepper than the original recipe because the suggested amount just looked like a lot to me. Make that suit your family. I used green onions instead of scallions. That's what my store sells.

I think my meatballs might be a little bigger than they should be. I actually measured out the first one and tried to make the rest of them match. But I didn't get quite the yield that the recipe states. My double batch gave me 56 meatballs. (According to Martha's recipe, I should have had 70.)  Should you decide to triple this recipe like some of the reviewers did, you'll need a HUGE mixing bowl. The doubled recipe filled my biggest bowl.


From the lesson-learned-the-hard-way department (years ago—not this time,) use a pot holder to remove the baking sheets from your freezer. A frozen pan hurts your fingers almost as much as an oven burn.

This is a good recipe. But you need to remember that these meatballs are made with turkey and not ground beef. The texture is a little different. But I will make these again.

TURKEY MEATBALLS
    adapted from Martha Stewart

3 slices whole-wheat sandwich bread
1/4 cup whole milk
1-1/2 lbs. ground turkey (lean, dark meat)
3 green onions, finely chopped
2 small garlic cloves, minced (I used 2 tsp. from a jar)
2 tablespoons chopped parsley
1 large egg
coarse salt and pepper to taste

Place bread in food processor; pulse until fine crumbs form. In a small bowl, mix breadcrumbs with milk; set aside at least 5 minutes.

In a large bowl, combine turkey, green onions, garlic, parsley, egg, salt (1-1/2 tsp) and pepper (1/4 tsp) and breadcrumb mixture. Mix gently with a fork.

With your hands, form into meatballs (1 meatball = 2 level tablespoons). Arrange in a single layer on a baking sheet with sides. Line the baking sheet with parchment paper.

To freeze: place meatballs on baking sheet in freezer for 1 hour. Move meatballs to a ziplock freezer bag. Lable and date. Store frozen up to 3 months.

Makes about 30 meatballs.


I forget how old I am most of the time. But when I pulled out the food processor for this recipe, I saw that it didn't have a polarized plug—that's the kind with one prong wider than the other. You know, it only goes into the outlet in one direction. Bet some of you have never seen an appliance without one of those.


Monday, February 4, 2013

Super Monday


I spent a good part of my weekend at Knit Inn 2013 in Greenville, taking classes, visiting with old friends and meeting new ones. Several hundred knitters take over a hotel for three days. Every possible spot is filled with knitters—in the lobby, in the dining area, in the ballrooms. I always wonder what the few non-knitting hotel guests think when they first walk in.


I knew I would not get home on Friday until supper time. I was glad to have Pineapple Beef in the freezer. A terrific slow cooker recipe I've posted here before. Now I know it is just as good from the freezer as it was the first time. (I was not the one who brought Krispie Kremes into the house.)


Sunday was Super Bowl Sunday. We had no particular interest in either team—although it turned out to be a great game. Almost as good as the Downton Abby episode I watched mid-game. But it was as good excuse as any to try a new snack recipe. 


Made hummus for the first time just after I walked in from a church meeting. Super easy to do. The tiny little plastic cup you get at the grocery store is good. But this was so easy to make and cost so much less, I don't think I'll buy it much any more. There are plenty of recipes on the internet but I tried one from Ina Garten. And then I changed it to suit us. You'll find my recipe below.


And this morning I woke up to see this glorious sky, thankful I get another day to do life all over again. Life is good. Thank you, God.

HUMMUS

3 cloves garlic (garlic cloves come in all sizes, so make it suit your taste)
2 (15-oz) cans chickpeas, drained, liquid reserved
1-1/2 teaspoons Kosher salt (if you use table salt, you might want less)
1/3 cup Tahini paste
6 tablespoons freshly squeezed lemon juice, about 2 lemons
3-4 tablespoons liquid from beans (or amount needed to reach desired consistency)
8 dashes hot sauce

Peel garlic cloves. Dip them into boiling water for 30 seconds to mellow the "raw" garlic flavor, unless you like the stronger raw taste.

Using a food processor or blender, turn it on and drop garlic into moving blades to mince it. Turn off blender and add the remaining ingredients and blend until coarsely pureed. Taste and adjust the seasoning to suit you. Serve at room temperature or chilled.

TERIYAKI BEEF with PINEAPPLE

2 lb. stew beef
15-20 oz. jar teriyaki sauce (I used Archer Farms Teriyaki Grilling Sauce)
20-oz. can pineapple tidbits, drained

Add stew beef to slow cooker. (I used a 3-1/2 qt. size.)
Pour sauce over beef and stir.
Cook on LOW for 7-9 hours or HIGH for 5-6 hours.
Add pineapple tidbits during last 20-30 minutes of cooking time.

Freezes well, if you have leftovers. Freeze flat in a freezer ziploc bag and it will thaw quicker than if frozen in a "block" in a plastic container. Be sure to label and date.


Sunday, October 14, 2012

Last Of The Summer....Peppers


For years we have watched the British comedy, Last Of The Summer Wine. Those words came to mind yesterday when Daddy-O walked into the kitchen with an armload of peppers--about the last of the summer garden. He went to see if he could find just one cucumber for our salad. No cukes left, but we still have lots of peppers.

So today after church, I put them in the freezer. Even if you are not into food preservation, you can do this. You might not have a boat load of peppers in your backyard, but maybe you bought a tri-pack of peppers and only used one. Or a big bag of peppers was on sale at the store. You can freeze what you don't use immediately. Here's how:


Dice the peppers and spread them in a single layer on a cookie sheet. 
I lined the pan with parchment (or use foil) to make pouring into the bag easier.


Place the cookie sheet in the freezer for an hour or so.


Pour peppers into a freezer bag. 
Press out as much air as possible and close. 
Label and date. That's it.

That is a gallon-size freezer bag. I think I'm good for a long time. I had so many peppers that I made layers with foil so each cookie sheet had three layers of peppers. You want the pieces to freeze separately so you can pour them out later. When you have a recipe that starts with sauteed peppers and onions, you'll be glad these are in the freezer. Don't thaw; just use them straight from the freezer.

I thought I might see what else in the yard is hanging on bravely. There are still a few flowers in our yard. Come walk with me and take a look at the last of the summer blossoms...


BONUS TIP:  Years ago when our girls were young and very much into dollhouses, a friend who was a serious about miniature houses told me that if you let bell pepper seeds dry, they look just like tiny potato chips. She was right. So our doll house soon had a couple of bowls of "potato chips" for the doll family.