Saturday, February 28, 2015

And You Get A Blanket


Yarn:  Cascade Ecological Wool
Needles:  size 10

It's nice when a plan comes together. Two really big balls of yarn. One set of needles. Practice of a tricky new cast-on method. Patience with a new pattern. Persistence with round after round after round of plain knitting. And after enough time passes, you get a blanket.

When I taught guitar lessons, I had a sign on the wall of my studio that said, "Practice. Patience. Persistence." That was the secret if you wanted to learn to play. It's kind of the secret to learning nearly anything.


Friday, February 27, 2015

Why I Knit


It started with just plain gray yarn, waiting to be wound into a ball.
This is not a hobby with quick results. I like that it requires patience.


I studied the pattern and read the notes made by so many other knitters.
There were several new things for me to learn here.
Homework up front would save some frustration. At least that was the plan.


 When you're learning new techniques, mistakes happen.
Mistakes that meant I unknitted one section over and over—until I read the pattern right.
Then, I unknitted row after row at one point when I got confused.
Thankfully, my mistakes were made when these rows were small.


After a couple of weeks, I finished the knitting and took it off the needles.
Doesn't look like much, does it? I'll be honest. I was a little worried.

I had admired the photos of this Hemlock Ring blanket for a long time.
I knew this was part of the process, but I wasn't sure mine would make the transition.
I didn't understand how this pile of ripples could possibly end up flat.


After a good long soak in cool water to relax the fibers,
the soggy lump got moved to Little Sister's alphabet blocks 
I pinned and pinned and pinned, stretching and smoothing carefully, 
working it into the shape I wanted. Who knew wet wool was so moldable?


And when I stood up, knees creaking, I looked at the blanket.
 The magic had happened—the knitting magic.
My soggy, lumpy mess of yarn had turned into a circle of lace.

When you start a new project, there is no guarantee 
that it will turn out like you imagine, like you hope.


But this time, it worked. The knitting magic.
 
Now, the comes the hardest part. 
 Leaving it alone until it is completely dry.

Tomorrow I'll take all the pins out.
Yarn has a way of softening when it is soaked. 
I can't wait to see how it feels. And how it drapes.

This is why I knit. It's creative. It's an adventure.

(Look for finished photos soon.)


Thursday, February 26, 2015

Make Mine Meatless

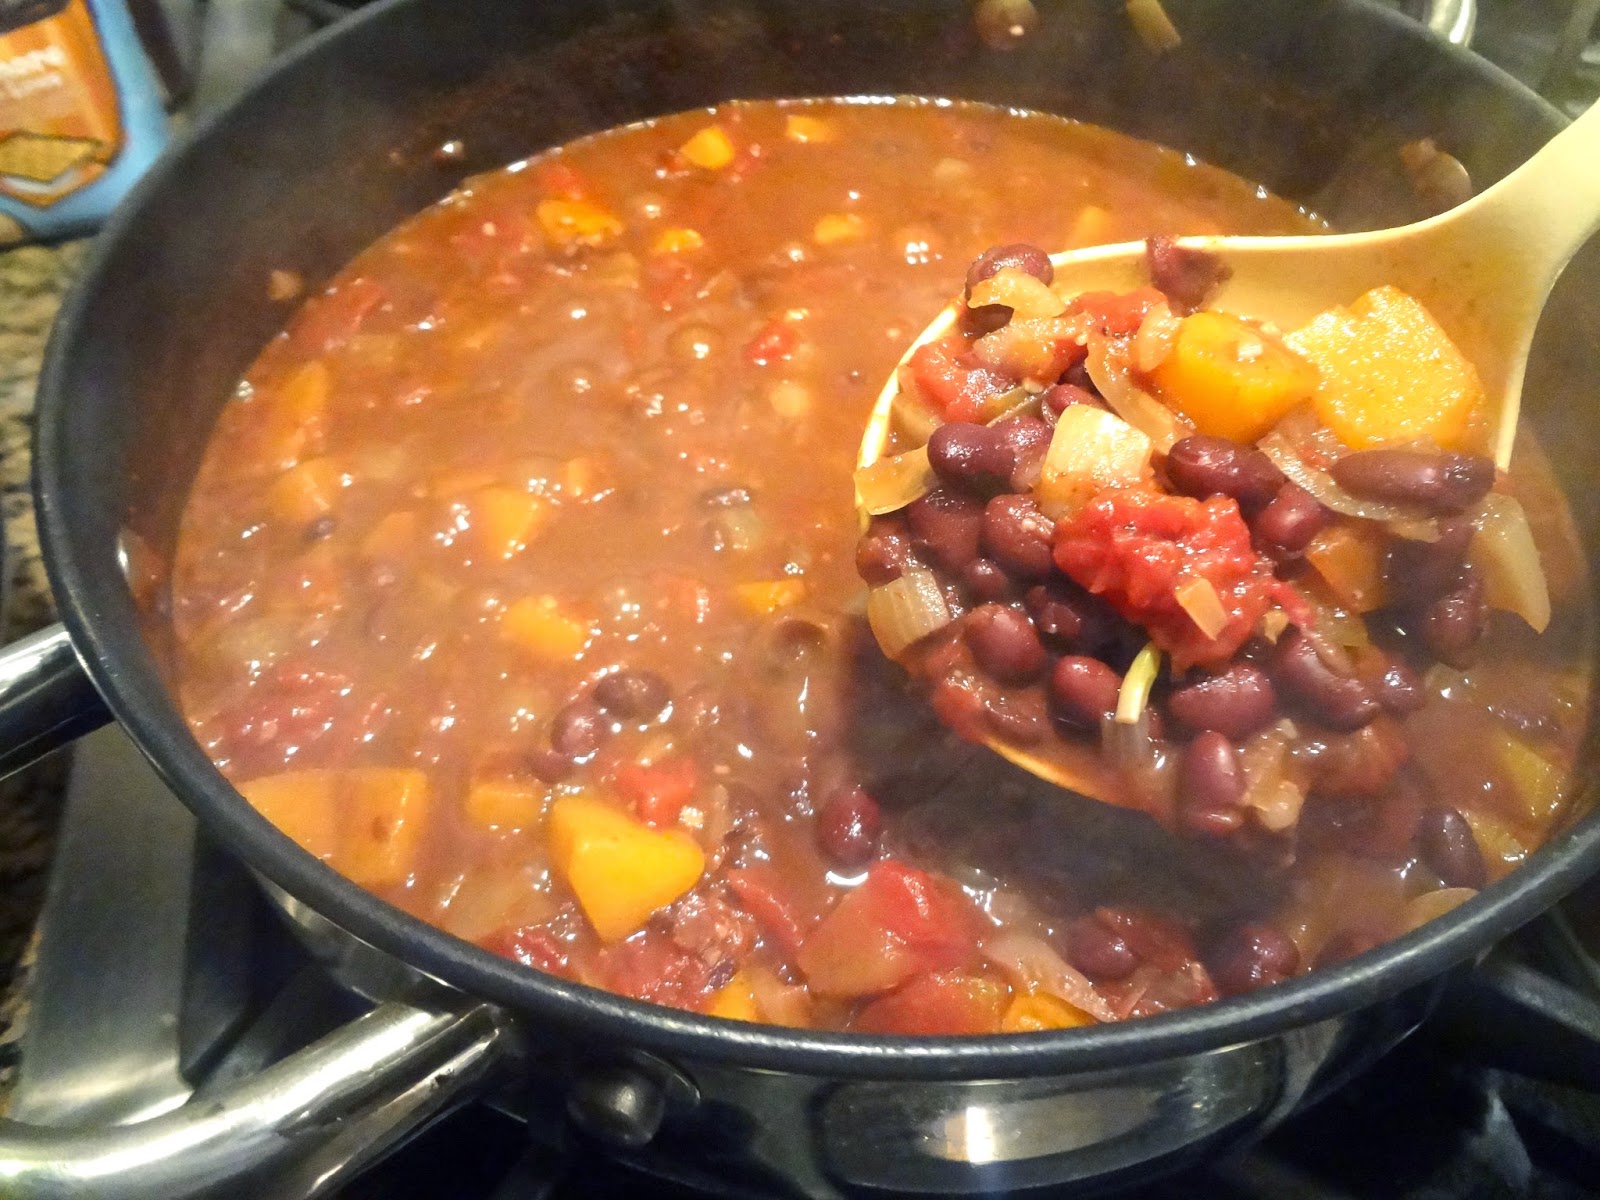
 Black Bean Butternut Squash Chili

You have seen what kind of cooking has been going on in my kitchen for the past couple of weeks—steaks, potato pancakes, apple cake, and brownies. I was so ready for healthy food. And it was COLD yesterday! We needed a stew or chili.

So what do you fix that's healthy and hearty and warming? Instead of browsing the internet for recipes, I looked back through my own recipe index. This meatless chili was just what I wanted to make. It's easy to put together and it makes enough to feed us a couple of times. And maybe a little will go into the freezer for later.

Trust me. This recipe is good. Daddy-O, "mister meat-and-potatoes", had seconds. He likes this chili. It is an odd combination of ingredients that really work. The cocoa and cinnamon give it a smoky aroma and a rich taste. 


BLACK BEAN BUTTERNUT SQUASH CHILI

1 medium red onion, chopped
2 (14-oz.) cans diced tomatoes (one can had green peppers & onion)
2 (15.5-oz.) cans black beans (do not drain)
2 cups cubed butternut squash (1 small squash)
4 garlic cloves, minced (or 2 tsp of jarred minced garlic)
1 tablespoon chili powder
1 tablespoon ground cumin
2 teaspoons unsweetened cocoa powder
1/4 teaspoon cinnamon
1 cup water

Combine all ingredients in large pot. Bring to a boil. Lower heat, cover and simmer for 60-90 minutes, stirring occasionally. (You can also use your slow cooker  and cook on HIGH for 3-4 hours.)

      Optional toppings: crushed tortilla chips, shredded cheese, sour cream


If I had the option to buy fresh cubed butternut squash like some of you do, this would be the easiest recipe ever. But even though I had to peel and cube the squash and dice the onion, it was cooking in just a few minutes.

It just dawned on me—this recipe would be so easy to cut in half. We have a lot left. Not a bad thing, but sometimes you don't want leftovers. Or, maybe you are a household of one. Everything in this recipe can be divided by 2. Recipes don't always work out that way. (So, you might have a half an onion left—not a big deal.)


We had expected to wake up to a few inches of snow this morning. The governor even declared a state of emergency early yesterday in anticipation of the coming storm. Schools announced closings. Much extra news coverage last night. But the "big event" just didn't happen. I'm glad I'm not the weatherman this morning.

Wednesday, February 25, 2015

Weather Watching


They say "red sky in morning, sailor take warning." This morning's weather warning is for snow tonight. Where we live, we are always on the very edge of "it might." We sit on the line—literally, a line on the weather map—that divides the snow from the cold rain for tomorrow.


Yesterday we had just a dusting of snow. But this was enough for schools on one side of us to be delayed and schools on the other side of us to close for the day. I just enjoyed watching it fall for an hour or so.


But while I am inside where it's warm, Daddy-O must always be out in the elements. The cows must eat. Feeding them is even more important when the weather is bad. He loads hay on the front and the back of the orange tractor and heads toward the pasture where the cows are for the winter. Every day he goes down that road.


And the cows are always glad to see that tractor arriving. Tomorrow morning they might be even MORE excited to see him. If the weatherman is right, it is supposed to be our biggest weather event of the winter. About 3-7 inches of snow. Yes, 3-7 inches is considered major. We have watched the enormous snow amounts in the northeast with fascination and with gratitude. Gratitude that we call a few inches of snow a major event. Gratitude that we don't live where snow is measured in feet.


Today we will enjoy the sun while we run a few errands to get ready for the snow. Tomorrow if we do wake up to a snow-covered pasture, we will be ready. And by Friday, it should be mostly melted. I love where we live.


Tuesday, February 24, 2015

Home Sweet Home


It was so good to have Jessica home with us for a few days over the weekend. It's always good to have time together. We had a chance to do some shopping in town on a beautiful cold Saturday, but some of the best times were just hanging out at home, watching old movies, and eating popcorn. We're glad she still likes to be home at the farm, where life moves a little slower than in the city. We don't have our children home nearly enough!


We went out to breakfast in our small town Saturday morning. Well, not exactly "in" town, but nearby. The big city doesn't have restaurants like ours. What our eateries lack in decor, they more than make up for in good food.


And after dinner at home on Saturday night, she made us brownies. I'll admit I usually use a box of mix when I need brownies, but she can whip up a batch from scratch almost as quickly. She has used this recipe for a long time. I like mine with a scoop of ice cream. Just like her mom, she has tweaked the recipe to suit her taste. Here is the recipe the way she does it...

NIGELLA LAWSON BROWNIES  (JESSICA'S VERSION)

1 cup unsalted butter, softened
13 oz. best milk chocolate chips (I use Ghirardelli chips, buy 2 bags and dump the leftover chips in at the end, to add a chocolate bite inside)
6 large eggs
1 tablespoon vanilla extract
1-2/3 cups sugar
1 ½ cups all-purpose flour
1 teaspoon salt
1-1/3 cups chopped walnuts (I use pecans, but leave them out if I’m taking them somewhere and not sure of everyone’s allergies!)

9x13 inch baking dish

Preheat the oven to 350 degrees. Line your brownie pan—I think it’s worth lining the sides as well as the base—with foil or parchment paper. Spray with PAM.

Melt butter and chocolate together in a large heavy-based pan (don’t let it scorch!). In a bowl or large wide-mouthed measuring cup, beat the eggs with the vanilla and sugar. Measure the flour into another bowl and add the salt.

When the chocolate mixture has melted, let it cool a bit before beating in the eggs and sugar, and then the nuts and flour. Beat to combine smoothly and then scrape out of the saucepan into the lined pan.

Bake for about 25 minutes. When it’s ready, the top should be dried to a paler brown speckle, but the middle still dark and dense and gooey. And even with such a big batch you do need to keep alert, keep checking: the difference between gungy brownies and dry brownies is only a few minutes; remember that they will continue to cook as they cool.


We have a few brownies left from the weekend. Still good! Good enough for a snowy afternoon snack. We had a little snow this morning. The cows will be more than ready to see Daddy-O coming this morning. He's heading out to the tractor now.


Monday, February 23, 2015

Staying Indoors

 One Bowl Apple Cake

When the high temps were in the 20s last weekend, I opted to stay indoors. (Thankfully, this week will be warmer.) There certainly was plenty to do in the house when I was hiding from Jack Frost. Cleaning. Organizing. Decluttering. All things that are easy to skip when I'm on the go.


And it was a great time for a little extra knitting. I'm working on a circular blanket with a lace pattern. There are so many new-to-me skills in this pattern. But I'm beyond the hard part now, so it's just fun. Easy enough to catch up on some PBS shows while I worked. (My new show to watch is Grantchester. For once, I got started with the very first episode.)


I had to ask Daddy-O for a little help with my knitting project. This yarn comes in a HUGE skein. Too big for my yarn winder. So I went old school and, with his help, wound it by hand. There is something soothing about this process. After being outside feeding the cows, he was happy to sit by the fire and help me.


And Jessica came home for the weekend! I had made soup. But a visit from family needs a special treat. In all my cleaning, I sorted through the gazillion recipes I had printed out during the last year. I found this one that I think someone shared on Facebook. It was the "one bowl" part that caught my eye. Well, it took me two bowls! One for the wet ingredients and one to mix the dry. But it was still quick and easy. This would be great with a cup of coffee.


I made some minor adjustments to the recipe that I think helped it. It's a different kind of cake---almost more apples than batter. When I put it in the pans, I really thought there was no way it would work, but the batter baked up and over the apples.

I made the cake in two round pans this time. I put one cake back into the pan and it went into the freezer so that Daddy-O can have a treat when I'm gone to visit the grandchildren in a few weeks.

ONE BOWL APPLE CAKE

2 eggs
1-3/4 cups sugar
2 teaspoons cinnamon
1/2 cup cooking oil
6 medium Gala or Fuji apples
2 cups all-purpose flour
2 teaspoons baking powder

Preheat oven to 350 degrees. Grease two 9-inch round cake pans. (Or, you can use a 9x13-inch baking pan.) Set aside.

In a large bowl, mix the eggs, sugar cinnamon, and oil. Peel and slice apples directly into this mixture, stirring to coat as you go to keep apples from turning brown.  Mix together flour and baking powder. Add to the apple mixture. Mix well until all of the flour is absorbed by the wet ingredients.

Spoon mixture into prepared pans and level with spatula. Bake for approximately 45 minutes, or until golden brown. (Add 5-10 minutes more for the 9x13 pan.)


Friday, February 20, 2015

Celebration Worthy

Easy "Béarnaise" Sauce

Remember Valentine's Day? Was that only a week ago? Back last week when it was warm? This morning is it 10 degrees here! Glad Daddy-O was cooking on the grill last week and not tonight.

We decided to make our own special meal for Valentine's Day last week. (No long wait. We know the food is good. The service is excellent. ) I went to the store with list in hand. But right at the front of the store was the lady doing the recipe demonstration. I tasted her sample and instantly changed my plan.

Daddy-O raises beef cattle after all. I should plan a steak dinner every now and then. This one was a wonderful combination of flavors that boosted it beyond just grilled steak (which he would be perfectly happy with.) The tasting sample included steak, portabella mushrooms, asparagus and a quick "bearnaise" sauce.

So that is exactly what we cooked for our Valentine meal. I say "we" because Daddy-O grilled the steaks outside, while I cooked the asparagus and sliced portabella mushrooms on the grill pan inside. That just made it easier for us. You could do the entire meal on the outdoor grill or on the stove top grill pan.

The recipe card gave instructions for the entire meal, but it is just a grilled steak and grilled vegetables. I brushed the vegetables with olive oil and sprinkled them with a little kosher salt and freshly ground pepper. About 10 minutes on a hot grill pan was all they needed to cook. Daddy-O grilled NY strip steaks, seasoned only with salt and pepper.

What made this a " special occasion" meal was the sauce. This is not the classic bearnaise sauce—the one that calls for a double boiler and needs close watching. This sauce is just stirred together! But it is so delicious. It was good on the steak and good on the asparagus and good on the mushrooms. Really. You need to try it.


EASY "BÉARNAISE" SAUCE

1  tablespoon fresh tarragon, finely chopped
1 carton lemon Greek yogurt (5 or 6 oz.)
2 tablespoons lemon herb finishing butter

Remove the tarragon leaves from the stems and chop. Whisk together yogurt, herb butter and tarragon. 
Spoon over vegetables or meat. (We liked ours on the side.)


I had never heard of "finishing butter." When they do these recipe demonstrations, all of the ingredients are in a refrigerated case next to the cook station, so I didn't have to search for it. But the food demonstrator told me it is found in the seafood section.


In case you can't find finishing butter, here is a link for recipes to make your own.


Thursday, February 19, 2015

Making The Most Of Leftovers

Potato Pancakes

 When we were growing up, my mother made this special treat for us occasionally. Now that I'm the one in the kitchen I know that she was really using up the leftovers! But to this day, I love the potato pancakes made when you have mashed potatoes left from the day before. 

You saw my supper on Monday night—pork tenderloin, mashed potatoes and asparagus. Tuesday night's supper was a leftover supper. (Forgive my lack of green on the plate. There was no asparagus left.) I froze one of the tenderloins for later. I made barbecue biscuits from the rest of the pork. And I made potato pancakes.


It had been quite a while since I made these, so my fingers were crossed. I smiled when I turned the pancake over in the pan and saw the lacy golden brown pattern. I knew I had done it right! Funny what things stick in your brain forever. I remember this was exactly how my mother's potato pancakes looked. 


Never in my life have I measured these ingredients. But this time I did pay attention to how I did it. The recipe amounts are pretty accurate for this night's cooking. But I wouldn't worry too much about following exactly what I did. It's not kind of recipe where "exact" matters much.

POTATO PANCAKES

2 cups leftover mashed potatoes
1 egg
3 tablespoons all-purpose flour
3 tablespoons minced onion
cooking oil

Combine all ingredients until well blended. Heat a small amount of oil in a skillet. Spoon potato mixture into pan. Spread out into patties. Cook these pancakes on medium heat. Brown on one side and carefully turn. Flatten with spatula and cook until brown on both side and pancakes hold together. Serve hot.

This made 8 pancakes.


My blog posts are a little out of order because we got distracted by the winter weather here. This morning we were looking for 8 degrees. But I woke up and it had only gotten down to 15. When you're expecting 8 degrees, 15 sounded warm. Now we are looking for the 8 degrees tonight.


Wednesday, February 18, 2015

Gated Community


 Daddy-O is known for his quick wit. 
He posted this photo on Instagram yesterday for the girls to see
and labeled it "gated community."


I'd never thought of it that way. 
But it is a gated community of sorts.
Pasture gates are everywhere.


Cows have to be fed every day in winter, even in the worst of weather.
No staying in where it's warm and dry for a farmer.
This ice storm at least had the bonus of some beautiful views.

All photos courtesy of Daddy-O.


Tuesday, February 17, 2015

Recipe Revisited

Slow Cooker Pork Tenderloin

A couple of weeks ago I got an email from someone who wanted to book our ukulele band. We exchanged several emails as we worked out dates and times. In one of these emails, she told me she was a regular reader of this blog and said, "In fact, I'm cooking one of your recipes right now. The Slow Cooker Pork Tenderloin is one of our favorites. We make it at least once a month." I think that might be my first ever fan mail.
  
Well, I make a lot of different recipes. So many that I don't always get back around to all of them. Even the ones we liked a lot. So I went to the recipe index (look at the tabs at the top of the post) and found the tenderloin recipe. Oh yeah...that WAS a good one! I had just forgotten about it. 

And then when I grocery shopped on Saturday, pork tenderloins were on sale. That did it. I knew I was making this recipe again. It was the perfect supper last night. The meat was moist and tender. The flavors were delicious, yet subtle. And it couldn't be easier.


SLOW COOKER PORK TENDERLOIN

2 pounds of pork tenderloins (the package I find at my store is about this size & holds 2 tenderloins)
1/4 cup soy sauce (I used low-sodium)
1 tablespoon yellow mustard
2-3 tablespoon maple syrup (I used 3)
2 tablespoons olive oil
2 tablespoon diced onion
1-1/2 teaspoons garlic salt

Put tenderloins in the crockpot. Mix remaining ingredients and pour over tenderloins. Cover and cook on LOW for 6-7 hours.


Thank you, Becky, for reminding me about this one. I first posted this recipe almost two years ago. I won't wait so long to make it again!


We have watched the Boston snow this winter on TV with great fascination. That is unimaginable for us. Our winter storms are different. This is the view out our back door this morning. Sleet and freezing rain fell all over the upstate overnight. Afternoon high should be in the 40s. Might be why so many people choose to move down here.


Monday, February 16, 2015

Say Cheese

Quick Gruyere Puffs

Okay. So when the doctor's office has magazines full of recipes like this on laying around, are they drumming up more business? I went for lab work a few days ago and saw this recipe. I just couldn't resist. At least the blood work was done before I made these!


I wanted something a little special for our Valentine celebration. We don't go out that night. A dinner at home suits us and it's a little less crazy. We started with these cheese puffs.

I have made hundreds and hundreds of plain puffs that I stuff with chicken salad for baby and wedding showers. So this technique was not so unusual for me. This recipe was pretty easy. Just one saucepan and a baking sheet. So the clean up was quick. It doesn't make nearly as many puffs as my other recipe, so there was only the single pan to bake. It was the perfect amount--just one pan full of delicious cheese puffs.

If you have never made puff shells, just trust the recipe. Do what it says. The dough looks a little like Play-Doh when it's ready to spoon onto the baking pan. It should look like that. It's easy enough to make for guests. (Read my reheating notes at the bottom.)


MINI GRUYERE PUFFS

1/2 cup water
1/4 cup butter
1/2 teaspoon dried basil, crushed
1/4 teaspoon garlic salt
Dash of cayenne pepper
1/2 cup all-purpose flour (I used King Arthur unbleached all-purpose)
2 eggs
1/2 cup shredded Gruyere or Swiss cheese (2 ounces)
2 tablespoons grated Parmesan cheese
extra grated Gruyere cheese (optional)

  • Preheat over to 450 degrees. Line a baking sheet with parchment paper (or grease it.) Set aside. 
  • In a small saucepan, combine water, butter, basil, garlic salt, and cayenne pepper. Bring to boiling over medium heat, stirring to melt butter.
  • Add flour, all at once. stirring vigorously. Cook and stir until dough forms a ball that doesn't separate. Remove from heat. Cool for 5 minutes.
  • Add eggs, one at a time, to dough in saucepan, beating with a spoon after each addition until smooth.
  • Stir in shredded Gruyere cheese. Drop dough by rounded teaspoons, about 2-inches apart, on prepared baking sheet. Sprinkle with Parmesan.
  • Bake for 10 minutes. Reduce heat to 375 degrees and bake for 10-12 minutes more, until puffed and golden brown. 
  • Turn off oven. Let puffs stand in oven for 3 minutes. If desired, sprinkle with extra Gruyere cheese. (This extra cheese did not melt for me, even though I sprinkle the minute they came out of the oven.) Serve hot. 

Makes 20 puffs


These were just perfect! Now, if you have never had cheese puffs, understand that the center is supposed to be empty. It's a very light appetizer.  This recipe is almost as good as the cheese puffs I enjoyed at Bistro Niko in Atlanta. And we got to enjoy these by our very own fire. A nice start to our Valentine dinner.

The restaurant puffs were smaller. About half the size of these. This recipe said it made 20 and that is what I got, so they are the size intended.  I'm not sure I would call these "mini." But whatever the size, they are delicious.

The morning after our Valentine celebration, I heated some of the leftover puffs for breakfast. I popped them into the toaster oven, tray removed, and pushed the "toast" button. Just a couple of minutes in the little oven and they were as delicious as the freshly baked ones. Knowing that they can be reheated nicely would make them more usable for serving to guests.

Reheating in the microwave would have left them soft, but with the toaster oven I got a hot, crispy puff. I think you probably could put the entire batch of puffs on a baking sheet and back into a hot oven for just a very few minutes if you wanted to make them ahead for a party.

I plan to freeze the last two, just to see if freezing and reheating will give me a good puff. I'll let you know how it goes. Fingers crossed that works because these would be fabulous to have on hand in your freezer.

Saturday, February 14, 2015

Happy Valentine's Day!

Hearts are aflutter here on the farm.  We normally don't do big things to celebrate. We exchange cards and sometimes there might be chocolate. That's usually it. But this year Daddy-O surprised me with very special chocolate.


A couple of years ago when I was out visiting Mommy and the girls, we took a trip to Kansas City for spring break. We visited the zoo. It snowed. And then we bought candy. 

I had never heard of artisanal chocolates. But Mommy had done her homework and had learned about this amazing chocolate company located in Kansas City. We visited. We oogled. We oohed and ahhed. We sampled. We bought a few to take home. And I bought a small box for Jessica's birthday which fell right after our trip.


I'm so glad she didn't forget, because when Daddy-O called her for a Valentine suggestion, she knew exactly what I would like. Every individual piece is a work of art. They taste every bit as good as they look. We will look at them for most of the day and then we each will enjoy a single piece tonight. Or, at least that's the plan. It's hard to make them last! Next year, we might be back to just a card and that will be okay. This year, however, I'm going to savor every bite of this wonderful chocolate.

After getting this box of sweets this morning, I scooted to the store for ingredients for a special dinner tonight. That will be my special treat for Daddy-O. I'll share the recipe (if it turns out like I hope) next week.


  Happy Valentine's Day to each of you!


Thursday, February 5, 2015

Winter Supper

Slow Cooker Beef Stew

This photo is my tomorrow night's supper. I borrowed the photo from daughter Jessica's blog since I haven't made mine yet. She and I both have been using this recipe for years. You can see that she added mushrooms to her mix, but I'm giving you the recipe the way I do it.

This weekend is Knit Inn 2015 in a nearby city. I'm going tomorrow afternoon for a class, then I'll head back on Saturday morning for two classes. It is a terrific weekend for seeing old friends, meeting new knitters, learning, looking, and just maybe I'll have a new finished knit or two when it's done.

Since Friday's class is over at 5:00 PM, I knew I needed a slow cooker meal, ready to eat when I get home. Friday traffic in Greenville is not like Atlanta, but it's bad enough, so I'm not sure how long it will take to get back to the farm. It is also supposed to be cold and windy tomorrow. Beef stew will be the perfect supper.

This recipe takes a little more effort than my often-used slow cooker beef stew recipe. (Sprinkle onion soup over stew beef in the slow cook and then spread a can of cream of mushroom soup over the top. Cover and cook.) But this is oh so much better. It has much more flavor. The aroma is divine. I'm happy that my class isn't until afternoon, so I'll have time in the morning to do the prep.

SLOW COOKER BEEF STEW

2 tablespoons all-purpose flour
1-1/2 to 2 lb. beef stew meat
2 tablespoons cooking oil (or more as needed)
2 medium potatoes, peeled & cut into chunks
2 or 3 carrots, peeled & cut into chunks
1 onion, peeled & cut into chunks
2 teaspoons instant beef bouillon granules
2 teaspoons Worcestershire sauce
1 teaspoon dried oregano
1/2 teaspoon dried marjoram or basil, crushed
1/4 teaspoon black pepper
1 bay leaf
2-1/2 cups V-8 juice

Place flour in a plastic bag. Add meat cubes and shake until meat is coated with flour. In a Dutch oven brown half of meat in 1 tablespoon of oil, turning to brown on all sides. Brown remaining meat in remaining oil. Drain off any excess oil.

In a 3-1/2 to 4 quart Crockpot, layer potatoes, carrots and onion. Add meat. Add all seasoning. Pour vegetable juice over all.

Cover and cook on LOW for 10-12 hours (or on HIGH for 5-6 hours) until meat and vegetables are tender.  Discard bay leaf.

You can serve it in bowls or over rice. We've done it both ways.


Tuesday, February 3, 2015

Memories In The Mail


I just put a box of dresses in the mail to Mommy and the girls today. In my after-Christmas deep cleaning, I found these dresses I had made years ago for our own little girls. The blue one was for Jessica. It even has a matching slip.


This pink dress and fancy work bib was made for Mommy.  As I pressed and then packed them to mail, I wondered how on earth I managed to sew this much when I had little people the right age to fit into them! They both look to be about a size 4. Little Sister's size now. (Are they too fancy for today's fashion? Maybe.)

The thought did cross my mind that I might have to fly out to press these dresses and tie the bows on the bib. Jessica and I had a funny conversation a year or two ago about what our obituaries might say. She declared that mine would include the line, "She tied a fine bow." Since dresses no longer have sashes, that skill is nearly gone. But, yes, I can still tie a fine bow!


Another thing that is about to go by the wayside is using a cookbook to find a recipe. Like so many of you, I am more likely to do a Google search when looking for a recipe now. But this time I pulled out a cookbook. A real book. With pages. Still trying to use up random items in the pantry. (I really should make a note of the recipe I had in mind when I buy these non-standard items.) 

I had a box of German chocolate cake mix that needed to be used pronto. And I almost always have pumpkin on hand. And there were chocolate chips left from holiday baking. I found just the recipe for these ingredients. Reminds me of the chocolate pumpkin muffins I've made before, but dressed up a little.

PUMPKIN GERMAN CHOCOLATE CHIP MUFFINS

1 box of German chocolate cake mix
1 (15-oz.) can pumpkin
2 eggs
1 teaspoon vanilla extract
1 teaspoon ground cinnamon (I didn't use it this time)
1 cup chocolate chips

Preheat oven to 350 degrees. 

Place cake mix, pumpkin, eggs, vanilla and cinnamon in a large bowl. Blend with electric mixer on low for 1 minute. Beat 2 minutes on medium, making sure to combine it well. Stir in chocolate chips. 

Spoon batter into greased (or use paper liners) muffin tins, filling each cup about 2/3 full. 

Bake 20-25 minutes, until they spring back when lightly pressed with your fingertip. Cool in pans for 5 minutes, then remove to rack to finish cooling.

Makes 24 muffins


Monday, February 2, 2015

Soup's On


Daddy-O worked outside all last week. New fences are being built around the pasture next to our house. Cows must be fed every day. And it was a cold and windy week. As I've stated before he is not a soup lover—unless it's really cold out. It was definitely a week for soup.

My young friend Holly gave me this recipe months ago. She is a librarian at our local library where we get together to knit weekly. Well, I lost it and had to ask her for the recipe again. I'm glad I asked. This is really good. And it's easy. Lately, seems like I'm only looking for the easy recipes. I keep cooked chicken in the freezer, so that made this a quick lunch.

The most time consuming part was slicing the spinach. Stack the leaves, then with a sharp knife, slice the stack crosswise into thin "ribbons." I did about half of an 8-oz. bag and decided that was enough.

The next time I make this, I will add an onion, a carrot and a stalk of celery to the broth when I start the recipe and let it simmer as I slice the spinach. Remove the onion, carrot and celery before you continue with the recipe. That would give a little more depth to the flavor to my boxed broth. I'm sure homemade stock would be even better, but I'm more likely to make this soup if I can use the boxed broth. I know fresh Parmesan would be better, but I didn't have any this time.


So what did Daddy-O think of this soup? When he saw it, he said he felt like he was in a fancy restaurant. He had three bowls the first day for lunch. And the next day when I was gone, he heated up soup again. He kept telling me how good it was. Thank you, Holly, for sharing this recipe.

 ITALIAN STYLE CHICKEN NOODLE SOUP

8 cups homemade chicken stock (I used 2 boxes of broth)
8-oz. cheese tortellini (dried or refrigerated)
1 cup of cooked chicken (I'm sure I used more)
8-oz. bag flat leaf spinach, thinly sliced (I used about half the bag)
salt & freshly ground black pepper
3 tablespoons coarsely chopped flat leaf parsley (I didn't have any)
freshly grated Parmesan cheese (I only had the green canister in the fridge)

Place stock or broth in a large saucepan and bring to a boil. Add the tortellini and cook as directed on package. Use the lesser time given. Add the chicken and spinach and cook for 1 minute. Season with salt and pepper to taste.

Ladle into bowls and garnish with parsley and Parmesan cheese.