Monday, December 18, 2023

Merry Christmas To You All!


Busy days around here. We made an early Christmas visit to see the smallest ones 
and to attend their school  Christmas program.


Little Brother calls these his "ho ho toes" pajamas. 
Excellent description. See what you learn when you help fold laundry?


I delivered a couple of new caps for the littles.


We took apart a nativity nesting doll set
 and then looked at the tiniest Jesus that was in the center.
It was a good chance to talk about the Christmas story.
~~~~~~~~~~~
Tbe older set will be here this week for Christmas. So many things to be squeezed into our time together. Music to prepare for church. Baking to get done. I've made my list and checked it twice. Fingers crossed I didn't forget anything. And it I did, it will be okay. I keep reminding myself...Christmas isn't about the list.

I'll see you back here after the holidays and after everyone gets back to their own homes. I'm looking forward to some new recipes. Some new adventures. Some new stories to share.


Merry Christmas!


 I 


Tuesday, November 28, 2023

Thanksgiving Week And Our Cornbread Dressing

My hat loving youngest grandchild. 

Our house was full to the brim last week. Five grandchildren, ranging from 22 months to 23 years old. Daughters. Son-in-laws. It was loud, messy, chaotic and wonderful. The youngest set was here for over a week. The others were in and out for several days. And to top it off, the day after Thanksgiving, we had 15 men on our roof replacing the shingles. It sounded like Santa and his eight tiny reindeers plus his reindeer B-team.


For almost all of my long life, Thanksgiving was a big extended family affair. I remember years when there were 40+ people heaping plates from a long line of casseroles. But because we always went to that house for Thanksgiving, my turkey cooking skills were in the "yet to be explored" category. Since the large family gathering came to an end a few years ago I've still not cooked the turkey. We had a Covid year when I cooked a turkey breast. One year a son-in-law took charge, brining and roasting an heirloom turkey. And the other son-in-law fried a turkey for us a couple of years.

But this year, it came down to me. After looking at so many ways to roast the perfect turkey—wet brine, dry brine, oven bag, slow roast, cook at a higher temp than usual, etc.—I decided to go with tried and true. I followed the Butterball instructions to the letter. And it worked perfectly. Their method is straight forward. Pretty uncomplicated compared to some of the other directions. If it's my turn again next year, I'll know this way works.

The dressing is between the turkey and the fork.

Our menu was like so many others for the actual Thanksgiving meal. Turkey, cranberry sauce, green beans, macaroni and cheese, sweet potatoes, deviled eggs and my favorite part, dressing and gravy.

There is a huge debate—where the right answer is always "the kind my mama made"—about dressing vs stuffing. Stuffing goes inside the turkey. Dressing is baked in a dish and served beside the turkey. And the debate continues...sausage or no sausage, oysters or no oysters, apples or no fruit. Here in the South, dressing is most often made with cornbread. Every cook has their own version. Both my son-in-laws have recipes from their families. Both are good. But this year I made dressing like my mother made it.

Like many good cooks, Mother didn't have a written recipe. But several years before she died, she decided to write down recipes for some of her favorite dishes. I am so glad. She didn't write them down as she made them, measuring as she wrote. Instead I remember her sitting at the kitchen table, writing down how she remembered doing it. So the directions are not specific like modern recipes. 

In the interest of preserving her "recipe" I'm sharing it here. This dressing is uncomplicated but it was delicious. I hadn't made it in years and was happy it was as good as I remembered.

This is in my mother's handwriting. 

CORNBREAD DRESSING

1 9x9-inch pan of cornbread (I used the recipe on the White Lily self-rising cornmeal mix bag)
1 egg
*1/3 cup celery, chopped fine
*1 medium onion, chopped fine
*a little Pepperidge Farm seasoned herb stuffing mix
enough chicken or turkey broth to moisten (and make it "mushy")
I added a few shakes of ground sage

Crumble the cornbread with your fingers so that there are no large pieces. The texture is a fine crumb. Mix all ingredients together, adding enough broth to make the mixture "mushy." Put into a greased 9x9 pan and bake for 25 to 30 minutes, until lightly browned on top.  

Notes:
*Double everything for a 9x13 pan. And the cooking time was nearly double, too. My double batch filled a 9x13 dish, plus a 1-qt dish which went into the freezer.

*Mother always stressed the importance of chopping the celery and onion fine. She said no one wants to bite into a big piece of celery. 

*I had a thought during the night! I did a reverse weigh of the stuffing I had left to figure out how much I used! It was right at 1 cup for a 9x9 pan of cornbread.

*It can be mixed the day before and refrigerated until it's time to bake. Adjust your time if baking straight from the refrigerator. 


And that's all she told me! Sometimes she added a little mashed cooked sweet potato to keep the dressing moist. (Instead of the can of chicken soup folks use now.) Last week I used the herb stuffing mix. How much you ask? About that much! I know you hate answers like that, but I can't tell you any more. 

And how much broth? For my double batch it was a little over a quart. I was using boxes of Swansons and I had to open the 2nd box. It always takes more than I think. 
A better question would be "how do I know when I've added enough?" My mother only said "mushy." I would add "but not soupy." Mine sloshed around a little in the dish when I put it in the refrigerator.

If you are brave enough to make this recipe that doesn't have precise amounts, remember that my mother never measured anything. So it's unlikely the amounts she used would have been exactly the same each time. And it always worked. I don't think precise is a requirement here.

As I sit here writing this a few days after our Thanksgiving feast, I am truly giving thanks for so many things. Let us all live in a season of thanksgiving all year long.


Friday, November 17, 2023

Happy Thanksgiving!


This is as far as I've gotten with my Thanksgiving prep. We will have a full house next week—a toddler, a preschooler, a 4th grader, a teenager, the recent college graduate and the parents of these children. I should have menus planned for the entire week by now. But I don't. There's still tomorrow.

But I decided today that on Wednesday night we should have a snacky kind of supper. The little kids eat really early. The rest of us eat later. And I'm not even sure who will be on hand that night. Appetizer foods should give us a lot of flexibility. And hopefully keep the kitchen relatively free for Thursday's cooking. 

Here are some of our favorite finger foods. The links will take you to the blog post that includes the recipe. Sometimes the recipe is way down in the post, but it's there. I wish I had a "print" button for the recipes, but this blog is a low-tech as they come.


Chicken Dip. — a substantial food that easy to put together. It's done in a slow cooker. Serve with crackers.

Ham Delights — this edges into "real food." Also good made with turkey. Can be made ahead and refrigerated or frozen.

Lavash Crackers — a new recipe! Easy to make crackers. This time I'll season with cinnamon sugar and serve with Boars Head Pumpkin Pie Hummus.

Easy Smoked Salmon Herb Appetizers — easy enough for a 3-year-old to make. (But she ate them as fast as she made them!)

Pumpkin-Shaped Baked Brie En Croûte — seriously, this is made for a Thanksgiving table. Ridiculously easy and ridiculously delicious. Serve with crackers and apple slices.


We can decide which ones we want to make in a day or two. I anticipate a trip to the grocery store every day anyway. We can add a veggie tray and maybe some chicken nuggets for the kids. The little ones and the big ones.

There is much to be thankful for this year although sometimes it seems the world is falling apart. After a peek at the morning news, I turn it off for the rest of the day and let my thoughts be aware of the wonder and the joy to be found in our surroundings. Find your joy.

Happy Thanksgiving!


Thursday, November 2, 2023

Doing Mimi Things

Sock Pumpkins

I got home last weekend after staying with the middle grandchildren while the parents traveled. At ages 9 and 13, they are easy to care for. The hardest part is all of the chauffeuring that age requires. I had forgotten at that stage of mothering how much of the day is spent in the car.

But on the weekend we stayed put. Before I left home I saw a craft I wanted to try with the girls, The first morning while they were at school I made a trip to buy supplies—one pack of kids socks, some cinnamon sticks, heavy duty thread and long tapestry needles. I brought a small bag of fiberfill from home.


All of the adorable pumpkins in the bowl were made from the same size socks. The amount of stuffing and the length of cuff you cut off makes the difference. The girls kept making them bigger and bigger.


It's all done with a tiny bit of hand sewing. The girls had learned some basic sewing stitches this summer during Mimi Camp, so they were ready. The hardest part of sewing during Mimi Camp was making the knot in the end of the thread. This is one time a big lumpy knot is what you need to keep the thread from pulling through. We used our thread doubled, too. 


If you google "sock pumpkins" you'll find many links to directions. As you'd expect, they are all slightly different. But you only need the basics. I saw a quick how-to reel on Instagram and that was all I needed. I'd share the link but I can't find the one I watched. Trust me, it's really easy. 


Remember the lavash crackers I told you about in the last blog post? Baby Girl asked if we could make some with cinnamon sugar. Man, was she on to something. These little crackers are super crispy and slightly sweet. Then I discovered this pumpkin pie spice hummus at their grocery store. As a life long pumpkin pie lover, let me say this was awesome! A perfect dip for these little crackers. 

Miss that recipe? Here is is again. Yes, this one is good enough to share two times in a row.

LAVASH CRACKERS

 1 package Joseph's Lavash Bread
 Pam olive oil spray
 Seasoning of your choice, such as cinnamon sugar, Everything but the Bagel or Ranch 

Preheat oven to 375º.
Put one sheet of lavash onto a sheet of parchment paper. Use pizza cutter to cut into cracker size pieces. Spray with olive oil spray. Sprinkle with seasoning. Carefully slide parchment paper onto a baking sheet. Bake for 5 to 6 minutes until lightly browned.  
Watch closely because they can burn easily! I rotate the sheet while baking.


Anthology Throw, by Curious Handmade

And I finally finished this circular blanket! I took the giant basket holding this work-in-progress with me to babysit. I was happy to get some extra knitting time while the girls were in school.

I started it last November so it was nearly a year from beginning to end. I will confess that it spent a good while in time out as my interest lagged. For you knitters out there, this is made of fingering weight yarn, nearly 500g. It's 5 ft. in diameter. So very glad to be finished. So very happy with the finished blanket. 


Monday, October 16, 2023

The Kindness Of Knitters

Finished with love. ❤️
This little heart marks where Bev's knitting ended and the new knitting started. 
We will mark each project like this, to honor the work she did.

I am moving in slow motion this morning after an intense—but totally wonderful—weekend. Two knitting friends drove up from Atlanta to help make and carry out a plan to deal with all the yarn left when our dear friend Bev passed away a couple of years ago. We had all met at a knitting retreat years ago and attended other retreats together. Knitting retreats are meant for learning new skills and making new friends. If you're lucky, these friendships will last a lifetime.  

This was a fraction of the yarn we sorted. If you knit and are like most knitters, you have accumulated a yarn stash. Likely more yarn than you could possibly knit in your lifetime.

Luxury yarns bought on travels around the globe, souvenir yarns, and yarns bought with specific projects in mind. Those were often bagged along with the pattern and needles. So much yarn. And so many memories. We had fun telling stories and laughing about the experiences we shared. 

In addition to sorting the yarns, these amazing friends also worked to complete unfinished projects, like this colorful blanket. There are multiple names for this blanket pattern, but I like the one that calls it "The Kindness of Knitters Blanket." This one truly is. We are still working on some other projects that could be taken home and finished after our weekend was over. But they will all be done soon and returned to her family.

Porch knitting before dawn.

The first night we watched a movie while the blanket knitting was happening. The last morning the knitted started before the sun came up as we raced to complete what we wanted to do. And in between the first night and the last morning, it was non-stop yarn sorting.


These knitting friends were also wonderful houseguests. They knew we had a lot of work to do. And to make the weekend easier for me, they brought food. Homemade muffins and fruit for breakfast, butternut squash soup and chicken salad for lunches. 


I made these crackers in case we needed an afternoon snack. (We did.) I have loved these! If you count WW points, an entire sheet of lavash made into crackers is 2 points. I never eat that many at one time.

LAVASH CRACKERS

 1 package Joseph's Lavash Bread
 Pam olive oil spray
 Seasoning of your choice, such as Everything but the Bagel or Ranch

Preheat oven to 375º.
Put one sheet of lavash onto a sheet of parchment paper. Use pizza cutter to cut into cracker size pieces. Spray with olive oil spray. Sprinkle with seasoning. Carefully slide parchment paper onto a baking sheet. Bake for 5 to 6 minutes until lightly browned.  
Watch closely because they can burn easily! I rotate the sheet while baking.

These are so crisp and they stay that way. Such a good snack when you want a crunch in your mouth.


There were nearly as many knitting notions as there was yarn. That was all sorted and packaged in to 40 sets to be used for goodies at a knitting retreat.


And while they were hard at work sorting and counting and packaging, I was busy in the kitchen. We took a break in the late afternoon, sharing good memories of our friend as we shared an appetizer.


These ladies brought breakfast and lunches. My job was to provide dinner. I tried to keep it easy and healthy. All of the food I made is here on the blog and I've linked the recipes. The first night I made Chicken Taco Soup and baked the Artisan Bread that I love. (I originally got the recipe from one of these friends!) 

The next night we invited another local knitting friend to join us for dinner. After the baked brie, I made Tuscan Garlic Chicken, roasted potatoes, watermelon feta salad...and these girls twisted my arm and I baked another loaf of bread!

The entire weekend we felt Bev smiling down on us, chuckling from time to time as we tired to figure out what she was doing...forensic knitting, detective work, mind reading. It took all of our skills. And I am sure that she would approve of how we shared the yarn—some went to friends who knew and loved her, some went to high school knitters who have not experienced the pleasure of using "good" yarn, and some went to knitters with limited budgets for indulging their hobby. Another batch was packaged for use later at an event. My dining room no longer looks like a yarn shop. The table is finally empty! 


**If you are looking for the lavash, this is what the package looks like. I found it in the deli section, near the pita breads and wraps.


Tuesday, October 10, 2023

Busy Fall Days

Pumpkin Baked Brie En Croûte


The older I get, the faster my days are flying by! I have so many things I want to do—and I do a lot of them—and there isn't time to ever get to the end of my list. I was happy that I got back here before I hit the one month mark since my last post. 


In the last month, we have had houseguests and spent some time at the beach with family. One houseguest brought me a car load of yarn. His wife was a dear friend whom I met at my first knitting retreat years ago. We attended several retreats together over the years. Now I have become the "executor" of her yarn estate. Trying to figure out what to do with her substantial stash has not been easy...for many reasons. But I am happy to honor her memory by doing so. Other knitting friends are helping. This coming weekend we are getting together to finish some of her unfinished projects and sort the yarn into some kind of order. And think of ways to best disperse it.

This process has made me take a hard look at my own stash and pile of unfinished projects. Since this "yarn estate" arrived at my house, I have finished two almost-done projects of my own and a third one is nearly done.


This linen and silk wrap lacked FOUR rows (it's 94 inches long) when I set it down a year ago. I don't even remember why I stopped working on it. But it is now ready to wear. 


Last night my book club (one friend properly calls it a "bookless club") met my house. Our rule is to keep things simple. And as fancy as this appetizer looks, it's about the easiest thing I've ever made. If you are on Facebook or Instagram you likely have seen videos of the how to process. There are many. Slight variations but similar. It's easier to watch a video but I'm going to write down how I did it.

PUMPKIN-SHAPED BAKED BRIE EN CROÛTE

1 sheet puff pastry, thawed
3 tablespoon apple butter
1 round brie cheese
1 egg, beaten
1 bell pepper stem

Preheat oven to 400º. Lay out puff pastry and spread the apple butter in the center in a circle the same size as the brie. Place the unwrapped Brie on top of the apple butter and fold the pastry up around the cheese. (You can cut off corners if necessary to make it easier to wrap.)

Lay out 4 pieces of kitchen twine. Cut twine long enough to tie around the pastry-wrapped brie. Lay first two pieces out crosswise. 
Lay it out like this... +  
Then the next two pieces go across so that it ends up like this....  ✳︎

Tie the twine around the pastry-wrapped brie. This is what makes the pumpkin shape. Place the brie on a baking sheet, smooth side up and brush with the beaten egg. (I used parchment under it.)
Bake for 20-25 minutes or until golden brown. Cut the twine and carefully pull the twine out from underneath. Use a toothpick to attach a green pepper stem to your "pumpkin." Serve while hot.


Now go find a video if you want to watch the process! It's all over the internet. Search for "pumpkin shaped baked brie."

Fall is here.


Friday, September 15, 2023

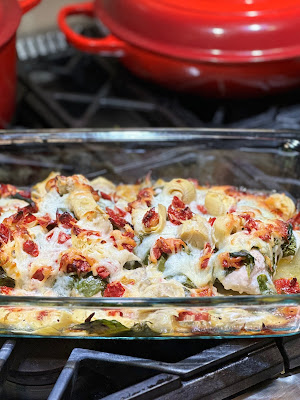
Tuscan Garlic Chicken (It's Gluten-Free)

Tuscan Garlic Chicken 


I've been sitting on this recipe longer than I intended. I had the photos all ready to post. Then life happened. All good things...but busy things. I've made this twice in the last few weeks. Once for family. And a week or so later, I wanted to take a meal to a household that I knew was gluten-free.

Often when I take a meal to people it involves pasta or bread or breadcrumbs or cream soups. But this new recipe was perfect. And perfectly delicious. It's a pleasant change of flavors from my usual dishes.

If you are an Instagram user, you can find the original source of the recipe. She is easyfamilyrecipes on IG. I love her posts and have made several her recipes. 


As always, I tweaked it a little. And the second time I was in a hurry and skipped drizzling with the dried tomato oil. I pushed the cheese to the side a little and added it after the fact. It was fine. I like a recipe that can hold up to my mistakes.


The other thing I liked about this recipe is that it isn't drowning in cheese. I like cheese. I like cheese a lot. So it was hard for me not to add more. But this time I stuck to the 1 cup it calls for. And it made for a much lighter dish.

I wasn't sure what to serve as a side dish with this. Jessica was here the first time I made this. She suggested roasted potatoes. If you buy the "ready to cook" bag of little potatoes, that's really easy to make. And it was a good combination with the flavors of the chicken dish.


This is so easy to make. Putting it together only takes a few minutes. I'm happy to have a completely new dish in my recipe box.

TUSCAN GARLIC CHICKEN

2 lb. boneless skinless chicken breasts (4 breast halves)

1 cloves garlic (mine was large)

Salt & pepper

2 oz. fresh baby spinach (I used a big handful)

14-oz can or jar artichoke hearts, drained and chopped

8.5 oz jar sun dried tomatoes, drained (reserving 1 tbsp oil) and chopped

1 cup shredded mozzarella


Preheat oven to 375.º


Lightly spray a 9x13-inch baking dish with cooking spray. Lay the chicken pieces flat in the dish. Season with salt & pepper and press garlic and spread it evenly over the chicken.


Place spinach, artichoke hearts and sun-dried tomatoes over the top. Drizzle the tablespoon of reserved oil over the top. Sprinkle the cheese over all. 


Bake for 45-50 minutes total. Cook the first 20 minutes uncovered, the lay a sheet of foil loosely over the dish and continue baking for the remaining time, 25-30 minutes, or until chicken reaches 165º internal temp.


MY NOTES:  

  • She called for 2 cloves of fresh garlic. I did that the first time and it was really garlicky. One large clove was enough for us. 
  • I only used half a jar of tomatoes. It looked like enough. If you love them, add them all! 
  • The chicken breasts I bought the second time were huge. I cut off the little side piece (you can see the divide) and made chicken tenders, which I baked with a simple seasoning. The family getting this meal included a young child and I thought simple might suit him better. The report was he gobbled the chicken and potatoes!
  • I think this would be a good dish for our book club but four chicken breasts won't work if we are all there. It might have been in the original recipe on her blog where I read that you could also use chunks of chicken. I might use a little more chicken, enough to cover the bottom of the dish.


Thursday, August 24, 2023

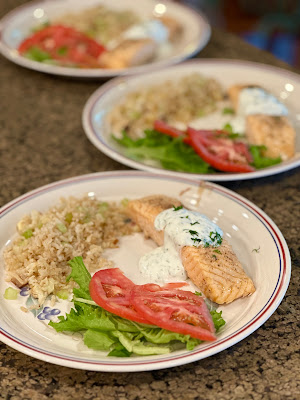
Salmon with Lemon Dill Sauce

Salmon with Lemon Dill Sauce
Still catching up here. This recipe goes back to early summer when Jessica and her littles arrived, minus their dad who was traveling. We were looking for easy meals and this one checked all the boxes. Quick. Easy. Delicious. And it was flavors that Jessica would never do at home. We have to be real and acknowledge food dislikes when cooking for a family. Lucky for her, in our house we LIKE lemon and dill!

I'm including the baking directions for the salmon, but this is really all about the sauce. You can prepare the salmon filets by your favorite method. Bake it. Grill it. Air fry it. Next on my "to try" list is cooking them in the air fryer. We'll see how that goes.


BAKED SALMON with EASY LEMON DILL SAUCE

4 (6-oz) salmon fillets 
2 tablespoons olive oil
salt & pepper to taste

Lemon Dill Sauce:
1/4 cup plain non-fat Greek yogurt
1/4 cup light mayonnaise
1 tablespoon milk--any kind is fine, including non-dairy options
1 tablespoon lemon juice
1 tablespoon water
1-1/2 tablespoons fresh dill, finely chopped
1/2 tablespoon lemon zest
1/4 teaspoon salt
1/4 teaspoon pepper

If salmon is especially cold, let it rest at room temp for 15 to 20 minutes. Blot salmon dry with paper towels.

Preheat oven to 400º. Place salmon in a baking dish or on baking sheet, skin side down. Drizzle olive oil over tops of filets. Season generously with salt and pepper.

Bake 15 to 20 minutes, until salmon is opaque and flaky with pulled apart with a fork.

While salmon is baking, combine all sauce ingredients. Whish until well blended.

Serve baked salmon with your favorite green vegetable. Top each filet with the lemon dill sauce and a sprinkle of fresh finely chopped dill or parsley.


To make our meal even easier, we zapped a pouch of rice in the microwave. I don't remember now which kind we used, but there are so many choices of rice and grains and rice/grain blends on the shelf. I don't use these products often, but every now and then they fill a need.


Sunday, August 13, 2023

Summer Round-Up (Part 3) plus Recipe Round-Up

No Knead Market Style Cheese & Herb Bread

By the time I am at part 3 of what's happened at the farm as summer winds down, the photos are few and far between. We have loved seeing these kiddos that we don't so often during the school year. But just as summer is winding down, so is Mimi. Might be running out of steam.

But I need to share a few recipes before I lose the printed copy or totally forget where I saw it on the internet. The bread you see above is a variation of the no knead bread I've been making for a long time. A good variation. In addition adding the cheese and herb layers, the recipe directions are slightly different. And for once, I did it just as written. The recipe is at the end of the post.  And there are a couple of other super easy recipes mixed in between.


"Pretend" knitting—but the concentration is real.
(Fortunately the tattoo is not.)


Chatting man to man.


The kids (all ages) made juice popsicles all summer.
Then I made some grownup popsicles.

WHITE WINE SANGRIA POPS

1/4 cup thinly sliced strawberries (I used cherry plums)
1/4 cup raspberries
1/4 cup blackberries (cut in half if large)
1 cup moscato wine
1/4 cup orange juice

Divide fruit between popsicle molds. (My set made four.)
Mix wine and orange juice and pour over fruit, leaving room at top
for popsicles to expand. Add handles and freeze.

(1 WW point if your mold set makes 6 pops, 2 WW points if you made 4 pops.)


Time will tell if his love of music lasts.


She graduated to training wheels!


Zero WW point dip.

Mix 1/2 cup of fat-free cottage cheese and 1-1/2 tsp
Everything But the Bagel seasoning. 


A 13th birthday celebration for "Middle Sister."
I cannot in good conscience call her Little Sister any longer.


This is ridiculously good. 

NO KNEAD MARKET STYLE CHEESE & HERB BREAD

3 cups all-purpose flour (I stick to the Kind Arthur brand.)
1 teaspoon salt
1/2 teaspoon instant yeast 
1-1/2 cup warm water (95º to 105º)
1-1/2 cups shredded sharp cheddar cheese
1/4 cup - 1/3 cup fresh chives, thinly cut
1 teaspoon dried thyme, or to taste

In a large bowl, whisk together flour, salt, and yeast. (Use the scoop-and-level measure method.) Pour in warm water and mix thoroughly. Dough will be sticky. Cover bowl with plastic wrap and set in a warm place to rise for 3 to 18 hours. 

When you are ready to bake, preheat oven to 450º. Place a dutch oven in the hot oven to preheat the pot. Let the dutch oven preheat for about 30 minutes while you continue with the dough prep. Use extra flour to flour your work surface and your hands. Use a spatula to slide dough out onto floured surface. Flatten dough, then fold dough over on itself 4 times. Layer the cheese and herbs into each fold.

Form dough into a tight ball and place on the center of a parchment baking sheet. Use the parchment to move the dough back into the mixing bowl. Cover and let rest for 20 minutes.

Take your pot from the oven and carefully remove lid. Use the parchment corners to put dough into hot Dutch oven. Use a very sharp knife and slice the top of dough to release steam. Replace cover on Dutch oven and bake for 30 minutes. 

After 30 minutes, remove top of the Dutch oven and bake for another 15 minutes, or until the bread is golden brown.

Remove from oven and remove bread from pot. Let cool for at least 10 minutes before slicing. 


I still have a few more recipes to share, so check back later. We really didn't cook a lot this summer, but we did try several new recipes that we liked.